在计算机视觉中卷积神经网络取得了巨大的成功,它在工业上以及商业上的应用很多,一个商业上最典型的应用就是识别支票上的手写数字的LeNet5神经网络。从20世纪90年代开始美国大多数银行都用这种技术识别支票上的手写数字。
实际应用中的LeNet5卷积神经网络共有8层,其中每层都包含可训练的神经元,而连接神经元的是每层的权重。

8层LeNet5神经网络。
首先对于INPUT层来说,这是数据的输入层,在原始模型框架中,输入图像大小为[32,32],这样能够将所有的手写信息被神经网络感受到。
第一个卷积层C1是最初开始进行卷积计算的层,形成6个特征图谱。卷积层特征的计算公式:
其中表示从第1层到l+1层要产生的feature数量,即5*5=25个;
b代表 bias的数量,这里的bias是1。
卷积的输入区域大小是5x5,每个特征图谱内参数共享,即每个特征图谱内只使用一个共同卷积核,卷积核有5x5个连接参数加上1个偏置共26个参数。卷积区域每次滑动一个像素,这样卷积层形成的每个特征图谱大小是(32-5)/1+1=28x28。C1层共有6*(55+1)=156个训练参数,对于C1层来说,每个像素都与前一个输入层的像素相连接,因此对于C1层,总共有15628*28=122304个连接。C1层的连接结构如下所示。
C1层连接结构:

S2是一个下采样层。这里是C1中的[2,2]区域内的像素求和再加上一个偏置,然后将这个结果再做一次映射(sigmoid等函数),所以相当于对S1做了降维,此处共有62=12个参数。S2中的每个像素都与C1中的22个像素和1个集团相连接,所以有6514*14=5880个连接。
LeNet5最复杂的就是S2到C3层,其连接如图所示:
前6个feature map与S2层相连的3个feature map相连接,后面6个feature map与S2层相连的4个feature map相连接,后面3个feature map与S2层部分不相连的4个feature map相连接,最后一个与S2层的所有feature map相连。卷积核大小依然是55,所以总共有6(355+1)+6*(455+1)+3*(455+1)+1*(655+1)=1516个参数。而图像大小为10*10,所以共有151600个连接。
C3层也是一个卷积层
S4是一个下采样Pooling层,窗口大小仍然是22,共计16个feaure map,所以32个参数。16(25*4+25)=2000个连接。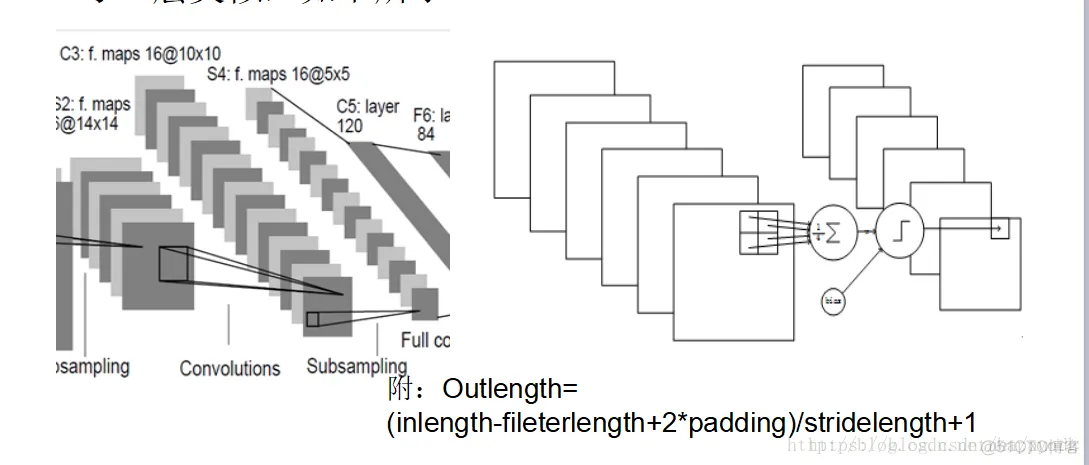
C5是卷积层,共120个feature map,每个feature map 与S4层所有的feature map相连接,卷积核大小是55,而S4层feature map大小也是55,所以C5的feature map就变成了1个点,共计有128*(25*16+1)=48120个参数。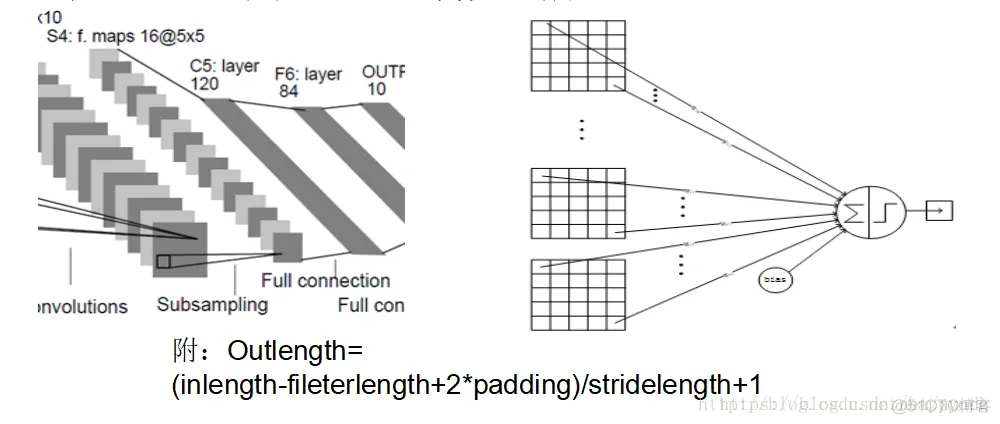
最后一个F6层也是全连接层,有84个节点,所以有84*(120+1)=10164个参数。F6层采用了正切函数,计算公式为: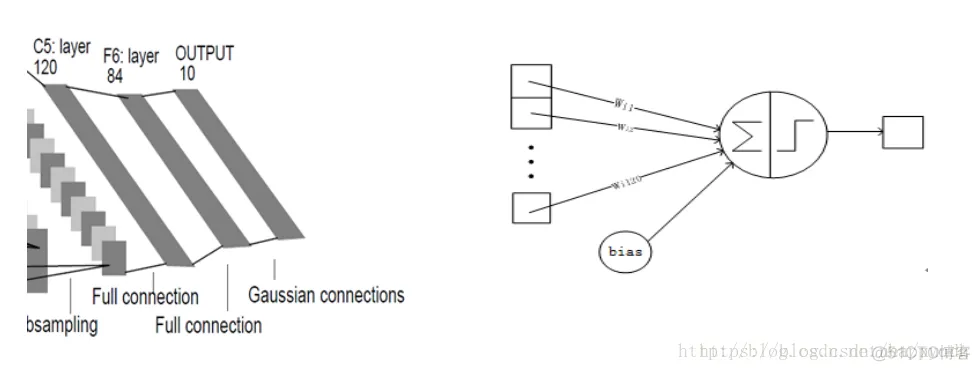
最后是输出层,以上这8层合在一起构成了LeNet5神经网络的全部结构。
本节逐步对LeNet5中的每一层进行分解,会对神经元的个数、隐藏层的层数以及学习率等神经网络关键参数做出调整,观察模型训练的时间。
#!/usr/bin/python# -*- coding: UTF-8 -*-import tensorflow as tffrom tensorflow
.examples.tutorials.mnist import input_dataimport timex = tf.placeholder('float',
[None, 784])y_ = tf.placeholder('float', [None, 10])x_image = tf.reshape(x, [-1, 28, 28, 1])
# 第一个卷积层# 初始化卷积核和偏置值filter1 = tf.Variable(tf.truncated_normal([5, 5, 1, 6]))
# 卷积核是由5*5大小的卷积,输入为1个通道而输出为6个通道bias1 = tf.Variable(tf.truncated_normal([6]))
# 生成的偏置值与卷积结果进行求和的计算conv1 = tf.nn.conv2d(x_image, filter1, strides=[1, 1, 1, 1],
padding='SAME')h_conv1 = tf.nn.sigmoid(conv1 + bias1)
# 求得第一个卷积层输出结果# maxPooling池化层,对于2*2大小的框进行最大特征取值maxPool2 = tf
.nn.max_pool(h_conv1, ksize=[1, 2, 2, 1], strides=[1, 2, 2, 1], padding='SAME')filter2 = tf
.Variable(tf.truncated_normal([5, 5, 6, 16]))bias2 = tf.Variable(tf.truncated_normal([16]))conv2 = tf.nn
.conv2d(maxPool2, filter2, strides=[1, 1, 1, 1],
padding='SAME')h_conv2 = tf.nn.sigmoid(conv2 + bias2)maxPool3 = tf.nn.max_pool(h_conv2,
ksize=[1, 2, 2, 1], strides=[1, 2, 2, 1], padding='SAME')
# 第三层 卷积层,这里需要进行卷积计算后的大小为[10,10,16],
其后的池化层将特征进行再一次压缩filter3 = tf.Variable(tf.truncated_normal([5, 5, 16, 120]))bias3 = tf
.Variable(tf.truncated_normal([120]))conv3 = tf.nn.conv2d(maxPool3, filter3, strides=[1, 1, 1, 1],
padding='SAME')h_conv3 = tf.nn.sigmoid(conv3 + bias3)
# 后面2个全连接层,全连接层的作用在整个卷积神经网络中起到“分类器”的作用
# 即将学到的“分布式特征表示”映射 到样本标记空间的作用# 权值参数W_fc1 = tf
.Variable(tf.truncated_normal([7 * 7 * 120, 80]))# 偏置值b_fc1 = tf
.Variable(tf.truncated_normal([80]))# 将卷积的输出展开h_pool2_flat = tf
.reshape(h_conv3, [-1, 7 * 7 * 120])
# 神经网络计算,并添加sigmoid激活函数h_fc1 = tf.nn.sigmoid(tf.matmul(h_pool2_flat, W_fc1) + b_fc1)
# 输出层,使用softmax进行多分类# 这里对池化后的数据进行重新展开,将二维数据重新展开成一维数组之后计算每一行的元素个数。
最后一个输出层在使用了softmax进行概率的计算W_fc2 = tf.Variable(tf.truncated_normal([80, 10]))b_fc2 = tf
.Variable(tf.truncated_normal([10]))y_conv = tf.nn.softmax(tf.matmul(h_fc1, W_fc2) + b_fc2)
# 最后是交叉熵作为损失函数,使用梯度下降来对模型进行训练cross_entropy = -tf.reduce_sum(y_
* tf.log(y_conv))train_step = tf.train.GradientDescentOptimizer(0.001).minimize(cross_entropy)sess = tf
.InteractiveSession()# 测试正确率corrent_prediction = tf.equal(tf.argmax(y_conv, 1),
tf.argmax(y_, 1))accuracy = tf.reduce_mean(tf.cast(corrent_prediction, "float"))
# 所有变量进行初始化sess.run(tf.initialize_all_variables())
# 获取mnist数据mnist_data_set = input_data.read_data_sets('MNIST_data', one_hot=True)
# 进行训练start_time = time.time()for i in range(20000):
# 取训练数据    batch_xs, batch_ys = mnist_data_set.train.next_batch(200)
# 每迭代100 个batch,对当前训练数据进行测试,输出当前预测准确率    if i % 2 == 0:
train_accuracy = accuracy.eval(feed_dict={x: batch_xs, y_: batch_ys})
print("step %d, training accuracy %g" % (i, train_accuracy))
# 计算间隔时间        end_time = time.time()        print('time:', (end_time - start_time))
start_time = end_time        # 训练数据        train_step.run(feed_dict={x: batch_xs, y_: batch_ys})
# 关闭会话sess.close()1.2.3.4.5.6.7.8.9.10.11.12.13.14.15.16.17.18.19.20.21.22.23.24.25.26.27.28.29.
30.31.32.33.34.35.36.37.38.39.40.41.42.43.44.45.46.47.48.49.50.51.52.53.54.55.56.57.58.59.60.61.62.
63.64.65.66.67.68.69.70.71.72.73.74.75.76.77.78.79.80.81.82.83.84.85.86.87.
运行结果: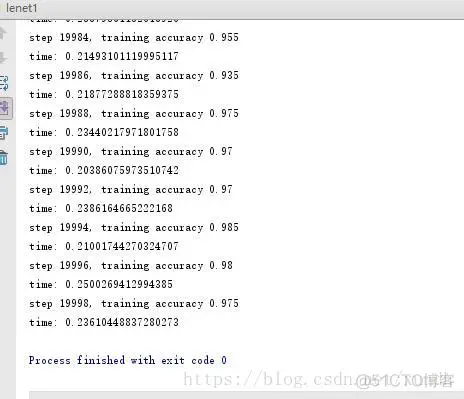
对于神经网络模型来说,首先重要的一个目标就是能够达到最好的准确率,这需要通过设计不同的模型和算法完成。其次在模型的训练过程中一般要求能够在最短的时间内达到收敛。
相较于sigmoid和tanh 函数,ReLU主要有以下优点:
把上面程序里的sigmoid换为Relu,可以看到训练准确度并没有提高,反而是在比较低的水平。不同的学习率对ReLU模型的训练会有很大影响,准确率设置不当会造成大量的神经元被锁死。这里需要减少模型的学习率。
上面的程序里为了模型的正常使用,在图计算过程中需要使用大量的权重值和偏置量。这些都是由TensorFlow变量所设置。而变量带来的问题就是每次图对话计算过程中都要被反复初始化和赋予新值。
#!/usr/bin/python# -*- coding: UTF-8 -*-from PIL import Image,
ImageFilterimport tensorflow as tffrom tensorflow.examples.tutorials
.mnist import input_dataimport timeimport matplotlib
.pyplot as pltimport numpy as npdef weight_variable(shape):    initial = tf
.truncated_normal(shape, stddev=0.1)    return tf.Variable(initial)
# 初始化单个卷积核上的偏置值def bias_variable(shape):    initial = tf.constant(0.1, shape=shape)
return tf.Variable(initial)# 输入特征 x,用卷积核W进行卷积运算,strides 为卷积核移动步长,
# padding 表示是否需要补齐边缘像素使输出图像大小不变def conv2d(x, W):    return tf.nn.conv2d(x, W,
strides=[1, 1, 1, 1], padding='SAME')# 对 x 进行最大池化操作,
ksize进行池化的范围def max_pool_2x2(x):    return tf.nn.max_pool(x, ksize=[1, 2, 2, 1],
strides=[1, 2, 2, 1], padding='SAME')# 自己输入的图片进行预测def imageprepare(path):    im = Image.open(path)
#读取的图片所在路径,注意是28*28像素    im.show()    im = im.convert('L')    tv = list(im.getdata())
tva = np.array([x*1.0/255.0 for x in tv])    return tvasess = tf.InteractiveSession()
# 声明输入图片数据、类别x = tf.placeholder('float', [None, 784])y_ = tf.placeholder('float', [None, 10])
# 输入图片数据化x_image = tf.reshape(x, [-1, 28, 28, 1])W_conv1 = weight_variable([5, 5, 1, 6])
b_conv1 = bias_variable([6])h_conv1 = tf.nn.relu(conv2d(x_image,
W_conv1) + b_conv1)h_pool1 = max_pool_2x2(h_conv1)W_conv2 = weight_variable([5, 5, 6, 16])
b_conv2 = bias_variable([16])h_conv2 = tf.nn.relu(conv2d(h_pool1, W_conv2) + b_conv2)h_pool2
= max_pool_2x2(h_conv2)W_fc1 = weight_variable([7 * 7 * 16, 120])# 偏置值b_fc1 = bias_variable([120])
# 将卷积的输出展开h_pool2_flat = tf.reshape(h_pool2, [-1, 7 * 7 * 16])
# 神经网络计算,并添加relu激活函数h_fc1 = tf.nn.relu(tf.matmul(h_pool2_flat, W_fc1) + b_fc1)W_fc2
 = weight_variable([120, 10])b_fc2 = bias_variable([10])y_conv = tf.nn.softmax(tf
 .matmul(h_fc1, W_fc2) + b_fc2)# 代价函数cross_entropy = -tf.reduce_sum(y_ * tf.log(y_conv))
 # 使用Adam优化算法来调整参数train_step = tf.train.GradientDescentOptimizer(1e-4).minimize(cross_entropy)
 # 测试正确率correct_prediction = tf.equal(tf.argmax(y_conv, 1),
 tf.argmax(y_, 1))accuracy = tf.reduce_mean(tf.cast(correct_prediction, "float32"))
 # 变量初始化sess.run(tf.initialize_all_variables())# 获取mnist数据mnist_data_set = input_data
 .read_data_sets('MNIST_data', one_hot=True)c = []# 进行训练start_time = time.time()for i in range(300):
 # 获取训练数据    batch_xs, batch_ys = mnist_data_set.train.next_batch(200)
 # 每迭代10个batch,对当前训练数据进行测试,输出当前预测准确率    if i % 10 == 0:
 train_accuracy = accuracy.eval(feed_dict={x: batch_xs, y_: batch_ys})
 c.append(train_accuracy)        print("step %d , training accuracy %g" % (i, train_accuracy))
 # 计算间隔时间        end_time = time.time()        print('time:', (end_time - start_time))
 start_time = end_time    # 训练数据    train_step.run(feed_dict={x: batch_xs, y_: batch_ys})plt.plot(c)plt
 .tight_layout()plt.savefig('cnn-tf-cifar10-2.png', dpi=200)path = './mnist_train/train_6
 .bmp'test_image = imageprepare(path)prediction = tf.argmax(y_conv, 1)result = prediction
 .eval(feed_dict={x: [test_image]}, session=sess)print('输入的图片:' + path + ' 识别结果=' + str(result[0]))sess
 .close()1.2.3.4.5.6.7.8.9.10.11.12.13.14.15.16.17.18.19.20.21.22.23.24.25.26.27.28.29.30.31.32.33.34.35.36.
 37.38.39.40.41.42.43.44.45.46.47.48.49.50.51.52.53.54.55.56.57.58.59.60.61.62.63.64.65.66.67.68.69.70.71.
 72.73.74.75.76.77.78.79.80.81.82.83.84.85.86.87.88.89.90.91.92.93.94.95.96.97.98.99.100.101.102.103.104.
 105.106.107.108.109.110.111.112.113.114.115.116.117.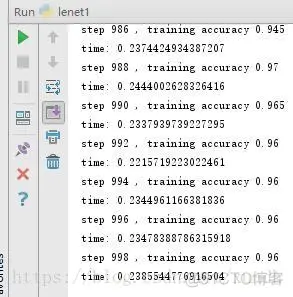
输出准确率: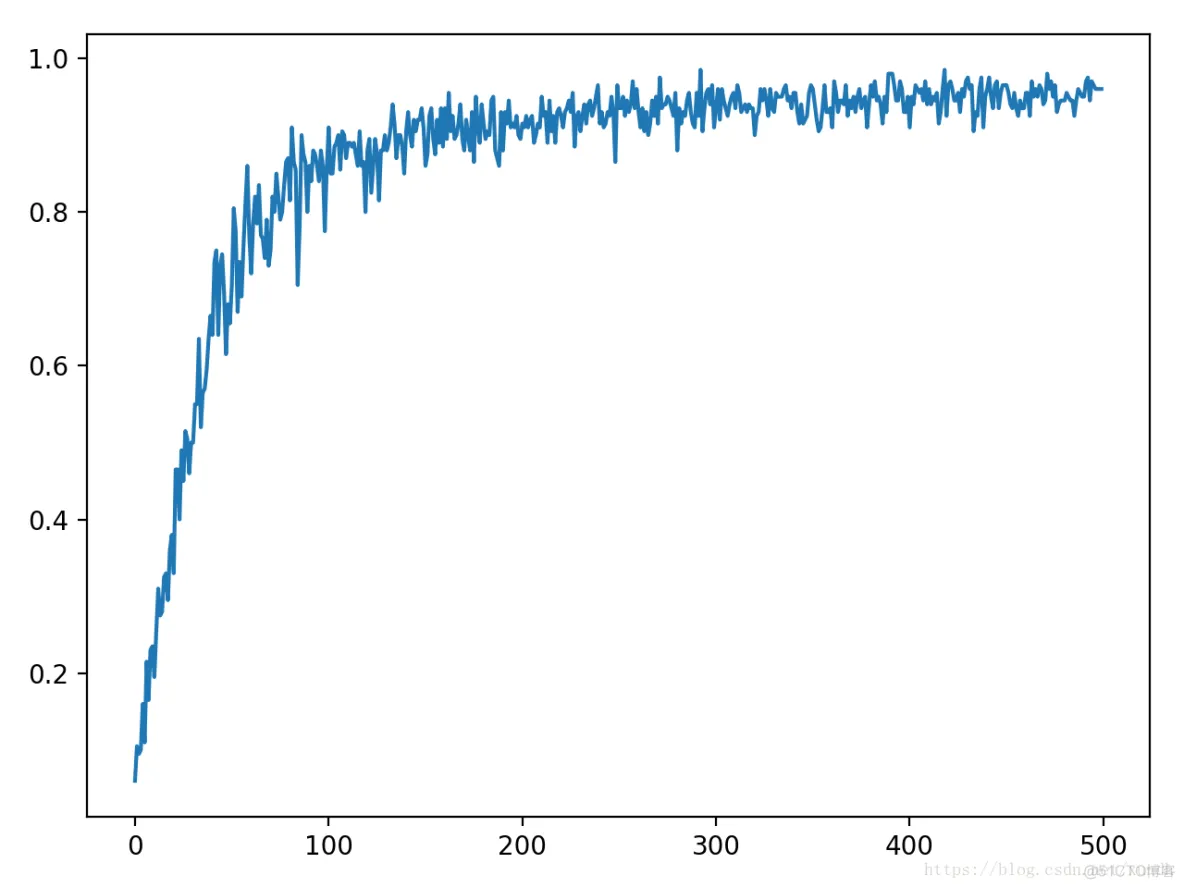
通过调整激活函数和学习率程序学习效率会有非常大的提高。除此之外深度学习中有不同的隐藏层和每层包含的神经元,而通过调节这些神经元和隐藏层的数目,也可以改善神经网络模型的设计。
下面修改每个隐藏层中神经元的数目,即第一次生成了32个通道的卷积层,第二层为64,而在全连接阶段使用了1024个神经元作为学习参数。
import tensorflow as tffrom tensorflow.examples.tutorials
.mnist import input_dataimport timeimport matplotlib
.pyplot as pltdef weight_variable(shape):    initial = tf
.truncated_normal(shape, stddev=0.1)    return tf
.Variable(initial)# 初始化单个卷积核上的偏置值def bias_variable(shape):
 initial = tf.constant(0.1, shape=shape)    return tf.Variable(initial)
 # 输入特征 x,用卷积核W进行卷积运算,strides 为卷积核移动步长,
 # padding 表示是否需要补齐边缘像素使输出图像大小不变def conv2d(x, W):
 return tf.nn.conv2d(x, W, strides=[1, 1, 1, 1], padding='SAME')
 # 对 x 进行最大池化操作,ksize进行池化的范围def max_pool_2x2(x):
 return tf.nn.max_pool(x, ksize=[1, 2, 2, 1], strides=[1, 2, 2, 1],
 padding='SAME')sess = tf.InteractiveSession()
 # 声明输入图片数据、类别x = tf.placeholder('float', [None, 784])y_ = tf.placeholder('float', [None, 10])
 # 输入图片数据化x_image = tf.reshape(x,
 [-1, 28, 28, 1])W_conv1 = weight_variable([5, 5, 1, 32])b_conv1 = bias_variable([32])h_conv1 = tf.nn
 .relu(conv2d(x_image, W_conv1) + b_conv1)h_pool1 = max_pool_2x2(h_conv1)W_conv2 = weight_variable
 ([5, 5, 32, 64])b_conv2 = bias_variable([64])h_conv2 = tf.nn.relu(conv2d(h_pool1,
 W_conv2) + b_conv2)h_pool2 = max_pool_2x2(h_conv2)W_fc1 = weight_variable([7 * 7 * 64, 1024])
 # 偏置值b_fc1 = bias_variable([1024])# 将卷积的输出展开h_pool2_flat = tf.reshape(h_pool2, [-1, 7 * 7 * 64])
 # 神经网络计算,并添加relu激活函数h_fc1 = tf.nn.relu(tf.matmul(h_pool2_flat, W_fc1)
 + b_fc1)W_fc2 = weight_variable([1024, 10])b_fc2 = bias_variable([10])y_conv = tf
 .nn.softmax(tf.matmul(h_fc1, W_fc2) + b_fc2)# 代价函数cross_entropy = -tf.reduce_sum(y_ * tf.log(y_conv))
 # 使用Adam优化算法来调整参数train_step = tf.train.GradientDescentOptimizer(1e-4).minimize(cross_entropy)
 # 测试正确率correct_prediction = tf.equal(tf.argmax(y_conv, 1), tf.argmax(y_, 1))accuracy = tf
 .reduce_mean(tf.cast(correct_prediction, "float32"))
 # 变量初始化sess.run(tf.initialize_all_variables())
 # 获取mnist数据mnist_data_set = input_data.read_data_sets('MNIST_data', one_hot=True)c = []
 # 进行训练start_time = time.time()for i in range(1000):
 # 获取训练数据    batch_xs, batch_ys = mnist_data_set.train.next_batch(200)
 # 每迭代10个batch,对当前训练数据进行测试,输出当前预测准确率    if i % 2 == 0:
 train_accuracy = accuracy.eval(feed_dict={x: batch_xs, y_: batch_ys})
 c.append(train_accuracy)        print("step %d , training accuracy %g" % (i, train_accuracy))
 # 计算间隔时间        end_time = time.time()        print('time:', (end_time - start_time))
 start_time = end_time    # 训练数据    train_step.run(feed_dict={x: batch_xs, y_: batch_ys})sess
 .close()plt.plot(c)plt.tight_layout()plt.savefig('cnn-tf-cifar10-1.png', dpi=200)1.2.3.4.5.6.7.
 8.9.10.11.12.13.14.15.16.17.18.19.20.21.22.23.24.25.26.27.28.29.30.31.32.33.34.35.36.37.38.39.40
 .41.42.43.44.45.46.47.48.49.50.51.52.53.54.55.56.57.58.59.60.61.62.63.64.65.66.67.68.69.70.71.72.
 73.74.75.76.77.78.79.80.81.82.83.84.85.86.87.88.89.90.91.92.93.94.95.
随着卷积核数目的增加,准确率上升的速度也非常快,但训练的速度明确变慢了。
免责声明:本文系网络转载或改编,未找到原创作者,版权归原作者所有。如涉及版权,请联系删