


软件

产品


大家好,我是小F~
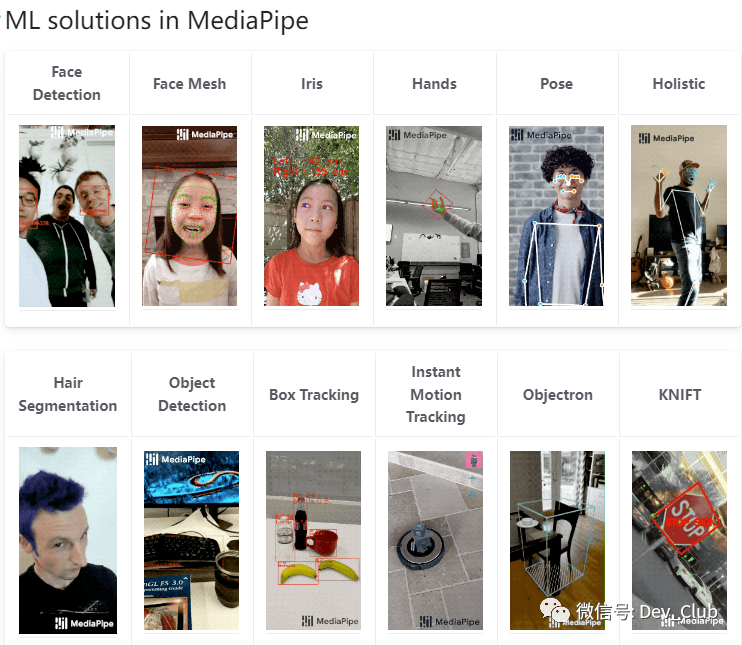
MediaPipe是一款由Google开发并开源的数据流处理机器学习应用开发框架。
它是一个基于图的数据处理管线,用于构建使用了多种形式的数据源,如视频、音频、传感器数据以及任何时间序列数据。
MediaPipe通过将各个感知模型抽象为模块并将其连接到可维护的图中来解决这些问题。
项目地址:
https://github.com/google/mediapipe
今天小F就给大家介绍一下,如何使用MediaPipe实现姿态识别!
通过这项技术,我们可以结合摄像头,智能识别人的行为,然后做出一些处理。
比如控制电脑音量,俯卧撑计数,坐姿矫正等功能。
/ 01 /
依赖安装
使用的Python版本是3.9.7。
需要安装以下依赖。
mediapipe==0.9.2.1numpy==1.23.5opencv-python==4.7.0.72使用pip命令进行安装,环境配置好后,就可以来看姿态识别的情况了。
有三种,包含全身、脸部、手部的姿态估计。
/ 02 /
全身姿态估计
首先是人体姿态估计,一次只能跟踪一个人。
并且会在人的身体上显示33个对应的坐标点。
具体代码如下。
import osimport timeimport cv2 as cvimport mediapipe as mp class BodyPoseDetect: def __init__(self, static_image=False, complexity=1, smooth_lm=True, segmentation=False, smooth_sm=True, detect_conf=0.5, track_conf=0.5): self.mp_body = mp.solutions.pose self.mp_draw = mp.solutions.drawing_utils self.body = self.mp_body.Pose(static_image, complexity, smooth_lm, segmentation, smooth_sm, detect_conf, track_conf) def detect_landmarks(self, img, disp=True): img_rgb = cv.cvtColor(img, cv.COLOR_BGR2RGB) results = self.body.process(img_rgb) detected_landmarks = results.pose_landmarks if detected_landmarks: if disp: self.mp_draw.draw_landmarks(img, detected_landmarks, self.mp_body.POSE_CONNECTIONS) return detected_landmarks, img def get_info(self, detected_landmarks, img_dims): lm_list = [] if not detected_landmarks: return lm_list height, width = img_dims for id, b_landmark in enumerate(detected_landmarks.landmark): cord_x, cord_y = int(b_landmark.x * width), int(b_landmark.y * height) lm_list.append([id, cord_x, cord_y]) return lm_list def main(path, is_image): if is_image: detector = BodyPoseDetect(static_image=True) ori_img = cv.imread(path) img = ori_img.copy() landmarks, output_img = detector.detect_landmarks(img) info_landmarks = detector.get_info(landmarks, img.shape[:2]) # print(info_landmarks[3]) cv.imshow("Original", ori_img) cv.imshow("Detection", output_img) cv.waitKey(0) else: detector = BodyPoseDetect() cap = cv.VideoCapture(path) prev_time = time.time() cur_time = 0 frame_width = int(cap.get(3)) frame_height = int(cap.get(4)) out = cv.VideoWriter('output.avi', cv.VideoWriter_fourcc('M', 'J', 'P', 'G'), 10, (frame_width, frame_height)) # 保存视频 while True: ret, frame = cap.read() if not ret: print("Video Over") break img = frame.copy() landmarks, output_img = detector.detect_landmarks(img) info_landmarks = detector.get_info(landmarks, img.shape[:2]) cur_time = time.time() fps = 1/(cur_time - prev_time) prev_time = cur_time cv.putText(output_img, f'FPS: {str(int(fps))}', (10, 70), cv.FONT_HERSHEY_COMPLEX_SMALL, 2, (0, 50, 170), 2) cv.namedWindow('Original', cv.WINDOW_NORMAL) # 窗口大小可设置 cv.resizeWindow('Original', 580, 330) # 重设大小 cv.namedWindow('Detection', cv.WINDOW_NORMAL) # 窗口大小可设置 cv.resizeWindow('Detection', 580, 330) # 重设大小 out.write(output_img) cv.imshow("Original", frame) cv.imshow("Detection", output_img) if cv.waitKey(1) & 0xFF == ord('q'): break cap.release() cv.destroyAllWindows() if __name__ == "__main__": # is_image = True # media_path = '.\\Data\\Images\\running.jpg' is_image = False media_path = '.\\Data\\Videos\\basketball.mp4' if os.path.exists(os.path.join(os.getcwd(), media_path)): main(media_path, is_image) else: print("Invalid Path")运行代码后,结果如下。
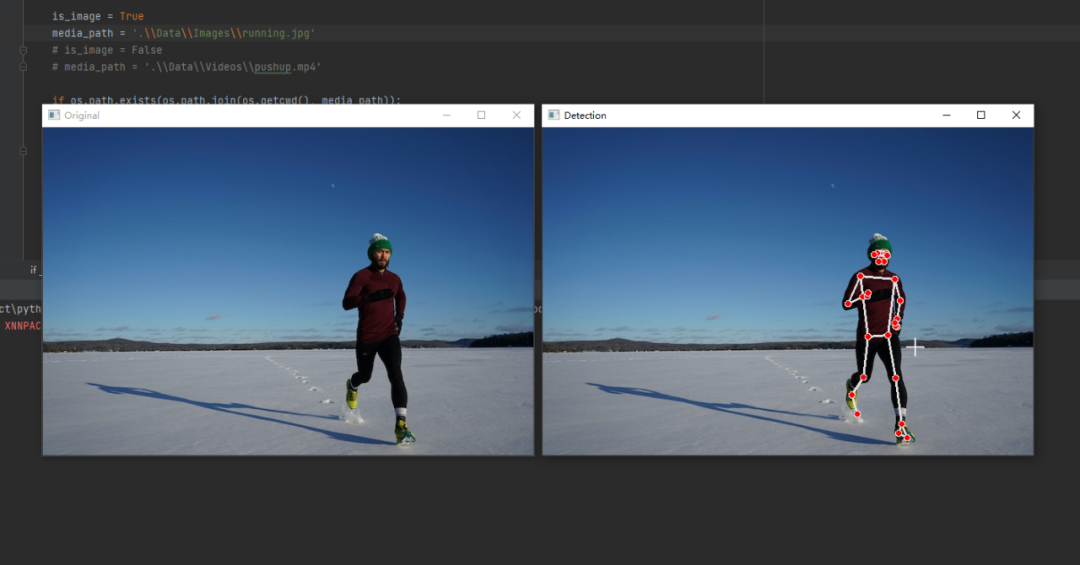
左侧是原图,右侧是检测结果。
其中代码里的is_image参数表示是否为图片或视频
而media_path参数则表示的是源文件的地址。
我们还可以看视频的检测效果,具体如下。
效果还不错。
/ 03 /
脸部识别跟踪
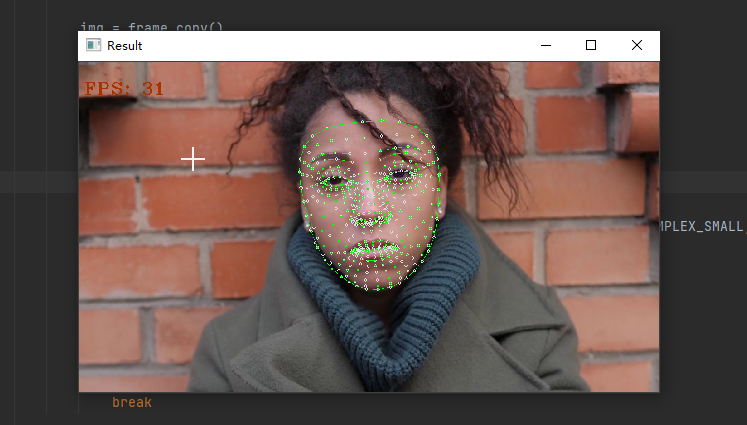
第二个是脸部,MediaPipe可以在脸部周围画一个网格来进行检测和跟踪。
具体代码如下。
import osimport timeimport argparseimport cv2 as cvimport mediapipe as mp class FaceDetect: def __init__(self, static_image=False, max_faces=1, refine=False, detect_conf=0.5, track_conf=0.5): self.draw_utils = mp.solutions.drawing_utils self.draw_spec = self.draw_utils.DrawingSpec(color=[0, 255, 0], thickness=1, circle_radius=2) self.mp_face_track = mp.solutions.face_mesh self.face_track = self.mp_face_track.FaceMesh(static_image, max_faces, refine, detect_conf, track_conf) def detect_mesh(self, img, disp=True): results = self.face_track.process(img) detected_landmarks = results.multi_face_landmarks if detected_landmarks: if disp: for f_landmarks in detected_landmarks: self.draw_utils.draw_landmarks(img, f_landmarks, self.mp_face_track.FACEMESH_CONTOURS, self.draw_spec, self.draw_spec) return detected_landmarks, img def get_info(self, detected_landmarks, img_dims): landmarks_info = [] img_height, img_width = img_dims for _, face in enumerate(detected_landmarks): mesh_info = [] for id, landmarks in enumerate(face.landmark): x, y = int(landmarks.x * img_width), int(landmarks.y * img_height) mesh_info.append((id, x, y)) landmarks_info.append(mesh_info) return landmarks_info def main(path, is_image=True): print(path) if is_image: detector = FaceDetect() ori_img = cv.imread(path) img = ori_img.copy() landmarks, output = detector.detect_mesh(img) if landmarks: mesh_info = detector.get_info(landmarks, img.shape[:2]) # print(mesh_info) cv.imshow("Result", output) cv.waitKey(0) else: detector = FaceDetect(static_image=False) cap = cv.VideoCapture(path) curr_time = 0 prev_time = time.time() frame_width = int(cap.get(3)) frame_height = int(cap.get(4)) out = cv.VideoWriter('output.avi', cv.VideoWriter_fourcc('M', 'J', 'P', 'G'), 10, (frame_width, frame_height)) # 保存视频 while True: ret, frame = cap.read() if not ret: print("Video Over") break img = frame.copy() landmarks, output = detector.detect_mesh(img) if landmarks: mesh_info = detector.get_info(landmarks, img.shape[:2]) # print(len(mesh_info)) curr_time = time.time() fps = 1/(curr_time - prev_time) prev_time = curr_time cv.putText(output, f'FPS: {str(int(fps))}', (10, 70), cv.FONT_HERSHEY_COMPLEX_SMALL, 2, (0, 50, 170), 2) cv.namedWindow('Result', cv.WINDOW_NORMAL) # 窗口大小可设置 cv.resizeWindow('Result', 580, 330) # 重设大小 out.write(output) cv.imshow("Result", output) if cv.waitKey(20) & 0xFF == ord('q'): break cap.release() cv.destroyAllWindows() if __name__ == "__main__": # is_image = True # media_path = '.\\Data\\Images\\human_2.jpg' is_image = False media_path = '.\\Data\\Videos\\humans_3.mp4' if os.path.exists(os.path.join(os.getcwd(), media_path)): main(media_path, is_image) else: print("Invalid Path")效果如下。
/ 04 /
手部跟踪识别
最后一个是手部,可以同时跟踪2只手并且在手部显示相应的坐标点。
具体代码如下。
import osimport timeimport argparseimport cv2 as cvimport mediapipe as mp class HandPoseDetect: def __init__(self, static_image=False, max_hands=2, complexity=1, detect_conf=0.5, track_conf=0.5): self.mp_hands = mp.solutions.hands self.mp_draw = mp.solutions.drawing_utils self.hands = self.mp_hands.Hands(static_image, max_hands, complexity, detect_conf, track_conf) def detect_landmarks(self, img, disp=True): img_rgb = cv.cvtColor(img, cv.COLOR_BGR2RGB) results = self.hands.process(img_rgb) detected_landmarks = results.multi_hand_landmarks if detected_landmarks: if disp: for h_landmark in detected_landmarks: self.mp_draw.draw_landmarks(img, h_landmark, self.mp_hands.HAND_CONNECTIONS) return detected_landmarks, img def get_info(self, detected_landmarks, img_dims, hand_no=1): lm_list = [] if not detected_landmarks: return lm_list if hand_no > 2: print('[WARNING] Provided hand number is greater than max number 2') print('[WARNING] Calculating information for hand 2') hand_no = 2 elif hand_no < 1: print('[WARNING] Provided hand number is less than min number 1') print('[WARNING] Calculating information for hand 1') if len(detected_landmarks) < 2: hand_no = 0 else: hand_no -= 1 height, width = img_dims for id, h_landmarks in enumerate(detected_landmarks[hand_no].landmark): cord_x, cord_y = int(h_landmarks.x * width), int(h_landmarks.y * height) lm_list.append([id, cord_x, cord_y]) return lm_list def main(path, is_image=True): if is_image: detector = HandPoseDetect(static_image=True) ori_img = cv.imread(path) img = ori_img.copy() landmarks, output_img = detector.detect_landmarks(img) info_landmarks = detector.get_info(landmarks, img.shape[:2], 2) # print(info_landmarks) cv.imshow("Landmarks", output_img) cv.waitKey(0) else: detector = HandPoseDetect() cap = cv.VideoCapture(path) prev_time = time.time() cur_time = 0 frame_width = int(cap.get(3)) frame_height = int(cap.get(4)) out = cv.VideoWriter('output.avi', cv.VideoWriter_fourcc('M', 'J', 'P', 'G'), 10, (frame_width, frame_height)) # 保存视频 while True: ret, frame = cap.read() if not ret: print("Video Over") break img = frame.copy() landmarks, output_img = detector.detect_landmarks(img) info_landmarks = detector.get_info(landmarks, img.shape[:2], 2) # print(info_landmarks) cur_time = time.time() fps = 1/(cur_time - prev_time) prev_time = cur_time cv.putText(output_img, f'FPS: {str(int(fps))}', (10, 70), cv.FONT_HERSHEY_COMPLEX_SMALL, 2, (0, 50, 170), 2) cv.namedWindow('Original', cv.WINDOW_NORMAL) # 窗口大小可设置 cv.resizeWindow('Original', 580, 330) # 重设大小 cv.namedWindow('Detection', cv.WINDOW_NORMAL) # 窗口大小可设置 cv.resizeWindow('Detection', 580, 330) # 重设大小 out.write(output_img) cv.imshow("Detection", output_img) cv.imshow("Original", frame) if cv.waitKey(1) & 0xFF == ord('q'): break cap.release() cv.destroyAllWindows() if __name__ == "__main__": is_image = False media_path = '.\\Data\\Videos\\piano_playing.mp4' if os.path.exists(os.path.join(os.getcwd(), media_path)): main(media_path, is_image) else: print("Invalid Path")结果如下所示。
/ 05 /
总结
以上操作,就是MediaPipe姿态识别的部分内容。
当然我们还可以通过MediaPipe其它的识别功能,来做出有趣的事情。
比如结合摄像头,识别手势动作,控制电脑音量。这个大家都可以自行去学习。
相关文件及代码都已上传,公众号回复【姿态识别】即可获取。
免责声明:本文系网络转载或改编,未找到原创作者,版权归原作者所有。如涉及版权,请联系删
 技术文档
技术文档
 推荐好文
推荐好文


 155-2731-8020


