产品
Google出了一个开源的、跨平台的、可定制化的机器学习解决方案工具包,给在线流媒体(当然也可以用于普通的视频、图像等)提供了机器学习解决方案。
它提供了手势、人体姿势、人脸、物品等识别和追踪功能,并提供了C++、Python、JavaScript等编程语言的工具包以及iOS、Android平台的解决方案。
在python环境下,只需要安装三个包:
pip install mediapipe
pip install numpy
pip opencv-python
至于python版本,建议使用python3.8以上的版本
我的mac电脑版本:
mediapipe==0.8.6
numpy==1.19.5
opencv-python==4.5.3.5
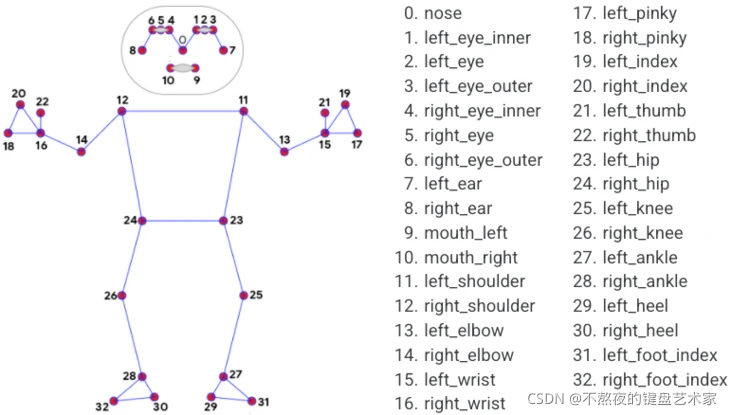
在看代码之前我们首先要知道我们人体的姿态对应到这个模块下的信息。
从上图可以看到mediapipe姿态检测模块,将我们人体各部位,拆分成32个点,我们只要在模型中输出指定点的数据,就能获取到对应该点的人体部位。
我们在做姿态判断姿态是什么动作的时候,通常是判断角度:
具体动作识别判断,通常是采集不同动作下的图片,然后通过姿态检测,根据角度,对图片进行标注,将大量图片作为训练集。最后完成这个姿态行为识别判断。
我们先定义一个姿态检测器类,里面包含获取姿态检测,获取姿态数据,获取姿态3个点p1-p2-p3角度
import cv2
import mediapipe as mp
import math


class PoseDetector():
    '''
    人体姿势检测类
    '''

        def __init__(self,
                 static_image_mode=False,
                 upper_body_only=False,
                 smooth_landmarks=True,
                 min_detection_confidence=0.5,
                 min_tracking_confidence=0.5):
        '''
        初始化
        :param static_image_mode: 是否是静态图片,默认为否
        :param upper_body_only: 是否是上半身,默认为否
        :param smooth_landmarks: 设置为True减少抖动
        :param min_detection_confidence:人员检测模型的最小置信度值,默认为0.5
        :param min_tracking_confidence:姿势可信标记的最小置信度值,默认为0.5
        '''
        self.static_image_mode = static_image_mode
        self.upper_body_only = upper_body_only
        self.smooth_landmarks = smooth_landmarks
        self.min_detection_confidence = min_detection_confidence
        self.min_tracking_confidence = min_tracking_confidence
        # 创建一个Pose对象用于检测人体姿势
        self.pose = mp.solutions.pose.Pose(self.static_image_mode, self.upper_body_only, self.smooth_landmarks,self.min_detection_confidence, self.min_tracking_confidence)


    def find_pose(self, img, draw=True):
        '''
        检测姿势方法
        :param img: 一帧图像
        :param draw: 是否画出人体姿势节点和连接图
        :return: 处理过的图像
        '''
        imgRGB = cv2.cvtColor(img, cv2.COLOR_BGR2RGB)
        # pose.process(imgRGB) 会识别这帧图片中的人体姿势数据,保存到self.results中
        self.results = self.pose.process(imgRGB)
        if self.results.pose_landmarks:
            if draw:
                mp.solutions.drawing_utils.draw_landmarks(img, self.results.pose_landmarks,mp.solutions.pose.POSE_CONNECTIONS)
				#三维真实物理坐标系中
				#mp.solutions.drawing_utils.plot_landmarks(self.results.pose_landmarks,mp.solutions.pose.POSE_CONNECTIONS)
        return img

    def find_positions(self, img):
        '''
        获取人体姿势数据
        :param img: 一帧图像
        :param draw: 是否画出人体姿势节点和连接图
        :return: 人体姿势数据列表
        '''
        # 人体姿势数据列表,每个成员由3个数字组成:id, x, y
        # id代表人体的某个关节点,x和y代表坐标位置数据
        self.lmslist = []
        if self.results.pose_landmarks:
            for id, lm in enumerate(self.results.pose_landmarks.landmark):
                h, w, c = img.shape
                cx, cy = int(lm.x * w), int(lm.y * h)
                self.lmslist.append([id, cx, cy])

        return self.lmslist

    def find_angle(self, img, p1, p2, p3, draw=True):
        '''
        获取人体姿势中3个点p1-p2-p3的角度
        :param img: 一帧图像
        :param p1: 第1个点
        :param p2: 第2个点
        :param p3: 第3个点
        :param draw: 是否画出3个点的连接图
        :return: 角度
        '''
        x1, y1 = self.lmslist[p1][1], self.lmslist[p1][2]
        x2, y2 = self.lmslist[p2][1], self.lmslist[p2][2]
        x3, y3 = self.lmslist[p3][1], self.lmslist[p3][2]

        # 使用三角函数公式获取3个点p1-p2-p3,以p2为角的角度值,0-180度之间
        angle = int(math.degrees(math.atan2(y1 - y2, x1 - x2) - math.atan2(y3 - y2, x3 - x2)))
        if angle < 0:
            angle = angle + 360
        if angle > 180:
            angle = 360 - angle

        if draw:
            cv2.circle(img, (x1, y1), 20, (0, 255, 255), cv2.FILLED)
            cv2.circle(img, (x2, y2), 30, (255, 0, 255), cv2.FILLED)
            cv2.circle(img, (x3, y3), 20, (0, 255, 255), cv2.FILLED)
            cv2.line(img, (x1, y1), (x2, y2), (255, 255, 255, 3))
            cv2.line(img, (x2, y2), (x3, y3), (255, 255, 255, 3))
            cv2.putText(img, str(angle), (x2 - 50, y2 + 50), cv2.FONT_HERSHEY_SIMPLEX, 2, (0, 255, 255), 2)

        return angle
def display_img(img):
	img_rgb=cv2.cvtColor(img,cv2.COLOR_BGR2RGB)
	plt.imshow(img_rgb)
	plt.show()

img=cv2.imread('data.jpg')
detector=PoseDetector()
img_pose=detector.find_pose(img)

display_img(img_pose)
import cv2
import time

#获取摄像头,传入0表示获取系统默认摄像头
cap=cv2.VideoCapture(0)
detector=PoseDetector()
cap=open(0)

while cap.isOpened():
	#获取画面
	success,frames=cap.read()
	if not success:
		print("Error")
		break

	#处理帧函数
	frame=detector.find_pose(frame)

	#展示图像
	cv2.imshow('frame',frame)
	#按下键盘q或者ese退出
	if cv2.waitKey(1) in [ord('q'),27]:
		break
#关闭摄像头
cap.release()

#关闭图像窗口
cv2.destroyAllWindows()
免责声明:本文系网络转载或改编,未找到原创作者,版权归原作者所有。如涉及版权,请联系删