译自:Ansys_Fluent_UDF_Manual_2021R2 Part2
本章概述了可以添加到GUI中的各种界面元素。

本节介绍如何将整数输入字段添加到界面。
本节讨论将整数输入字段添加到对话框的功能。整型字段使用cx-create-integer-entry宏创建。整型字段的值可以使用cx-set-integer-entry宏来设置,整型字段的值可以使用cx-show-integer-entry宏来获取。
本节介绍各种整数输入字段宏中使用的参数
3.1.2.1. cx-create-integer-entry
(cx-create-integer-entry parent label row column)

注意:行和列属性是可选的。如果省略了这两个属性中的一个或两个,整数输入字段将被添加到父属性的第一行/第一列,并覆盖该位置中已有的任何内容。
3.1.2.2. cx-set-integer-entry
(cx-set-integer-entry intentry value)

3.1.2.3. cx-show-integer-entry
(cx-show-integer-entry intentry

此示例显示了 cx-create-integer-entry、cx-set-integer-entry 和 cx-show-integer-entry 宏的工作原理。创建整数输入字段后,该字段的初始值将通过语句 (cx-set-integer-entry intField 1) 设置为 1。接下来,使用另一个 cx-set-integer-entry 语句将该整数输入字段的值增加到 2。该语句还嵌套了一个 cx-show-integer-entry 语句,以便获取整数中已有的值输入字段并将其增加 1。
到 cx-show-panel 语句被读取时,intField 的值现在是 2,所以当打开对话框时整数输入字段中出现数字 2。单击是因为我们已经用布尔值替换了 apply-cb 和 update-cb 参数,这通常是函数调用。

(define (apply-cb) #t)
(define update-cb #f)
(define table)
(define intField)
(define my-dialog-box (cx-create-panel "My Dialog Box" apply-cb update-cb))
(set! table (cx-create-table my-dialog-box "This is an example Dialog Box"))
(set! intField (cx-create-integer-entry table "Integer Entry Field"))
(cx-set-integer-entry intField 1)
(cx-set-integer-entry intField (+ 1 (cx-show-integer-entry intField)))
(cx-show-panel my-dialog-box)

本节介绍如何向界面添加实数输入字段。
本节讨论向对话框添加实数输入字段的能力。使用 cx-create-real-entry 宏创建实数字段。实数字段的值可以使用 cx-set-real-entry 宏设置,实数字段的值可以使用cx-show-real-entry 宏。
本节解释了各种实数输入字段宏中使用的参数
3.2.2.1. cx-create-real-entry
(cx-create-real-entry parent label row column)

3.2.2.2. cx-set-real-entry
(cx-set-real-entry realentry value)

3.2.2.3. cx-show-real-entry
(cx-show-real-entry realentry)

3.2.3.实数输入示例
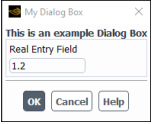
此示例显示 cx-create-real-entry、cx-set-real-entry 和 cx-showreal-entry 宏如何工作。创建实数输入字段后,该字段的初始值将通过语句 (cx-set-real-entry realField 0.7) 设置为 0.7。接下来,使用另一个 cx-set-real-entry 语句将该整数输入字段的值增加到 1.2。该语句还有一个嵌套在其中的 cx-show-real-entry 语句,以便获取整数输入字段中已有的值并添加 0.5。
到 cx-show-panel 语句被读取时,realField 的值现在是 1.2,所以当对话框打开时,实数输入字段中出现数字 1.2。当点击 OK 按钮时,这个对话框不做任何事情被点击是因为我们已经用布尔值替换了 apply-cb 和 update-cb 参数,这通常是函数调用。

(define (apply-cb) #t)
(define update-cb #f)
(define table)
(define realField)
(define my-dialog-box (cx-create-panel "My Dialog Box" apply-cb update-cb))
(set! table (cx-create-table my-dialog-box "This is an example Dialog Box"))
(set! realField (cx-create-real-entry table "Real Entry Field"))
(cx-set-real-entry realField 0.7)
(cx-set-real-entry realField (+ 0.5 (cx-show-real-entry realField)))
(cx-show-panel my-dialog-box)

本节介绍如何向界面添加文本输入字段。
本节讨论向对话框添加文本输入字段的能力。文本输入字段使用 cx-create-text-entry 宏创建。文本输入字段的文本可以使用 cx-set-text-entry 宏设置,并且可以使用 cx-show-text-entry 宏获得。
3.3.2.1. cx-create-text-entry
(cx-create-text-entry parent label row column)

3.3.2.2. cx-set-text-entry
(cx-set-text-entry text-var value)

3.3.2.3. cx-show-text-entry
(cx-show-text-entry textentry)

这个例子展示了 cx-set-text-entry 和 cx-show-text-entry 宏是如何工作的。创建文本输入字段后,该字段的初始值将通过语句 (cx-set-text-entry txtField "Starting text") 设置为起始文本。接下来,通过 (set! isString "This is different text") 语句将随机字符串 isString 的值设置为 This is different text。在将 isString 设置为 This is different text 之后,接下来通过使用 cx-show-text-entry 语句将其设置为文本输入字段的值。
最后,将文本输入字段的值设置为 isString 的值。由于文本输入字段在对话框打开时显示Starting text,我们知道 cx-show-text-entry 语句起作用,因为它将 isString 的值更改为Starting text。

(define (apply-cb) #t)
(define update-cb #f)
(define table)
(define txtField)
(define isString)
(define my-dialog-box (cx-create-panel "My Dialog Box" apply-cb update-cb))
(set! table (cx-create-table my-dialog-box "This is an example Dialog Box"))
(set! txtField (cx-create-text-entry table "Text Entry Field"))
(cx-set-text-entry txtField "Starting text")
(set! isString "This is different text")
(set! isString (cx-show-text-entry txtField))
(cx-set-text-entry txtField isString)
(cx-show-panel my-dialog-box)
本节介绍如何向界面添加复选框和单选按钮。
本节讨论向对话框添加复选框和单选按钮的能力。复选框和单选按钮通常组合在称为按钮框的结构中。按钮框允许复选框和单选按钮以单一间隔格式堆叠在彼此的顶部。按钮框还控制您添加的按钮是复选框还是选项按钮。复选框和选项按钮的区别在于可以同时选中一个按钮框中的多个复选框。单选按钮是互斥的,因此一次只能选择按钮框中的一个选项按钮。按钮框是使用 cx-create-button-box 宏创建的。复选框和单选按钮是用 cx-create-toggle-button 宏创建的。复选框或选项按钮的状态可以用 cx-set-toggle-button 宏设置,并用 cx-show-toggle-button 查询按钮宏。
本节说明各种复选框/选项按钮宏中使用的参数。
3.4.2.1. cx-create-button-box
(cx-create-button-box parent label radio-mode)

3.4.2.2. cx-create-toggle-button
(cx-create-toggle-button parent label row column)

3.4.2.3. cx-set-toggle-button
(cx-set-toggle-button togglebutton value)

3.4.2.4. cx-show-toggle-button
(cx-show-toggle-button togglebutton)

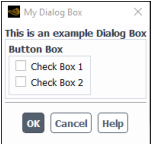
此示例显示了 cx-create-button-box、cx-create-toggle-button、cx-set-toggle-button 和 cx-show-toggle-button 宏是如何工作的。在 cx-create-buttonbox 行中,radio-mode 参数设置为 #f,这表示正在使用复选框,而不是单选按钮。一旦创建了两个复选框,checkBox1 的初始值就会通过语句 (cx-set-toggle-button checkBox1 #f) 设置为 #f。接下来,通过 (set! isBool #t) 语句将随机布尔变量 isBool 的值设置为 #t。在将 isBool 设置为 #t 之后,接下来通过使用 cx-show-toggle-button 语句将其设置为 checkBox1 的值。
最后,将 checkBox2 的值设置为 isBool 的值。由于打开对话框时并没有勾选checkBox2,所以我们知道cx-show-toggle-button语句起作用了,因为它把isBool的值改成了#f。

(define (apply-cb) #t)
(define update-cb #f)
(define checkBox1)
(define checkBox2)
(define isBool)
(define my-dialog-box (cx-create-panel "My Dialog Box" apply-cb update-cb))
(define table (cx-create-table my-dialog-box "This is an example Dialog Box"))
(define buttonBox (cx-create-button-box table "Button Box" 'radio-mode #f))
(set! checkBox1 (cx-create-toggle-button buttonBox "Check Box 1"))
(set! checkBox2 (cx-create-toggle-button buttonBox "Check Box 2"))
(cx-set-toggle-button checkBox1 #f)
(set! isBool #t)
(set! isBool (cx-show-toggle-button checkBox1))
(cx-set-toggle-button checkBox2 isBool)
(cx-show-panel my-dialog-box)
此示例显示了 cx-create-button-box、cx-create-toggle-button 和 cx-set-toggle-button 宏的工作原理。在 cx-create-button-box 语句中,radiomode 参数设置为 #t,表示正在使用单选按钮,而不是复选框。创建所有四个单选按钮后,使用 cx-set-toggle-button 宏将 radioButton2 设置为 #t,这意味着打开对话框时将选择此选项按钮。由于这些是单选按钮而不是复选框,因此这是按钮框中唯一可以选择的按钮。如果您选择任何其他按钮,radioButton2 将自动取消选择。

(define (apply-cb) #t)
(define update-cb #f)
(define radioButton1)
(define radioButton2)
(define radioButton3)
(define radioButton4)
(define my-dialog-box (cx-create-panel "My Dialog Box" apply-cb update-cb))
(define table (cx-create-table my-dialog-box "This is an example Dialog Box"))
(define buttonBox (cx-create-button-box table "Button Box" 'radio-mode #t))
(set! radioButton1 (cx-create-toggle-button buttonBox "Radio Button 1"))
(set! radioButton2 (cx-create-toggle-button buttonBox "Radio Button 2"))
(set! radioButton3 (cx-create-toggle-button buttonBox "Radio Button 3"))
(set! radioButton4 (cx-create-toggle-button buttonBox "Radio Button 4"))
(cx-set-toggle-button radioButton2 #t)
(cx-show-panel my-dialog-box)

本节介绍如何向界面添加按钮。
虽然对话框带有标准的“OK”和“Cancel”按钮,但添加具有与“OK”按钮不同功能的其他按钮有时会很有用。要构建新按钮,您必须使用 cx-create-button 宏。
(cx-create-button parent label callback row column

这个例子展示了如何使用 cx-create-button 宏来创建一个新按钮,以及回调参数是如何工作的。在下面的 cx-create-button 语句中,'activate-callback-button-cb 参数确保每次单击按钮时都会调用 button-cb 过程。 button-cb 函数是用行 (define (button- cb . args),这就像如何在功能齐全的对话框中设置 apply-cb 和 update-cb 功能一样(请参阅综合示例 (p. 759))。一旦您使用此行打开 button-cb 过程然后,您可以编写代码以赋予其功能。
在本例中,每次单击按钮时,变量 counter 递增 1,并将按钮被单击的次数输出到文本输入字段 txtField。单击 OK 按钮时,此对话框不执行任何操作因为我们已经为 apply-cb 和 update-cb 参数替换了布尔值,这通常是函数调用,就像 cx-create-button 行中的 button-cb 参数一样。

(define (apply-cb) #t)
(define update-cb #f)
(define table)
(define txtField)
(define counter 0)
(define (button-cb . args)
(set! counter (+ counter 1))
(cx-set-text-entry txtField (string-append "Times Clicked: " (number->string counter)))
)
(define my-dialog-box (cx-create-panel "My Dialog Box" apply-cb update-cb))
(set! table (cx-create-table my-dialog-box "This is an example Dialog Box"))
(set! txtField (cx-create-text-entry table "" 'row 0 'col 0))
(cx-create-button table "Button" 'activate-callback button-cb 'row 1 'col 0)
(cx-show-panel my-dialog-box)

本节介绍如何将列表或下拉列表添加到界面。
本节讨论将列表和下拉列表添加到对话框的功能。列表是使用cx-create-list宏创建的,下拉列表是使用cx-create-dropdown-list宏创建的。列表和下拉列表在创建后都使用相同的列表项宏。可以使用cx-set-List-Items宏设置列表项。可以使用cx-set-list-seltions宏设置列表选择,并使用cx-show-list-seltions宏获取列表选择。
本节介绍各种列表和下拉列表宏中使用的参数。
3.6.2.1. cx-create-list
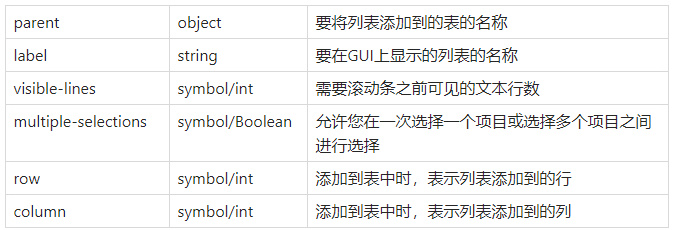
(cx-create-list parent label visible-lines multiple-selections row column)

visible-lines,multiple-selections, row 和column是可选的。如果不包括它们,则可见行数默认为10,多选项为#f,这意味着您一次只能选择一个列表项。
3.6.2.2. cx-create-drop-down-list
(cx-create-drop-down-list parent label multiple-selections row column)

3.6.2.3. cx-set-list-items
(cx-set-list-items list items)

3.6.2.4. cx-set-list-selections
(cx-set-list-selections list selections)

3.6.2.5. cx-show-list-selections
(cx-show-list-selections list)

3.6.3.列表示例
此示例显示了 cx-create-list、cx-set-list-items、cx-set-list-selections 和 cx-show-list-selections 宏的工作原理。这两个列表都是通过 cx-create-list 语句创建的。第一个列表一次只允许显示三个可见的列表项,而第二个列表一次允许显示五个。这是如何设置大小的示例您的列表通过visible-lines参数。
打开对话框后,第一个列表将通过 cx-setlist-items 行自动加载所有五个列表项,而第二个列表开始为空。通过从第一个列表中选择一个或多个列表项,然后单击 Button,将从列表 1 中选择的列表项通过 cx-show-list-selections 语句收集并通过 cx-set-list-items 语句添加到列表 2 .添加到列表 2 的列表项也将通过 cx-set-list-selections 语句自动选择。
在这个例子中额外的按钮是必要的,因为设置 OK 按钮的功能会导致它在每次点击时关闭对话框。要查看这个例子中的按钮是如何工作的,请参阅按钮 (cx-create-button)

(define (apply-cb) #t)
(define update-cb #f)
(define table)
(define myList1)
(define myList2)
(define (button-cb . args)
(cx-set-list-items myList2 (cx-show-list-selections myList1))
(cx-set-list-selections myList2 (cx-show-list-selections myList1))
)
(define my-dialog-box (cx-create-panel "My Dialog Box" apply-cb update-cb))
(set! table (cx-create-table my-dialog-box "This is an example Dialog Box"))
(set! myList1 (cx-create-list table "List 1" 'visible-lines 3 'multiple-selections #t 'row 0))
(cx-set-list-items myList1 (list "Item 1" "Item 2" "Item 3" "Item 4" "Item 5"))
(set! myList2 (cx-create-list table "List 2" 'visible-lines 5 'multiple-selections #t 'row 1))
(cx-create-button table "Button" 'activate-callback button-cb 'row 2)
(cx-show-panel my-dialog-box)
此示例显示了 cx-create-drop-down-list、cx-set-list-items、cx-set-list-selections 和 cx-show-list-selections 宏的工作原理。由于列表和下拉列表都使用相同的列表数据类型,因此这个示例与上面的示例非常相似。与下拉列表的主要区别在于它们不允许进行多项选择。在示例中,两个下拉列表都是通过 cx-create-drop-down-list 语句创建的。
打开对话框后,第一个下拉列表将通过 cx-set-list-items 行自动加载所有五个列表项,而第二个下拉列表开始为空。通过从第一个下拉列表中选择一个列表项,然后单击Button,将从下拉列表 1 中选择的列表项将通过 cx-show-list-selections 语句收集并通过 cx-set-list-items 语句添加到下拉列表 2 。添加到列表 2 的列表项也将通过 cx-set-list-selections 语句自动选择。
在这个例子中额外的按钮是必要的,因为设置 OK 按钮的功能会导致它在每次点击时关闭对话框。要查看这个例子中的Button是如何工作的,请参阅Button (cx-create-button) 。当单击 OK 按钮时,此对话框不执行任何操作。

(define (apply-cb) #t)
(define update-cb #f)
(define table)
(define myDropList1)
(define myDropList2)
(define (button-cb . args)
(cx-set-list-items myDropList2 (cx-show-list-selections myDropList1))
)
(define my-dialog-box (cx-create-panel "My Dialog Box" apply-cb update-cb))
(set! table (cx-create-table my-dialog-box "This is an example Dialog Box"))
(set! myDropList1 (cx-create-drop-down-list table "Drop Down List 1" 'row 0))
(cx-set-list-items myDropList1 (list "Item 1" "Item 2" "Item 3" "Item 4" "Item 5"))
(set! myDropList2 (cx-create-drop-down-list table "Drop Down List 2" 'row 1))
(cx-create-button table "Button" 'activate-callback button-cb 'row 2)
(cx-show-panel my-dialog-box)
免责声明:本文系网络转载或改编,未找到原创作者,版权归原作者所有。如涉及版权,请联系删