


软件

产品


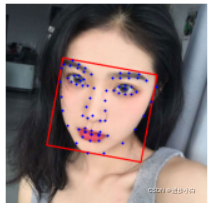
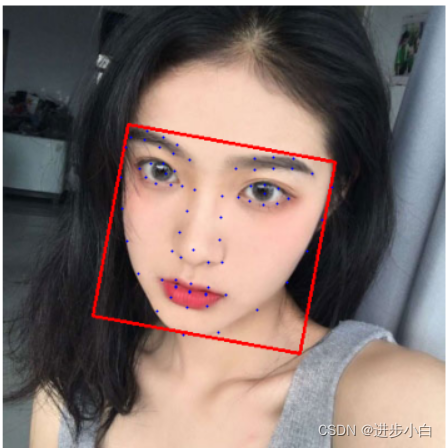
在进行人脸识别之前,要对人脸的特征进行检测,获取关键部位信息。百度的api提供这一接口。对一张照片的人脸进行关键特征部位的检测,本文提供以下代码供参考。
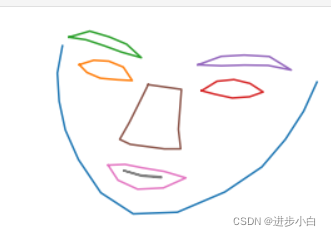
五官位置会标记具体坐标;72个关键点坐标也包含具体坐标,但不包含对应位置的详细位置描述。
# -*- coding: utf-8 -*-# from aip import AipFaceimport cv2import base64import mathimport matplotlib.pyplot as pltfrom graphics import*#import tkinter as tkfrom tkinter import filedialogfrom time import sleep APP_ID = '16290061'API_KEY = '4uKwGeC2Ci7aHbn6dHuYIrGc'SECRET_KEY = 'KRdPZdtYwLsdEthIGu03jb7GEeRtTUMF'aipFace = AipFace(APP_ID, API_KEY, SECRET_KEY) filepath = "C:/Users/ZXY13/Desktop/train_face/1.jpg"win = GraphWin('人脸关键点检测', 500, 90)win.setBackground("yellow")Text(Point(win.getWidth()/2, 40), "请在文件夹中选择一张人脸图片进行关键点检测").draw(win)sleep(1)filepath = filedialog.askopenfilename() from PIL import Imageim = Image.open(filepath) with open(filepath, "rb") as fp: base64_data = base64.b64encode(fp.read())image = str(base64_data, 'utf-8')imageType = "BASE64" options = {}options["face_field"] = "age,beauty,expression,faceshape,gender,glasses,landmark,race,quality,facetype"options["max_face_num"] = 10options["face_type"] = "LIVE" result = aipFace.detect(image, imageType, options)img = cv2.imread(filepath) face_num = result['result']['face_num']face_list = result['result']['face_list'] xvalue = []yvalue = []xvaluef = []yvaluef = [] plt.figure(figsize=(9,6.5))for num in range(0,int(face_num)): location = result['result']['face_list'][num-1]['location'] landmark72 = result['result']['face_list'][num-1]['landmark72'] xvaluef1 = [] yvaluef1 = [] xvaluef2 = [] yvaluef2 = [] xvaluef3 = [] yvaluef3 = [] xvaluef4 = [] yvaluef4 = [] xvaluef5 = [] yvaluef5 = [] xvaluef6 = [] yvaluef6 = [] xvaluef7 = [] yvaluef7 = [] xvaluef8 = [] yvaluef8 = [] for i in range(0,72): xvalue.append(landmark72[i]['x']) yvalue.append(landmark72[i]['y']) xvaluef.append(im.size[0]-landmark72[i]['x']) yvaluef.append(im.size[1]-landmark72[i]['y']) for i in range(0,13): xvaluef1.append(landmark72[i]['x']) yvaluef1.append(im.size[1]-landmark72[i]['y']) for i in range(13,21): xvaluef2.append(landmark72[i]['x']) yvaluef2.append(im.size[1]-landmark72[i]['y']) xvaluef2.append(landmark72[13]['x']) yvaluef2.append(im.size[1]-landmark72[13]['y']) for i in range(22,30): xvaluef3.append(landmark72[i]['x']) yvaluef3.append(im.size[1]-landmark72[i]['y']) xvaluef3.append(landmark72[22]['x']) yvaluef3.append(im.size[1]-landmark72[22]['y']) for i in range(30,38): xvaluef4.append(landmark72[i]['x']) yvaluef4.append(im.size[1]-landmark72[i]['y']) xvaluef4.append(landmark72[30]['x']) yvaluef4.append(im.size[1]-landmark72[30]['y']) for i in range(39,47): xvaluef5.append(landmark72[i]['x']) yvaluef5.append(im.size[1]-landmark72[i]['y']) xvaluef5.append(landmark72[39]['x']) yvaluef5.append(im.size[1]-landmark72[39]['y']) for i in range(47,57): xvaluef6.append(landmark72[i]['x']) yvaluef6.append(im.size[1]-landmark72[i]['y']) xvaluef6.append(landmark72[47]['x']) yvaluef6.append(im.size[1]-landmark72[47]['y']) for i in range(58,66): xvaluef7.append(landmark72[i]['x']) yvaluef7.append(im.size[1]-landmark72[i]['y']) xvaluef7.append(landmark72[58]['x']) yvaluef7.append(im.size[1]-landmark72[58]['y']) for i in range(66,71): xvaluef8.append(landmark72[i]['x']) yvaluef8.append(im.size[1]-landmark72[i]['y']) xvaluef8.append(landmark72[66]['x']) yvaluef8.append(im.size[1]-landmark72[66]['y']) plt.subplot(2,2,num+2) plt.plot(xvaluef1,yvaluef1)#'ro',markersize=1 plt.plot(xvaluef2,yvaluef2) plt.plot(xvaluef3,yvaluef3) plt.plot(xvaluef4,yvaluef4) plt.plot(xvaluef5,yvaluef5) plt.plot(xvaluef6,yvaluef6) plt.plot(xvaluef7,yvaluef7) plt.plot(xvaluef8,yvaluef8) plt.axis('off') Theta = location['rotation'] / 60 A = (int(location['left']),int(location['top'])) B = (int(location['left'])+int(location['width']*math.cos(Theta)),int(location['top'])+int(location['width']*math.sin(Theta))) AC_Len = math.sqrt(location['width']**2 + location['height']**2) AC_Theta = math.atan(location['height']/location['width'])+location['rotation']/60 C = (int(location['left']) + int(AC_Len*math.cos(AC_Theta)), int(location['top'])+int(AC_Len*math.sin(AC_Theta))) D = (int(location['left'])-int(location['height']*math.sin(Theta)), int(location['top']) + int(location['height']*math.cos(Theta))) cv2.line(img, A, B, (0, 0, 255), 2) cv2.line(img, B, C, (0, 0, 255), 2) cv2.line(img, C, D, (0, 0, 255), 2) cv2.line(img, D, A, (0, 0, 255), 2) plt.axis('off')plt.subplot(2,2,1)img = img[:,:,[2,1,0]]plt.imshow(img,cmap='gray')plt.plot(xvalue,yvalue,'bo',markersize=1)plt.axis('off')plt.show() plt.figure(figsize=(9,6.5))plt.imshow(img,'gray')plt.plot(xvalue,yvalue,'bo',markersize=1)plt.axis('off')plt.show() BASE64:图片的base64值,base64编码后的图片数据,需urlencode,编码后的图片大小不超过2M; options[“face_field”]:在”face_field”我们可以选择我们需要百度云服务器回传的信息,如年龄(age),美貌评分(beauty),表情(expression),等等。若想选择这些参数,只需将其所表示的英文名称赋值于options[“face_field”]就可以了,比如我想检测出我上传的图片的人是啥人种,年龄大致多少,就可以这么写。 aipFace.detect(image, imageType, options):即为面部检测函数,内部可填入三个参数,image,imageType,options。这三个参数你也已经在上面的代码中赋值好了
| log_id | uint64 | 是 | 日志id |
| result_num | uint32 | 是 | 人脸数目 |
| result | object[] | 是 | 人脸属性对象的集合 |
| +age | double | 否 | 年龄。face_fields包含age时返回 |
| +beauty | double | 否 | 美丑打分,范围0-100,越大表示越美。face_fields包含beauty时返回 |
| +location | object | 是 | 人脸在图片中的位置 |
| ++left | uint32 | 是 | 人脸区域离左边界的距离 |
| ++top | uint32 | 是 | 人脸区域离上边界的距离 |
| ++width | uint32 | 是 | 人脸区域的宽度 |
| ++height | uint32 | 是 | 人脸区域的高度 |
| +face_probability | double | 是 | 人脸置信度,范围0-1 |
| +rotation_angle | int32 | 是 | 人脸框相对于竖直方向的顺时针旋转角,[-180,180] |
| +yaw | double | 是 | 三维旋转之左右旋转角[-90(左), 90(右)] |
| +pitch | double | 是 | 三维旋转之俯仰角度[-90(上), 90(下)] |
| +roll | double | 是 | 平面内旋转角[-180(逆时针), 180(顺时针)] |
| +expression | uint32 | 否 | 表情,0,不笑;1,微笑;2,大笑。face_fields包含expression时返回 |
| +expression_probability | double | 否 | 表情置信度,范围0~1。face_fields包含expression时返回 |
| +faceshape | object[] | 否 | 脸型置信度。face_fields包含faceshape时返回 |
| ++type | string | 是 | 脸型:square/triangle/oval/heart/round |
| ++probability | double | 是 | 置信度:0~1 |
| +gender | string | 否 | male、female。face_fields包含gender时返回 |
| +gender_probability | double | 否 | 性别置信度,范围0~1。face_fields包含gender时返回 |
| +glasses | uint32 | 否 | 是否带眼镜,0-无眼镜,1-普通眼镜,2-墨镜。face_fields包含glasses时返回 |
| +glasses_probability | double | 否 | 眼镜置信度,范围0~1。face_fields包含glasses时返回 |
| +landmark | object[] | 否 | 4个关键点位置,左眼中心、右眼中心、鼻尖、嘴中心。face_fields包含landmark时返回 |
| ++x | uint32 | 否 | x坐标 |
| ++y | uint32 | 否 | y坐标 |
| +landmark72 | object[] | 否 | 72个特征点位置,示例图 。face_fields包含landmark时返回 |
| ++x | uint32 | 否 | x坐标 |
| ++y | uint32 | 否 | y坐标 |
| +qualities | object | 否 | 人脸质量信息。face_fields包含qualities时返回 |
| ++occlusion | object | 是 | 人脸各部分遮挡的概率,[0, 1],0表示完整,1表示不完整 |
| +++left_eye | double | 是 | 左眼 |
| +++right_eye | double | 是 | 右眼 |
| +++nose | double | 是 | 鼻子 |
| +++mouth | double | 是 | 嘴 |
| +++left_cheek | double | 是 | 左脸颊 |
| +++right_cheek | double | 是 | 右脸颊 |
| +++chin | double | 是 | 下巴 |
| ++blur | double | 是 | 人脸模糊程度,[0, 1]。0表示清晰,1表示模糊 |
| ++illumination | - | 是 | 取值范围在[0,255],表示脸部区域的光照程度 |
| ++completeness | - | 是 | 人脸完整度,[0, 1]。0表示完整,1表示不完整 |
| ++type | object | 是 | 真实人脸/卡通人脸置信度 |
| +++human | - | 是 | 真实人脸置信度,[0, 1] |
| +++cartoon | - | 是 | 卡通人脸置信度,[0, 1] |
这些就是我们在进行人脸识别的依据的特征信息。
免责声明:本文系网络转载或改编,未找到原创作者,版权归原作者所有。如涉及版权,请联系删
武汉格发信息技术有限公司,格发许可优化管理系统可以帮你评估贵公司软件许可的真实需求,再低成本合规性管理软件许可,帮助贵司提高软件投资回报率,为软件采购、使用提供科学决策依据。支持的软件有: CAD,CAE,PDM,PLM,Catia,Ugnx, AutoCAD, Pro/E, Solidworks 等。
 技术文档
技术文档
 推荐好文
推荐好文


 155-2731-8020


