软件

产品


本次记录是在上一次使用YooAsset完成资源热更新后继续执行的
YooAsset资源热更新教程链接:https://www.bilibili.com/opus/1080391442695716870
资源热更新完成后我们来看代码热更新
首先是HybridCLR官网:https://hybridclr.doc.code-philosophy.com/
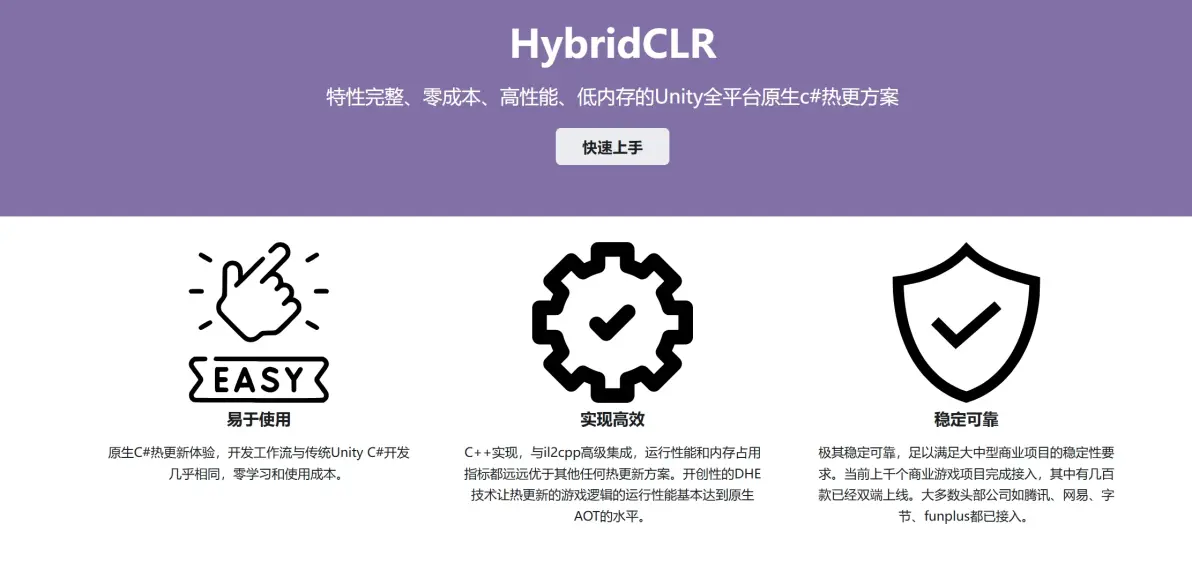
官网主页介绍
我们仅使用的话非常简单,主要需要先进行配置,跟着官网步骤来即可
首先就是安装Unity,对版本有一定要求,尽量按照官方推荐的版本
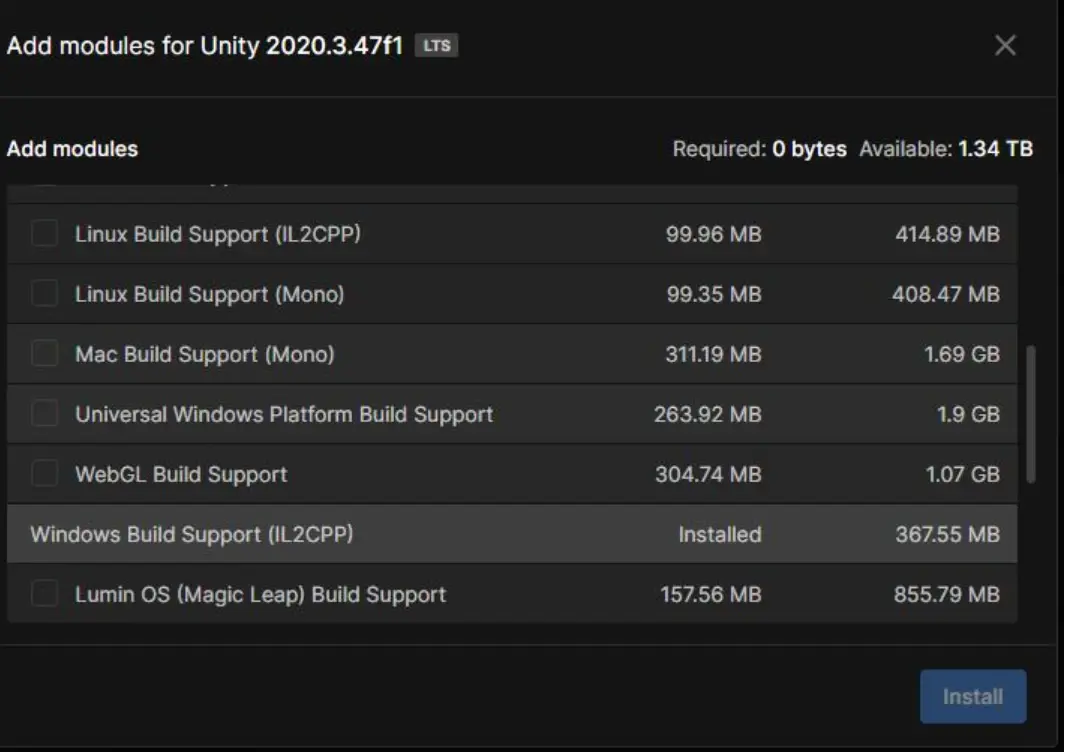
安装Unity的时候添加对应的模块
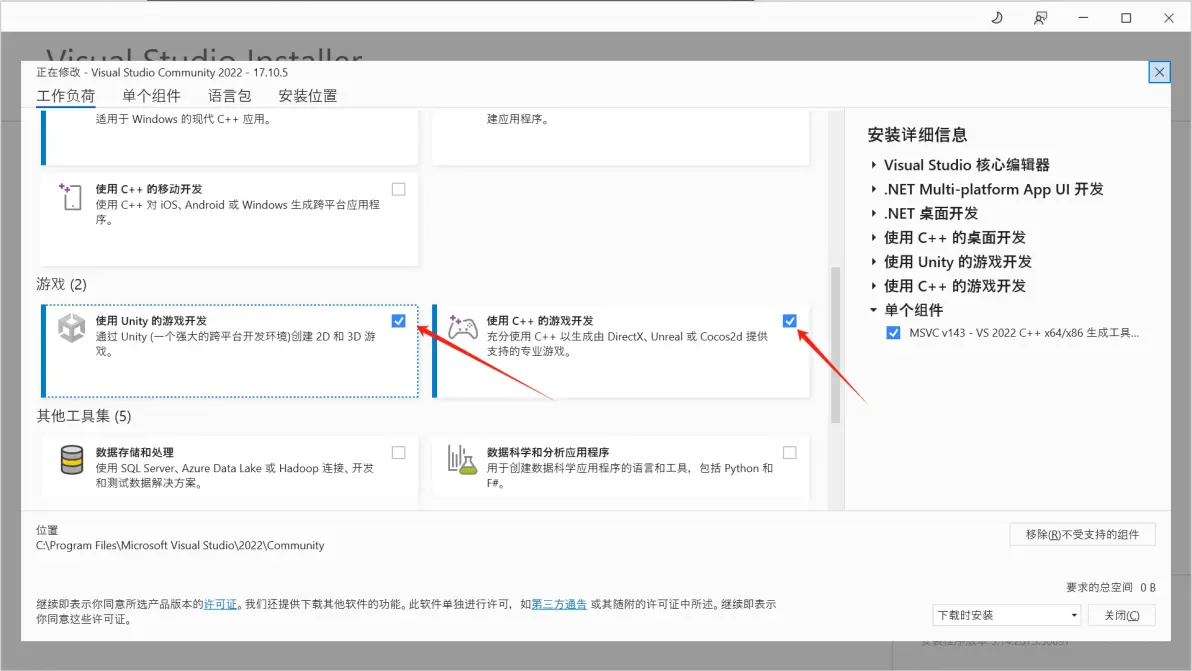
打开后点击修改,查看这两个组件是否添加,没有的话添加一下
git如果没有安装的话可以通过官网下载安装:https://git-scm.com/downloads
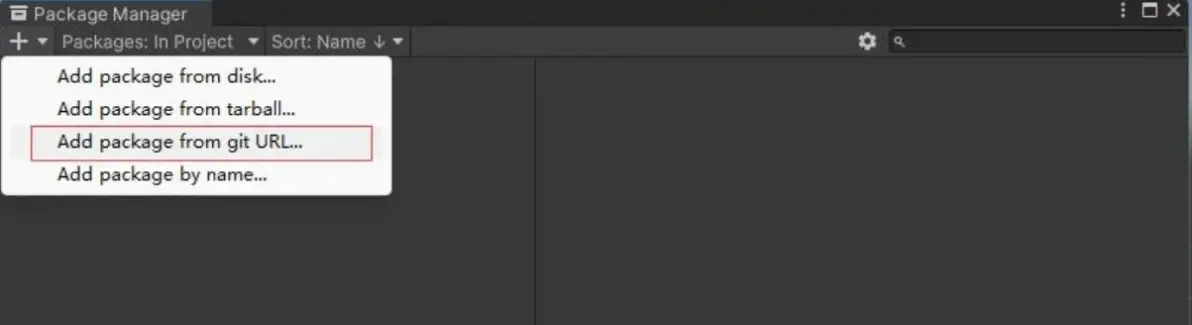
主菜单中点击打开包管理器。如下图所示点击,填入或。
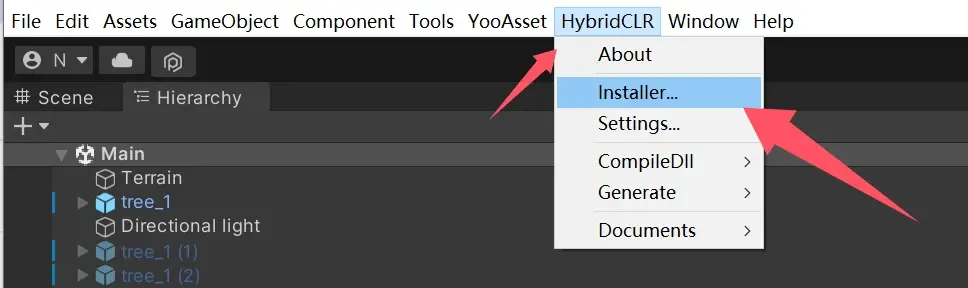
安装完成后点击HybridCLR下面的Installer...
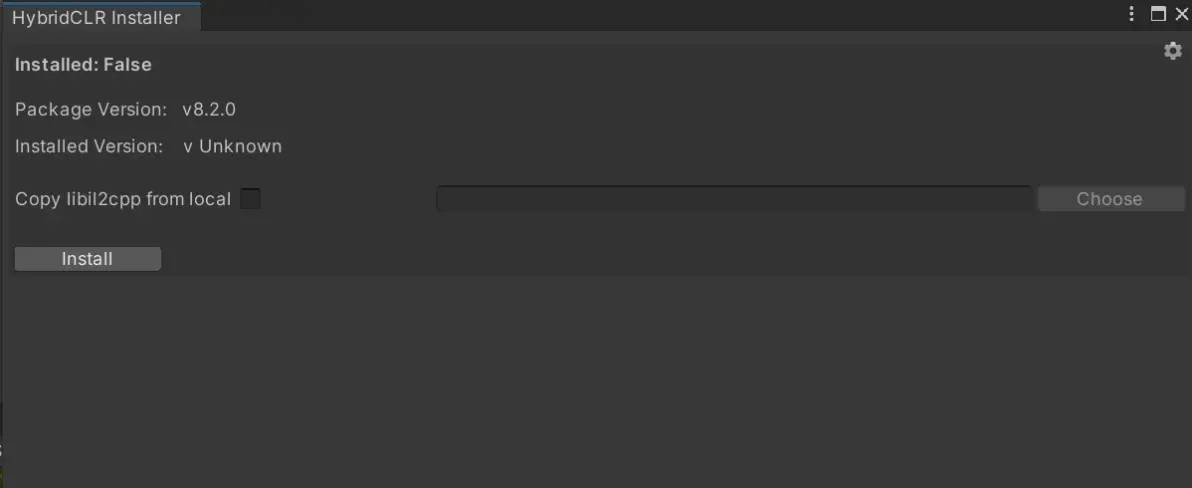
在弹出的界面中点击Install
这个是官方提示

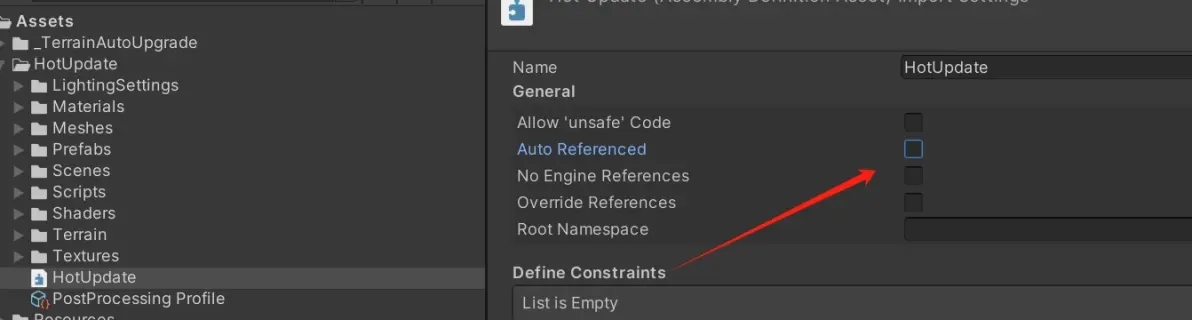
根据官方提示是否取消勾选
配置HybridCLR
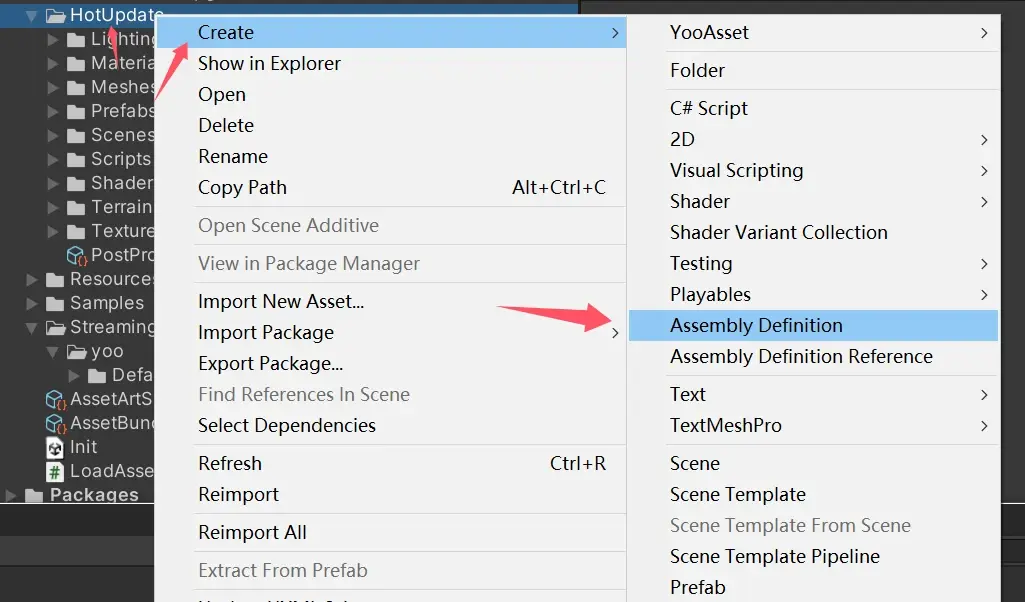
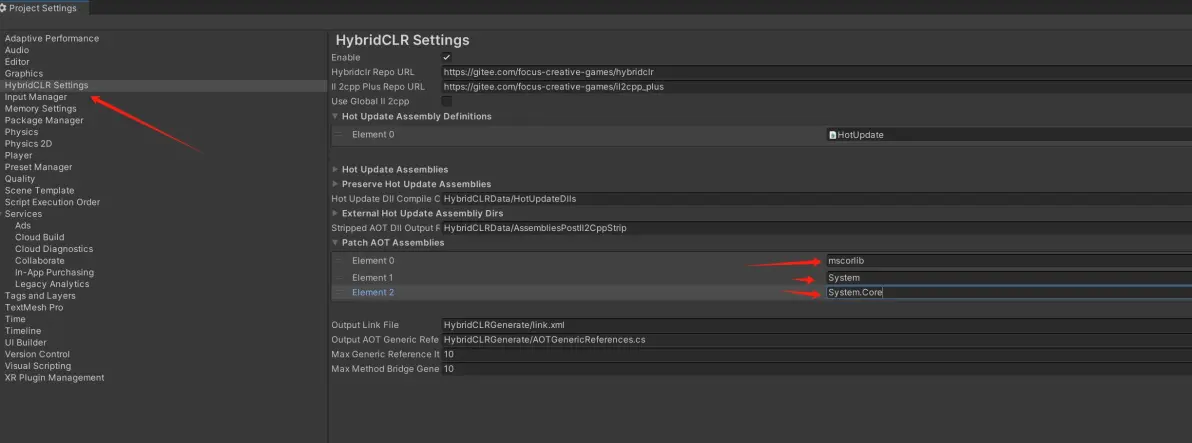
打开菜单 , 在配置项中添加程序集,如下图:
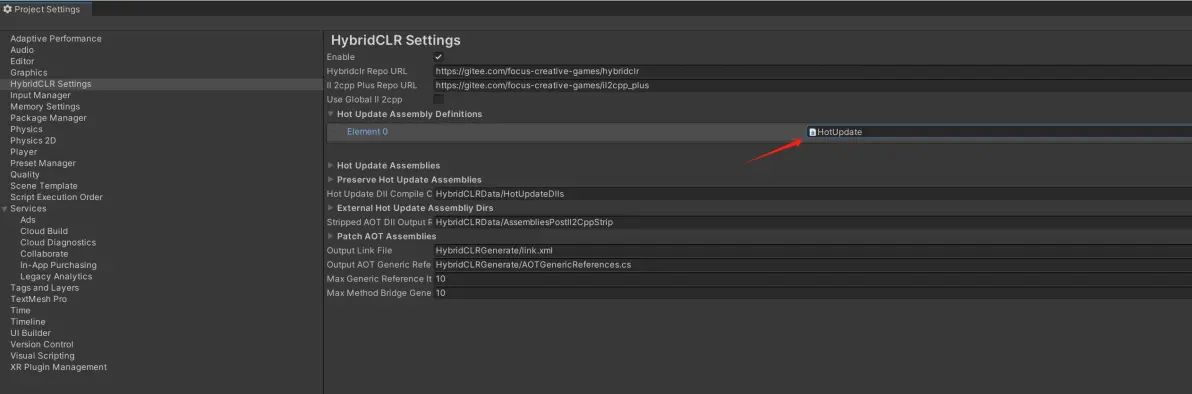
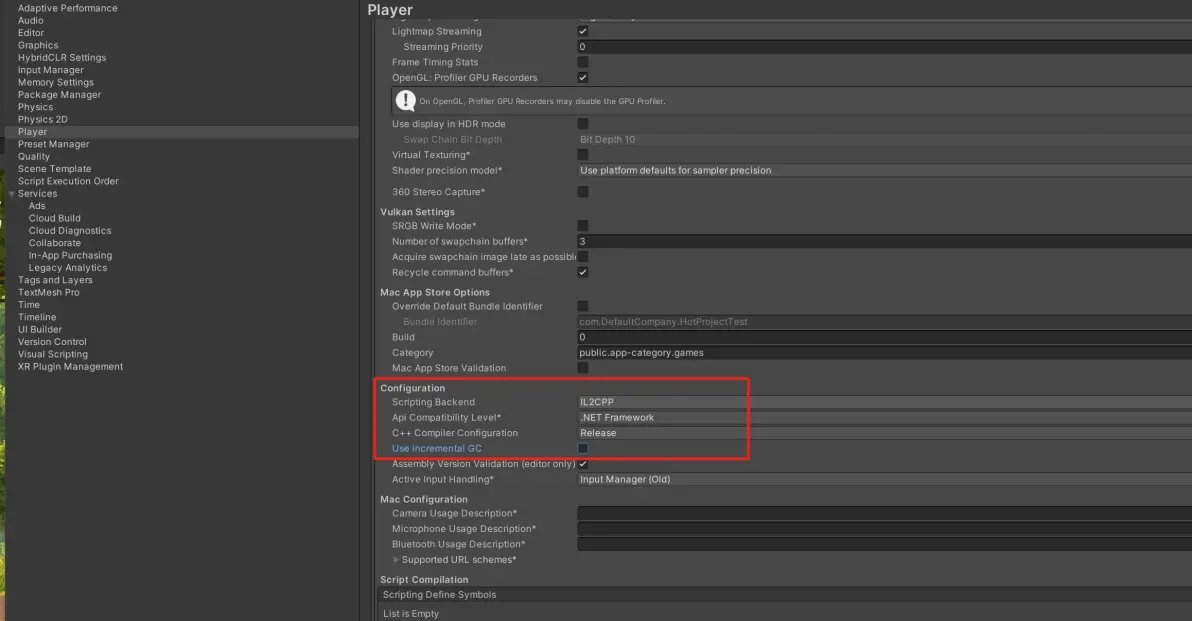
到这里就根据官方的教程配置完,官方的快速为了简化演示,没有通过http服务器下载HotUpdate.dll,而是直接将HotUpdate.dll放到StreamingAssets目录下。这里我直接下载了官方的Demo
Demo地址:https://gitee.com/focus-creative-games/hybridclr_trial
主要参考了Demo中的LoadDll脚本BuildAssetsCommand脚本
代码块
using HybridCLR.Editor.Commands;
using System;
using System.Collections.Generic;
using System.IO;
using System.Linq;
using System.Text;
using System.Threading.Tasks;
using UnityEditor;
using UnityEngine;

namespace HybridCLR.Editor {
    public static class BuildAssetsCommand {
		/// <summary>
		/// HybridCLR 构建缓存目录,用于临时存储构建过程中的文件。
		/// </summary>
		public static string HybridCLRBuildCacheDir => Application.dataPath + "/HybridCLRBuildCache";
		/// <summary>
		/// AssetBundle 输出目录,最终生成的 AB 包放在这里。
		/// </summary>
		public static string AssetBundleOutputDir => $"{HybridCLRBuildCacheDir}/AssetBundleOutput";
		/// <summary>
		/// AssetBundle 源数据临时目录,构建前的资源存放位置。
		/// </summary>
		public static string AssetBundleSourceDataTempDir => $"{HybridCLRBuildCacheDir}/AssetBundleSourceData";

		/// <summary>
		/// 根据目标平台返回对应的 AssetBundle 输出目录。
		/// </summary>
		public static string GetAssetBundleOutputDirByTarget(BuildTarget target) {
            return $"{AssetBundleOutputDir}/{target}";
        }

        public static string GetAssetBundleTempDirByTarget(BuildTarget target) {
            return $"{AssetBundleSourceDataTempDir}/{target}";
        }

        public static string ToRelativeAssetPath(string s) {
            return s.Substring(s.IndexOf("Assets/"));
        }

        /// <summary>
        /// 将HotFix.dll和HotUpdatePrefab.prefab打入common包.
        /// 将HotUpdateScene.unity打入scene包.
        /// </summary>
        /// <param name="tempDir"></param>
        /// <param name="outputDir"></param>
        /// <param name="target"></param>
        private static void BuildAssetBundles(string tempDir, string outputDir, BuildTarget target) {
            Directory.CreateDirectory(tempDir);
            Directory.CreateDirectory(outputDir);

            List<AssetBundleBuild> abs = new List<AssetBundleBuild>();

            {
                var prefabAssets = new List<string>();
                string testPrefab = $"{Application.dataPath}/Prefabs/Cube.prefab";
                prefabAssets.Add(testPrefab);
                AssetDatabase.Refresh(ImportAssetOptions.ForceUpdate);
                abs.Add(new AssetBundleBuild {
                    assetBundleName = "prefabs",
                    assetNames = prefabAssets.Select(s => ToRelativeAssetPath(s)).ToArray(),
                });
            }

            BuildPipeline.BuildAssetBundles(outputDir, abs.ToArray(), BuildAssetBundleOptions.None, target);
            AssetDatabase.Refresh(ImportAssetOptions.ForceUpdate);
        }

        public static void BuildAssetBundleByTarget(BuildTarget target) {
            BuildAssetBundles(GetAssetBundleTempDirByTarget(target), GetAssetBundleOutputDirByTarget(target), target);
        }

        [MenuItem("Build/BuildDll")]
        public static void BuildAndCopyABAOTHotUpdateDlls() {
            BuildTarget target = EditorUserBuildSettings.activeBuildTarget;
            //   BuildAssetBundleByTarget(target);
            CompileDllCommand.CompileDll(target);
            CopyABAOTHotUpdateDlls(target);
            AssetDatabase.Refresh();
        }

        public static void CopyABAOTHotUpdateDlls(BuildTarget target) {
            // CopyAssetBundlesToStreamingAssets(target);
            CopyAOTAssembliesToStreamingAssets();
            CopyHotUpdateAssembliesToStreamingAssets();
        }


        //[MenuItem("HybridCLR/Build/BuildAssetbundle")]
        public static void BuildSceneAssetBundleActiveBuildTargetExcludeAOT() {
            BuildAssetBundleByTarget(EditorUserBuildSettings.activeBuildTarget);
        }

        public static void CopyAOTAssembliesToStreamingAssets() {
            var target = EditorUserBuildSettings.activeBuildTarget;
            string aotAssembliesSrcDir = SettingsUtil.GetAssembliesPostIl2CppStripDir(target);
            string aotAssembliesDstDir = Application.dataPath + "/HotUpdate/Dlls";
            Debug.Log($"aotAssembliesDstDir::{aotAssembliesDstDir}");
            foreach (var dll in SettingsUtil.AOTAssemblyNames) {
                string srcDllPath = $"{aotAssembliesSrcDir}/{dll}.dll";
                if (!File.Exists(srcDllPath)) {
                    Debug.LogError($"ab中添加AOT补充元数据dll:{srcDllPath} 时发生错误,文件不存在。裁剪后的AOT dll在BuildPlayer时才能生成,因此需要你先构建一次游戏App后再打包。");
                    continue;
                }
                string dllBytesPath = $"{aotAssembliesDstDir}/{dll}.dll.bytes";
                File.Copy(srcDllPath, dllBytesPath, true);
                Debug.Log($"[CopyAOTAssembliesToStreamingAssets] copy AOT dll {srcDllPath} -> {dllBytesPath}");
            }
        }

        public static void CopyHotUpdateAssembliesToStreamingAssets() {
            var target = EditorUserBuildSettings.activeBuildTarget;

            string hotfixDllSrcDir = SettingsUtil.GetHotUpdateDllsOutputDirByTarget(target);

            string hotfixAssembliesDstDir = Application.dataPath + "/HotUpdate/Dlls";
            foreach (var dll in SettingsUtil.HotUpdateAssemblyFilesExcludePreserved) {
                string dllPath = $"{hotfixDllSrcDir}/{dll}";
                string dllBytesPath = $"{hotfixAssembliesDstDir}/{dll}.bytes";
                File.Copy(dllPath, dllBytesPath, true);
                Debug.Log($"[CopyHotUpdateAssembliesToStreamingAssets] copy hotfix dll {dllPath} -> {dllBytesPath}");
            }
        }

        public static void CopyAssetBundlesToStreamingAssets(BuildTarget target) {
            string streamingAssetPathDst = Application.streamingAssetsPath;
            Directory.CreateDirectory(streamingAssetPathDst);
            string outputDir = GetAssetBundleOutputDirByTarget(target);
            var abs = new string[] { "prefabs" };
            foreach (var ab in abs) {
                string srcAb = ToRelativeAssetPath($"{outputDir}/{ab}");
                string dstAb = ToRelativeAssetPath($"{streamingAssetPathDst}/{ab}");
                Debug.Log($"[CopyAssetBundlesToStreamingAssets] copy assetbundle {srcAb} -> {dstAb}");
                AssetDatabase.CopyAsset(srcAb, dstAb);
            }
        }
    }
}
这个脚本主要用于 构建 AssetBundle 资源包、拷贝 AOT 和热更新 DLL 到指定目录 ,以便在运行时加载。适用于热更新流程中资源与代码的打包处理。
新建Editor文件夹放入文件
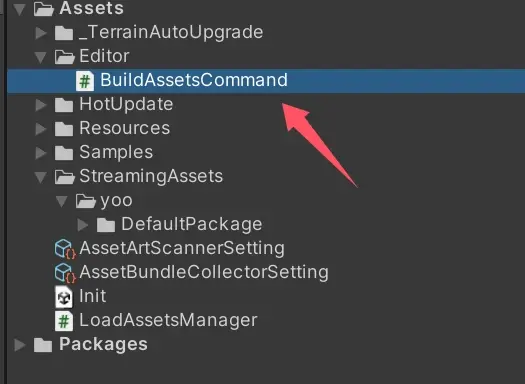
然后我们需要在HotUpdate文件中新建一个Dlls文件夹,并且使用YooAsset管理,这个是存放我们代码的文件夹
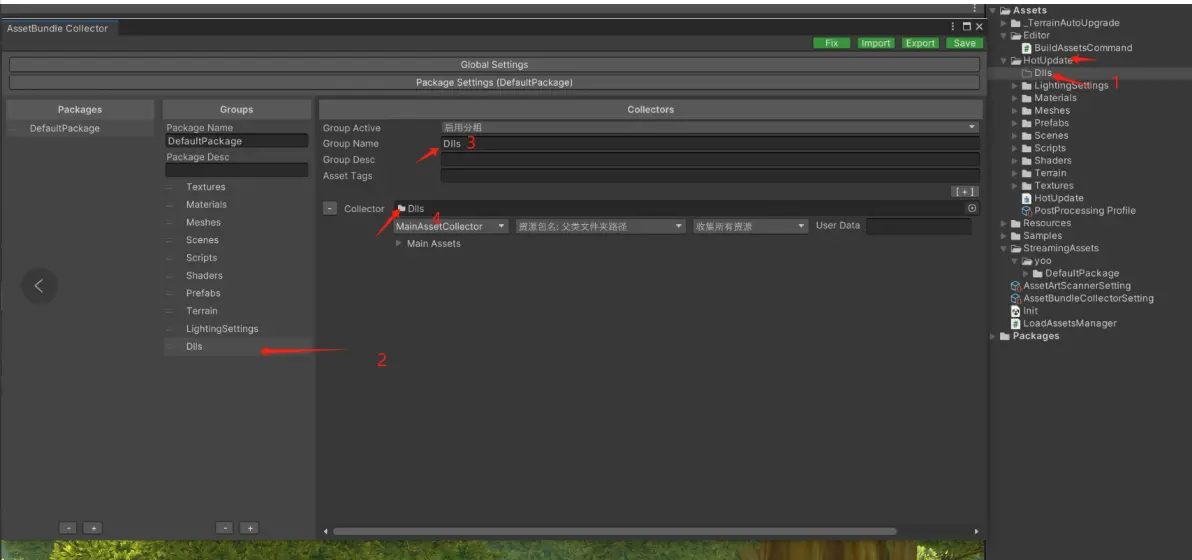
打开菜单 , 在Patch AOT Assemblies中添加buch补充元数据,如下图:
然后根据官方Demo中的LoadDll补充我们上一篇文章LoadAssetsManager脚本
以下代码就是加载代码的逻辑,增加代码之后我们只需要把执行EnterGame方法换成InitCode携程,在initCode方法中加载脚本成功后再进行EnterGame即可
代码块
//在LoadAssetsManager加入以下代码
//补充元数据dll的列表,Yooasset中不需要带后缀
	public static List<string> AOTMetaAssemblyNames { get; } = new List<string>()
	{
		"mscorlib.dll",
		"System.dll",
		"System.Core.dll",
        //"Assembly-CSharp.dll"
    };
	//获取资源二进制
	private static Dictionary<string, byte[]> s_assetDatas = new Dictionary<string, byte[]>();
	/// <summary>
	/// 初始化补充元数据dll
	/// </summary>
	/// <returns></returns>
	private IEnumerator InitCode()
	{

		var assets = new List<string> {
			   "HotUpdate.dll"
		}.Concat(AOTMetaAssemblyNames);

		foreach (var asset in assets)
		{
			var dllHandle = package.LoadAssetAsync<TextAsset>("Assets/HotUpdate/Dlls/" + asset);
			yield return dllHandle;
			TextAsset textAsset = dllHandle.AssetObject as TextAsset;
			s_assetDatas[asset] = textAsset.bytes;
			Debug.Log($"dll:{asset} size:{textAsset.bytes.Length}");
		}

		LoadMetadataForAOTAssemblies();
#if !UNITY_EDITOR
        // Editor环境下,HotUpdate.dll.bytes已经被自动加载,不需要加载,重复加载反而会出问题。
        Assembly.Load(s_assetDatas["HotUpdate.dll"] );
#endif

		yield return EnterGame();
	}
	private static void LoadMetadataForAOTAssemblies()
	{

		/// 注意,补充元数据是给AOT dll补充元数据,而不是给热更新dll补充元数据。
		/// 热更新dll不缺元数据,不需要补充,如果调用LoadMetadataForAOTAssembly会返回错误
		HomologousImageMode mode = HomologousImageMode.SuperSet;
		foreach (var aotDllName in AOTMetaAssemblyNames)
		{
			byte[] dllBytes = s_assetDatas[aotDllName];
			// 加载assembly对应的dll,会自动为它hook。一旦aot泛型函数的native函数不存在,用解释器版本代码
			LoadImageErrorCode err = RuntimeApi.LoadMetadataForAOTAssembly(dllBytes, mode);
			Debug.Log($"LoadMetadataForAOTAssembly:{aotDllName}. mode:{mode} ret:{err}");
		}
	}
引入命名空间
代码块
using System.Reflection;
代码添加完毕后我们点击HybridCLR-Generater-All
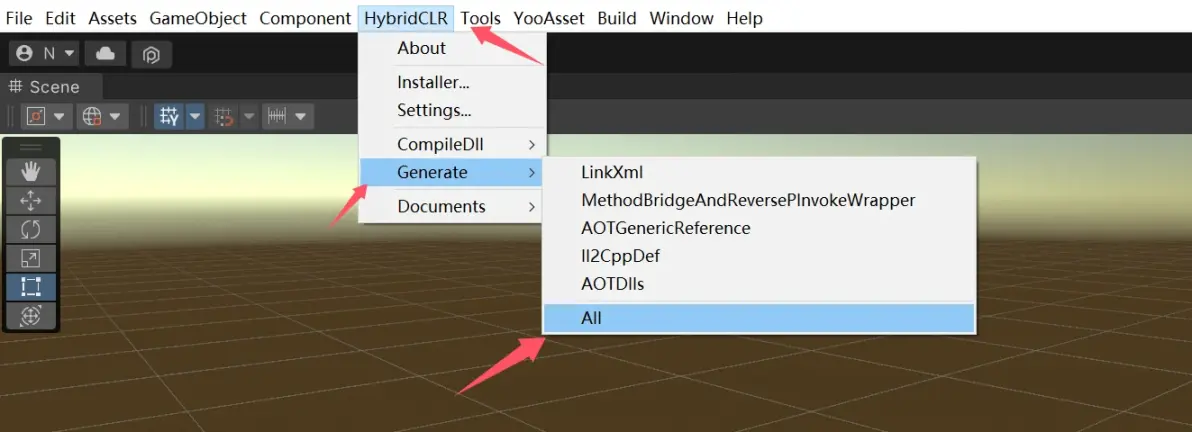
完成后提示
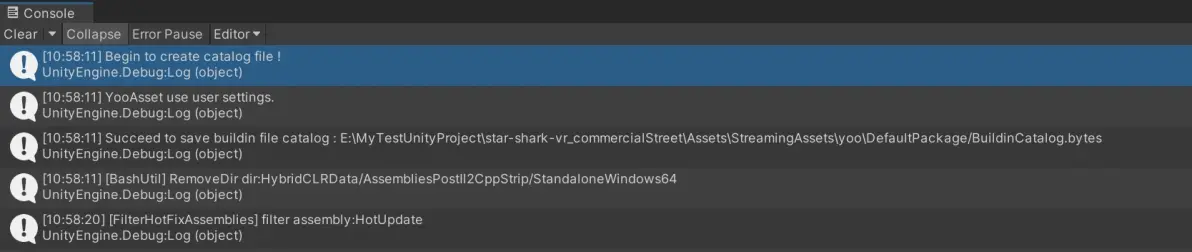
提示完成后先打出exe包,之后再次点击Build-BuildDll,如果不打包可能会提示让先打包一次
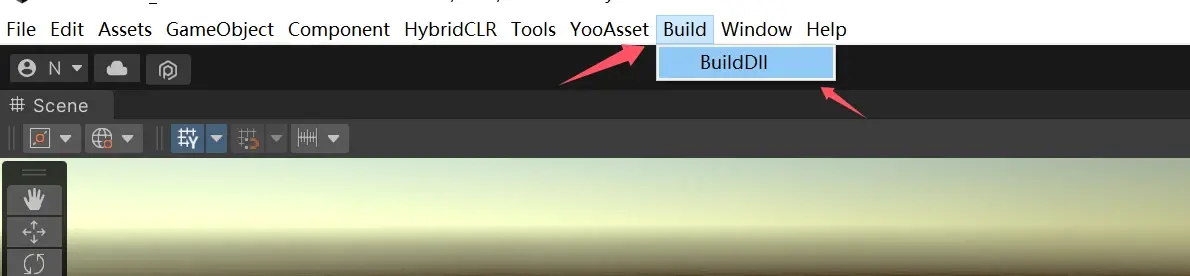
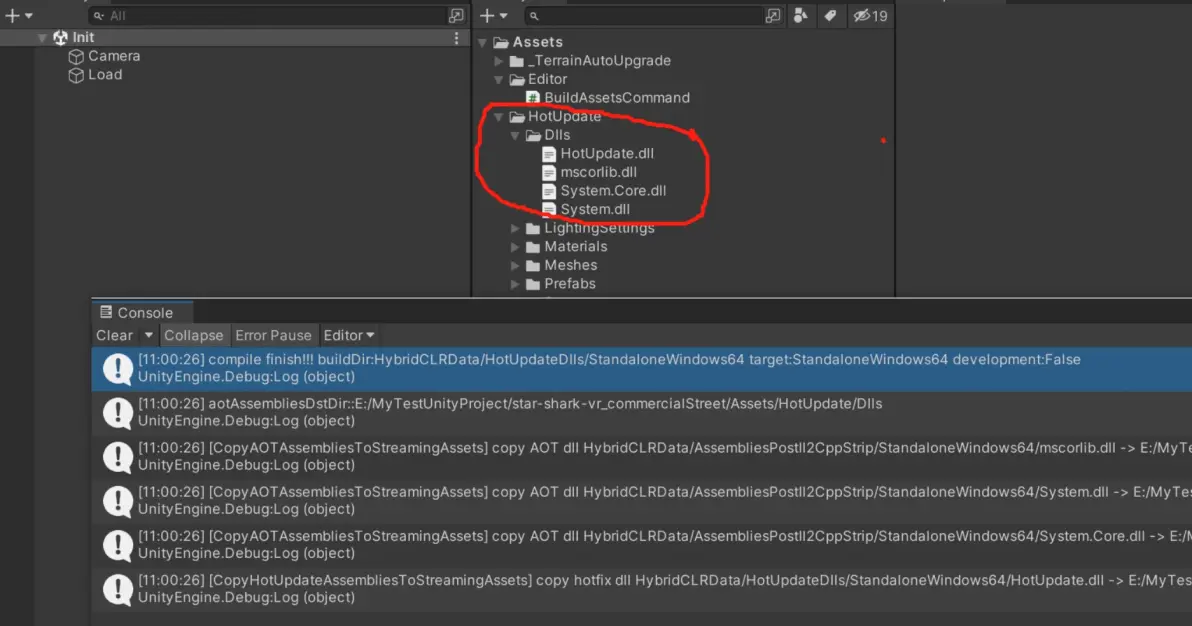
完成后可以看到对应的提示
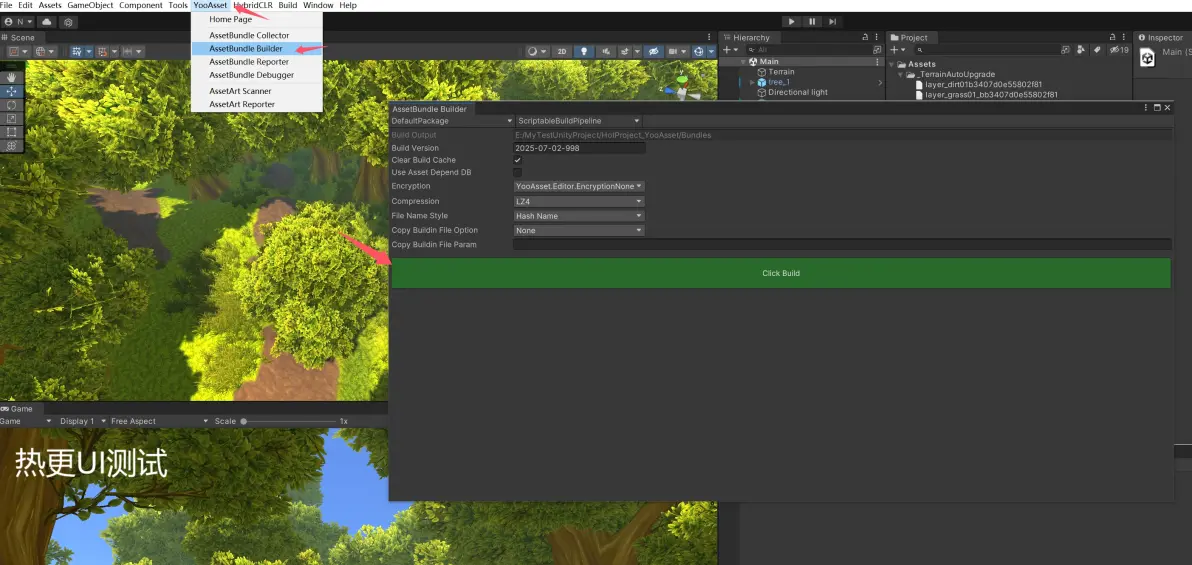
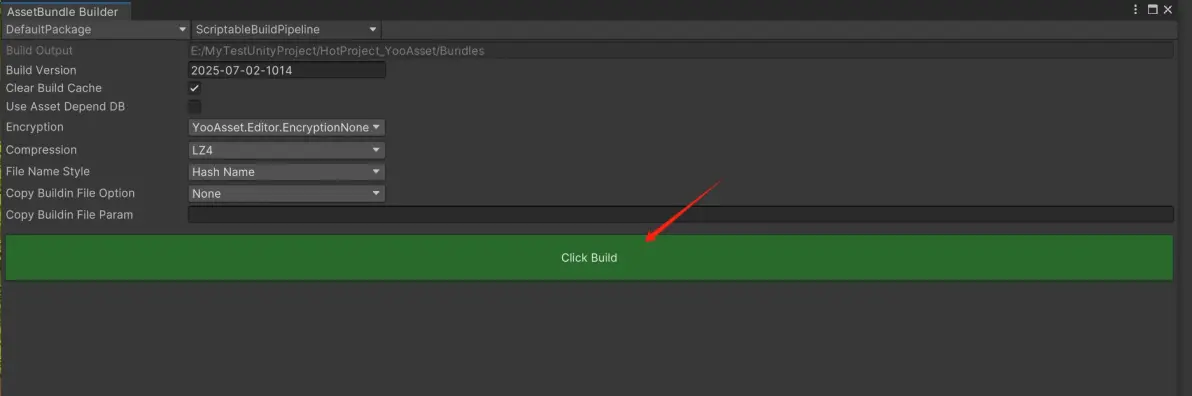
使用YooAsset再次打包
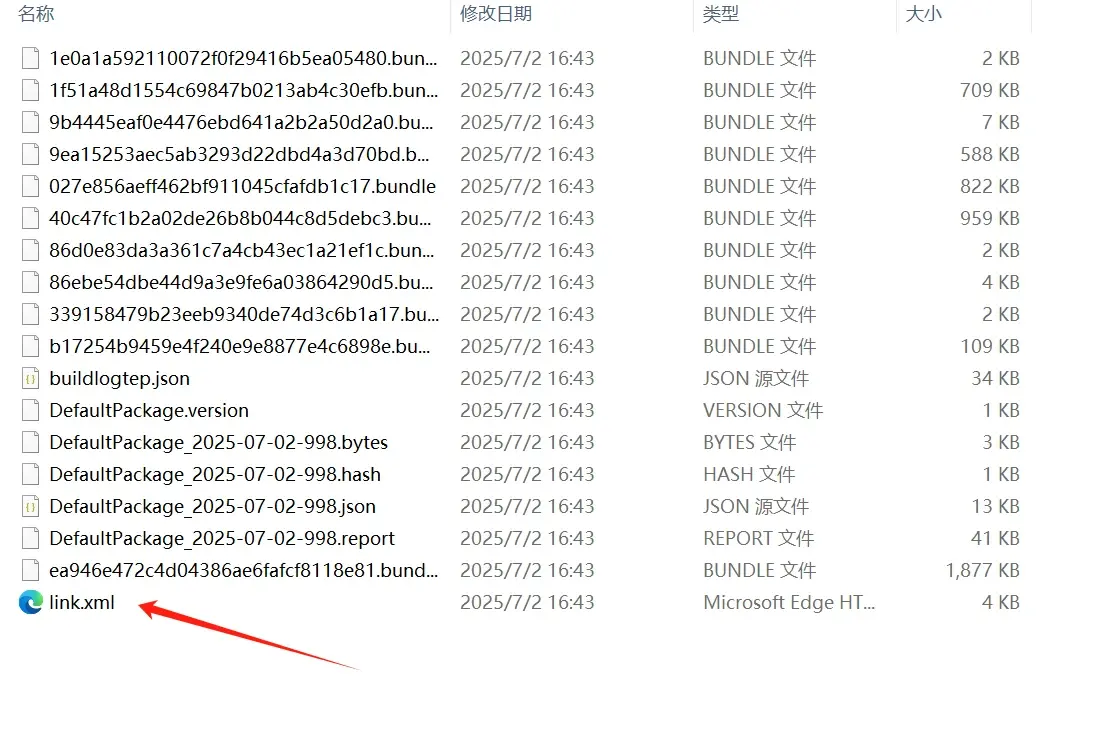
打包完成之后我们需要把link.xml放到我们项目的Assets下面
然后我们把AB资源放到我们的资源服务器上,重新打包一下exe,运行后可以看到我们当前的场景,但是现在还没有添加代码
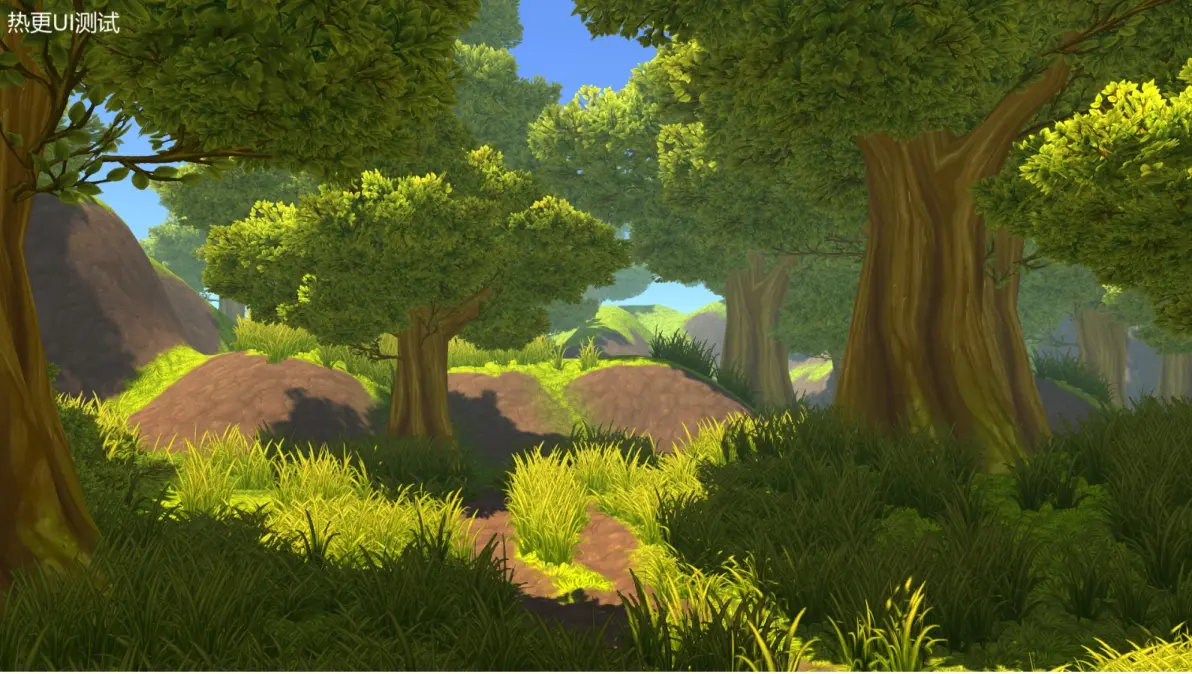
现在我们来添加代码,新建HotTest,并且添加代码
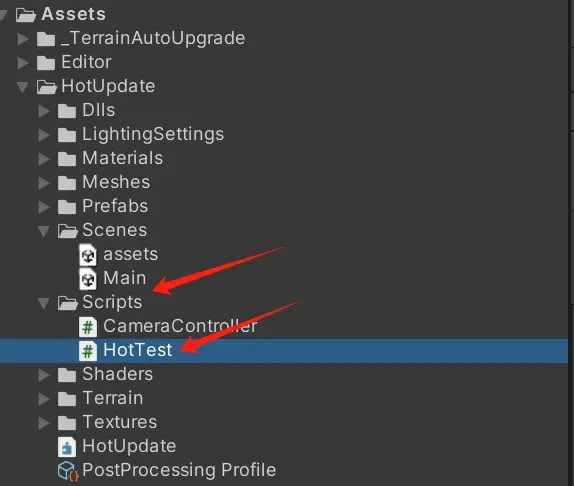
代码块
using System.Collections;
using System.Collections.Generic;
using UnityEngine;
using UnityEngine.UI;

public class HotTest : MonoBehaviour
{
    private Text _HotText;
    void Start()
    {
        _HotText = GameObject.Find("HotText").GetComponent<Text>();
        _HotText.text = "热更脚本测试";

	}

    // Update is called once per frame
    void Update()
    {

    }
}
修改text组件名字方便我们查找
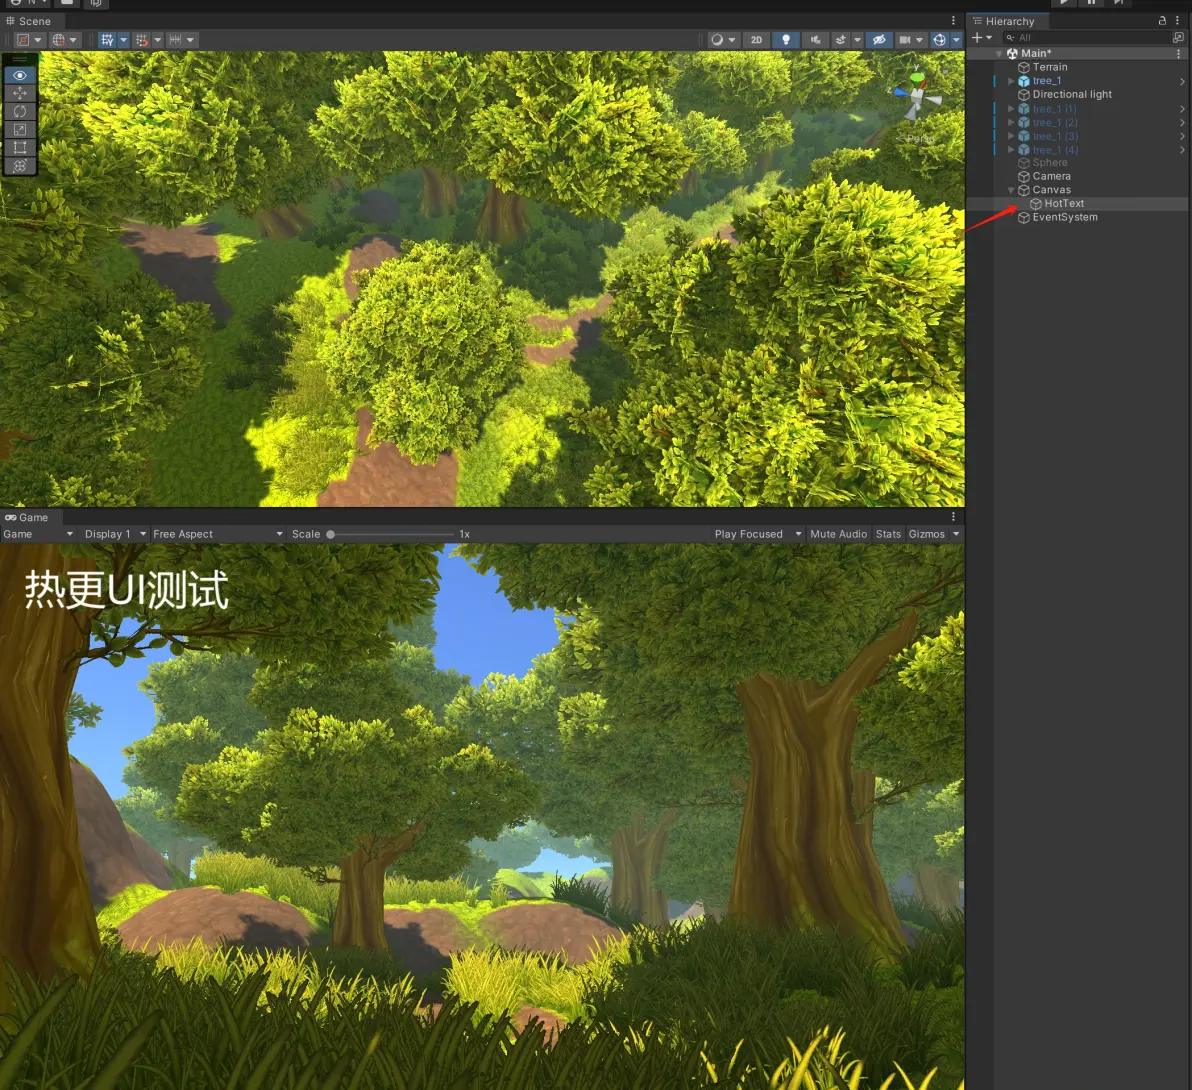
挂载脚本,这样我们的代码就写好了
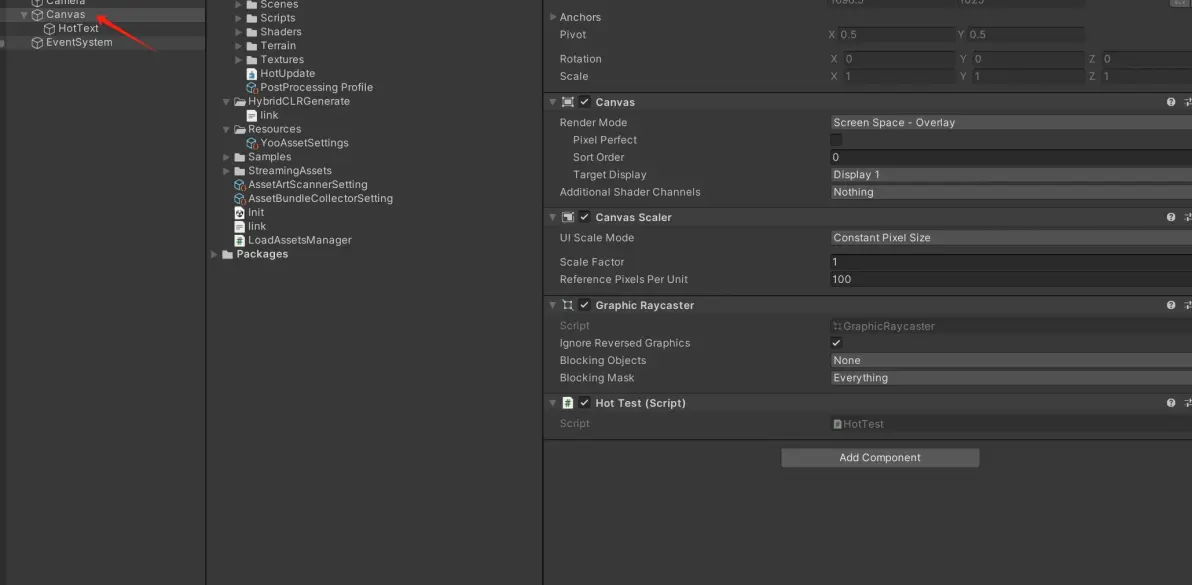
因为更新的代码,我们需要buildDll

然后重新打包资源,打包完成后将AB包放到资源服务器
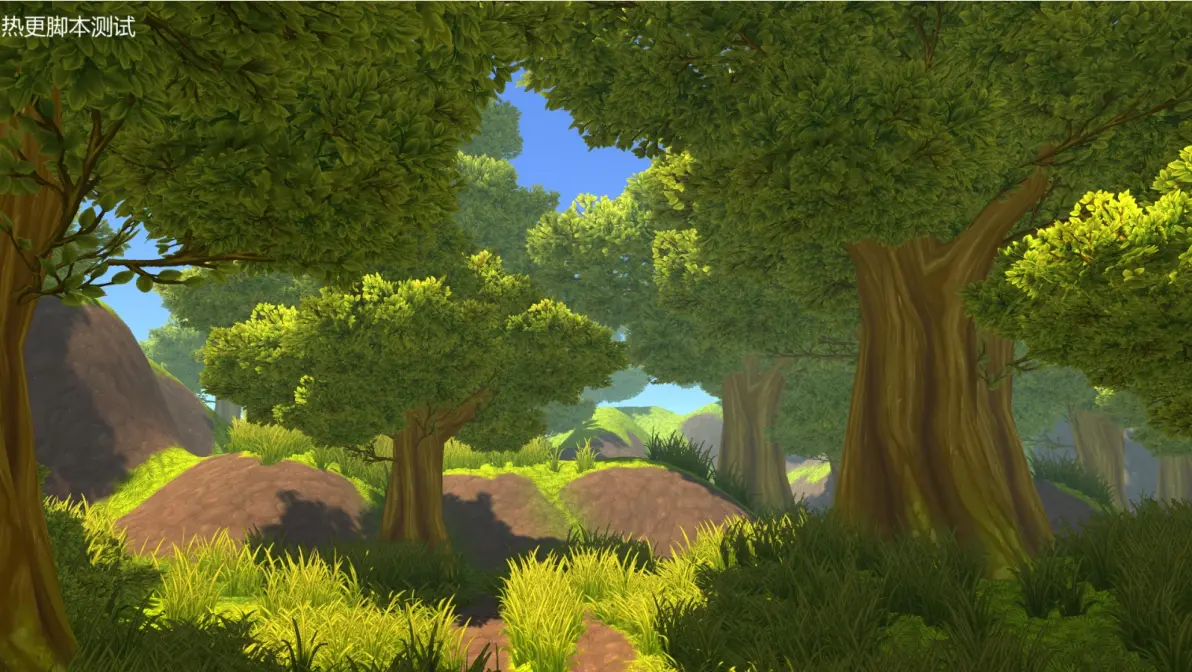
运行之前打包的exe,可以看到热更的脚本起效果了
免责声明:本文系网络转载或改编,未找到原创作者,版权归原作者所有。如涉及版权,请联系删
 技术文档
 推荐好文



 155-2731-8020