


软件

产品


pytorch的aarch包
https://torch.kmtea.eu/whl/stable.html
jetson平台的pytorch版本
https://forums.developer.nvidia.com/t/pytorch-for-jetson-version-1-10-now-available/72048
注意这里的 v0.9.0 和pytorch版本1.8对应
sudo apt-get install libjpeg-dev zlib1g-dev libpython3-dev libavcodec-dev libavformat-dev libswscale-dev
# 注意这里的 v0.9.0 和pytorch版本1.8对应
git clone --branch v0.9.0 https://github.com/pytorch/vision torchvision
cd torchvision
export BUILD_VERSION=0.9.0
# 注意 pillow<7
pip install pillow==6.2.2
python3 setup.py install --user
出现错误
OSError: libmpi_cxx.so.20: cannot open shared object file
解决
apt-get install libopenblas-base libopenmpi-dev
在Jetson Xavier NX上安装torchvision编译报错:fatal error: libavcodec/avcodec.h: No such file or directory
https://blog.csdn.net/weixin_41010198/article/details/109862917
deepstream6.1下载相应版本的deepstream
https://developer.nvidia.com/embedded/deepstream-on-jetson-downloads-archived
jetson平台安装deepstream5.1,参考:Install Jetson SDK components
https://docs.nvidia.com/metropolis/deepstream/5.1/dev-guide/text/DS_Quickstart.html#install-jetson-sdk-components
x86平台安装deepstream6.1,参考:dGPU Setup for Ubuntu
https://docs.nvidia.com/metropolis/deepstream/6.1/dev-guide/text/DS_Quickstart.html#id1
yolov5s_v5.0.pt
https://github.com/ultralytics/yolov5/releases/download/v5.0/yolov5s.pt
yolov5s_v6.1.pt
https://github.com/ultralytics/yolov5/releases/download/v6.1/yolov5s.pt
训练自己的模型略
DeepStream-Yolo 下载到 deepstream/source 目录下git clone https://github.com/marcoslucianops/DeepStream-Yolo.git
git clone https://github.com/ultralytics/yolov5.git
# 切换到对应分支,这里以最新版v6.1分支为例
git checkout v6.1
把 DeepStream-Yolo/utils 中的 gen_wts_yoloV5.py 文件复制到 yolov5 项目 根目录 ;并且把刚才下载好的 yolov5s_v6.1.pt yolov5s_v6.1.pt 或者自己训练的模型,复制进 yolov5 项目根目录,执行以下命令会生成对应的 .cfg 文件和 .wts 文件
python gen_wts_yoloV5.py -w yolov5s_v6.1.pt
把生成的yolov5s_v6.1.wts复制到 DeepStream-Yolo 项目根目录
执行命令生成 .so 文件
CUDA_VER=11.1 make -C nvdsinfer_custom_impl_Yolo
config_infer_primary_yoloV5.txt[property]
...
custom-network-config=yolov5s.cfg
model-file=yolov5s.wts
...
...
[primary-gie]
...
config-file=config_infer_primary_yoloV5.txt
修改 config_infer_primary_yoloV5.txt
[property]
gpu-id=0
net-scale-factor=0.0039215697906911373
##0=RGB, 1=BGR
model-color-format=0
custom-network-config=yolov5sv6_fire.cfg
model-file=yolov5sv6_fire.wts
model-engine-file=model_b1_gpu0_fp32.engine
#int8-calib-file=calib.table
labelfile-path=labels.txt
batch-size=1
##0=FP32, 1=INT8, 2=FP16 mode
network-mode=0
##检测类别数
num-detected-classes=2
interval=0
gie-unique-id=1
process-mode=1
network-type=0
##1=DBSCAN, 2=NMS, 3= DBSCAN+NMS Hybrid, 4 = None(No clustering)
cluster-mode=4
maintain-aspect-ratio=1
parse-bbox-func-name=NvDsInferParseYolo
custom-lib-path=nvdsinfer_custom_impl_Yolo/libnvdsinfer_custom_impl_Yolo.so
engine-create-func-name=NvDsInferYoloCudaEngineGet

[class-attrs-all]
##几项阈值
pre-cluster-threshold=0
配置相应的 labels 文件
deepstream-app -c deepstream_app_config.txt
运行成功的效果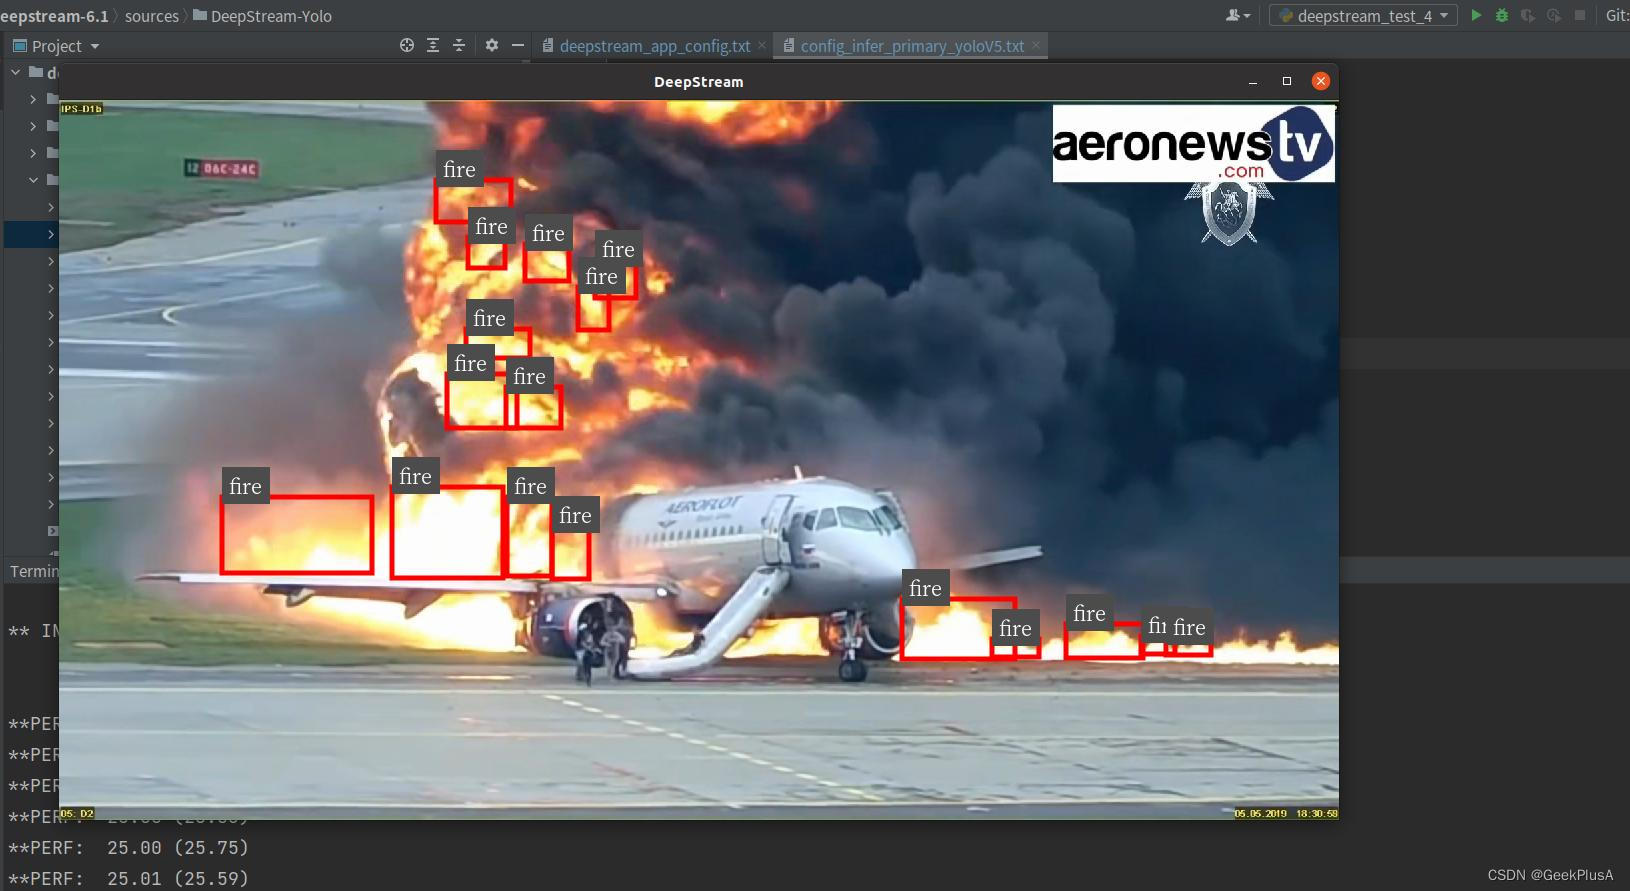
cankao:Jetson Xavier NX使用yolov5对比GPU模型下的pt、onnx、engine 、 DeepStream 加速性能
https://blog.csdn.net/sxj731533730/article/details/121305007
NX上使用deepstream5.0框架运行yolov5检测视频
一、NX上运行yolov5步骤:

1.基本命令
#set python Version
#常用软件
#apt-get如何查看已安装的软件包
dpkg -l或dpkg --get-selections |less
#pip3 如何查看已安装的软件包
 pip3 list

#驱动版本
head -n 1 /etc/nv_tegra_release
#内核版本
uname -r
#操作系统
lsb_release -i -r
#CUDA版本
nvcc -V
#cuDNN版本
dpkg -l libcudnn8
#opencv版本
dpkg -l libopencv / pkg-config opencv --modversion
#Tensorrt版本
dpkg -l tensorrt


2.基本配置
#添加CUDA环境变量

#cuda
sudo vi ~/.bashrc
#添加
export PATH=/usr/local/cuda/bin:$PATH
export LD_LIBRARY_PATH=/usr/local/cuda/lib64:$LD_LIBRARY_PATH
export CUDA_HOME=$CUDA_HOME:/usr/local/cuda
#保存并刷新
source ~/.bashrc

3换源

#备份原有软件源
sudo cp /etc/apt/sources.list /etc/apt/sources.list.bak
sudo vi /etc/apt/sources.list
#清华源
deb http://mirrors.tuna.tsinghua.edu.cn/ubuntu-ports/ bionic main multiverse restricted universe
deb http://mirrors.tuna.tsinghua.edu.cn/ubuntu-ports/ bionic-security main multiverse restricted universe
deb http://mirrors.tuna.tsinghua.edu.cn/ubuntu-ports/ bionic-updates main multiverse restricted universe
deb http://mirrors.tuna.tsinghua.edu.cn/ubuntu-ports/ bionic-backports main multiverse restricted universe
deb-src http://mirrors.tuna.tsinghua.edu.cn/ubuntu-ports/ bionic main multiverse restricted universe
deb-src http://mirrors.tuna.tsinghua.edu.cn/ubuntu-ports/ bionic-security main multiverse restricted universe
deb-src http://mirrors.tuna.tsinghua.edu.cn/ubuntu-ports/ bionic-updates main multiverse restricted universe
deb-src http://mirrors.tuna.tsinghua.edu.cn/ubuntu-ports/ bionic-backports main multiverse restricted universe
#更新没问题
sudo apt-get update


4 pip/python3

#查看python版本是否最新
sudo apt-get install python3-pip python3-dev
python3 -m pip install --upgrade pip
Jetson-stats

#查看系统使用情况,类似top
sudo -H pip3 install jetson-stats
#使用
jtop
5配置python环境

sudo pip3 install -U pip testresources setuptools
sudo apt-get install libopenblas-base libopenmpi-dev
sudo pip3 install mpi4py
sudo pip3 install Cython
6安装pytorchy

sudo pip3 install torch-1.6.0-cp36-cp36m-linux_aarch64.whl

7. torchvision安装
git clone --branch v0.7.0 https://github.com/pytorch/vision torchvision
cd torchvision
export BUILD_VERSION=0.7.0
sudo python3 setup.py install

8 配置YOLOv5开源代码

    (1) 代码仓库git clone https://github.com/ultralytics/yolov5 (慎重:下载权重文件,代码和权重我已经下载好了,在weights下)
***此处有一个坑:yolov5更新频繁,兼容torch1.6和torchvision0.7的是5-3.0版本,如果现在最新的yolov5会出现torchvision0.7版本不匹配等问题。
    (2) 安装依赖(torch和torchvision上面已经安装完成)
cd yolov5
sudo pip3 install  -r requirements.txt
***此处有一个坑:
对于PyYAML的更新问题:如果卸载不掉可以使用命令:直接安装新的版本
pip3 install PyYAML -i https://mirrors.aliyun.com/pypi/simple/ --ignore-installed
***此处还有一个更大的坑:
安装上边的依赖有可能会更显numpy到1.19.5版本,该版本再arm64的pyhon3.6下会出现:Illegal Instruction。解决方法是卸载后,重装1.19.3
    (3) 测试是否成功
sudo python3 detect.py --source inference/images/ --weights weights/yolov5s.pt --conf-thres 0.7
成功会在inference/output下生产检测结果
    (4) 使用自己的数据集

    二、 NX上使用tensorrt加速yolov5步骤:
# 参考网址:
# https://blog.csdn.net/m0_37426155/article/details/108254714
#https://github.com/wang-xinyu/tensorrtx/tree/master/yolov5
# 1.下载大牛的yolov5转换tensorrt的开源代码。
git clone  https://github.com/wang-xinyu/tensorrtx
#2.针对我的yolov5-2.0下载对应分支。
cd tensorrtx/yolov5
git checkout 5cfa444 #
# 3.先把 yolov5s.pt转换成yolov5s.wts
cd yolov5
cp ../tensorrtx/yolov5/gen_wts.py .
#ensure the file name is yolov5s.pt and yolov5s.wts in gen_wts.py
python gen_wts.py
#a file 'yolov5s.wts' will be generated.

4.最后把yolov5s.wts 转化成yolov5.engine
mv yolov5s.wts ../tensorrtx/yolov5/
cd ../tensorrtx/yolov5
#ensure the macro NET in yolov5.cpp is s
mkdir build
cd build
cmake ..
make
sudo ./yolov5 -s             // serialize model to plan file i.e. 'yolov5s.engine'
sudo ./yolov5 -d  ../samples   // deserialize plan file and run inference, the images in samples will be processed.


三、NX上使用deepstream集成yolov5步骤:
源码编译安装,亲测通过
# 提前在jetson nx上编译安装opencv opencv-contrib-python 参考..
git clone https://github.com/PaddlePaddle/PaddleOCR.git
# opencv-contrib-python==4.4.0.46 版本
pip install -r requirements.txt
python setup install
参考:Jetson Xavier NX部署PaddleOCR
https://www.tqwba.com/x_d/jishu/341922.html
h5pywget https://github.com/yihuajack/h5py-aarch64/raw/main/h5py-3.1.0-cp36-cp36m-linux_aarch64.whl
2. 安装onnx
sudo apt-get install protobuf-compiler libprotoc-dev
pip3 install onnx -i https://pypi.doubanio.com/simple/
如果安装失败,尝试下面的命令
sudo apt-get install protobuf-compiler libprotobuf-dev
pip install pybind11[global]
pip install onnx==1.9.0
sentencepiecesudo apt-get install cmake build-essential pkg-config libgoogle-perftools-dev
git clone https://github.com/google/sentencepiece
cd sentencepiece/
mkdir build
cd build/
cmake ..
make -j4
sudo make install
sudo ldconfig -v
ncclgit clone https://github.com/NVIDIA/nccl.git
cd nccl/
make -j4
sudo make install
# 卸载
sudo apt remove cmake
sudo apt purge --auto-remove cmake
# 安装
sudo pip install cmake
sudo cp /usr/local/bin/cmake /usr/bin/
下载jetson平台的paddlepaddle_gpu,
https://paddle-inference.readthedocs.io/en/latest/user_guides/download_lib.html
paddlepaddle_gpu-2.2.1-cp36-cp36m-linux_aarch64.whl
https://paddle-inference-lib.bj.bcebos.com/2.2.1/python/Jetson/jetpack4.4_gcc7.5/all/paddlepaddle_gpu-2.2.1-cp36-cp36m-linux_aarch64.whl
pip install paddlepaddle_gpu-2.2.1-cp36-cp36m-linux_aarch64.whl
sudo nvpmodel -m 2 && sudo jetson_clocks
git clone https://github.com/NVIDIA/nccl.git
cd nccl/
make -j6
sudo make install
git clone https://github.com/paddlepaddle/paddle
cd Paddle
# 切换到对应分支,这里以最新版v6.1分支为例
git checkout v2.4.0-rc0
mkdir build
cd build
pip install cython wheel numpy
cmake .. \
  -DWITH_CONTRIB=OFF \
  -DWITH_MKL=OFF  \			#编译支持MKL的预测库
  -DWITH_MKLDNN=OFF \			#编译支持MKLDNN的预测库
  -DWITH_AVX=OFF \			#是否编译含有AVX指令集的飞桨二进制文件
  -DWITH_GPU=ON \			#编译支持GPU的预测库
  -DWITH_TESTING=OFF \			#是否开启单元测试
  -DCMAKE_BUILD_TYPE=Release \		#编译方式,仅使用预测库设为Release即可
  -DON_INFER=ON \			#预测时使用,必须设为ON
  -DWITH_PYTHON=ON  \			#是否内嵌PYTHON解释器并编译Wheel安装包
  -DPY_VERSION=3.6  \			#指定Python版本
  -DWITH_XBYAK=OFF  \			#使用XBYAK编译,在jetson硬件上编译需要设置为OFF
  -DWITH_NV_JETSON=ON			#在NV Jetson硬件上编译时需要设为ON


make -j6
最后编译生成的预测库位于build文件夹下:
参考Jetson AGX Xavier配置cuDNN流程
https://blog.csdn.net/weixin_42622181/article/details/107662855
sudo nvpmodel -m 1
sudo nvpmodel -m 2
设置完后,都要运行
sudo /usr/bin/jetson_clocks
参考:Jetson 系列——jetson xavier nx和nano设置工作模式设置功率
https://blog.csdn.net/weixin_42264234/article/details/120276627
参考:NVIDIA Jetson Xavier NX-设置开机启动脚本
https://isning.top/index.php/ning/672.html
sudo vim /etc/systemd/system/rc-local.service
添加以下代码
[Unit]
Description=Python
After=network.service

[Service]
Type=simple
User=nx
Group=nx
WorkingDirectory=/home/nx/Ai_project/Pet
ExecStart=/usr/bin/python3 /home/nx/Ai_project/Pet/Fetch/detection.py
PrivateTmp=true
Restart=on-failure

[Install]
WantedBy=multi-user.target
配置文件解析(主要分成三个部分):
[Unit] 段: 启动顺序与依赖关系
[Service] 段: 启动行为,如何启动,启动类型
[Install] 段: 定义如何安装这个配置文件,即怎样做到开机启动
sudo chmod +x /etc/systemd/system/rc-local.service
创建一个超链接,在系统启动服务程序中
sudo systemctl enable rc-local
sudo systemctl daemon-reload
开启/暂停,服务命令
sudo systemctl start  rc-local.service
sudo systemctl stop   rc-local.service
查看服务进程状态
sudo systemctl status rc-local.service
重启命令
sudo init 6
sudo reboot -h now
参考:jetson 设置程序开机自启动
https://blog.csdn.net/weixin_48136049/article/details/110880101
nvidia@nvidia-desktop:~$ cd .config/
# 若此目录下不存在 autostart 文件夹,则创建
nvidia@nvidia-desktop:~/.config$ mkdir autostart
nvidia@nvidia-desktop:~/.config$ cd autostart/
[Desktop Entry]
Type=Application
Exec=/home/nvidia/Desktop/demo.sh
Hidden=false
NoDisplay=false
X-GNOME-Autostart-enabled=true
Name[en_US]=demo
Name=demo
Comment[en_US]=开机启动demo程序
Comment=开机启动demo程序
Exec 的自启动路径应为绝对路径。
参考:Jetson Nano设置开机启动程序
https://blog.csdn.net/Lstar_/article/details/120993385
每次打开终端都会执行程序,程序会多次执行
sudo apt-get update
sudo visudo
icir ALL=(ALL) NOPASSWhttps://www.gofarlic.comALL
首先 添加dns服务器
vi /etc/resolv.conf
#在文件中添加如下两行:

nameserver 8.8.8.8
nameserver 8.8.4.4
更新系统时间
# 首先安装 ntpdate 命令:
sudo apt-get install -y ntpdate
# 接着执行如下命令开始同步:
sudo ntpdate 0.asia.pool.ntp.org
# 最后执行如下命令将系统时间同步到硬件,防止系统重启后时间被还原。
sudo hwclock --systohc
export DISPLAY=:0
xhost +
xhost + 192.168.70.234
sudo apt-get update
#安装桌面软件
sudo apt-get install ubuntu-desktop
#重启
reboot
dpkg -l | grep TensorRT
sudo apt-get update
sudo apt-get install gstreamer1.0-tools gstreamer1.0-alsa gstreamer1.0-plugins-base gstreamer1.0-plugins-good gstreamer1.0-plugins-bad gstreamer1.0-plugins-ugly gstreamer1.0-libav
sudo apt-get install libgstreamer1.0-dev libgstreamer-plugins-base1.0-dev libgstreamer-plugins-good1.0-dev libgstreamer-plugins-bad1.0-dev

sudo apt-get install libjson-glib-1.0-0 libjson-glib-dev
Illegal instruction (core dumped)# 临时修改
export OPENBLAS_CORETYPE=ARMV8
# 永久修改
将“export OPENBLAS_CORETYPE=ARMV8”加入到“~/.bashrc”中
error: libhdf5.so: cannot open shared object file: No such file or directory
sudo apt install libhdf5-dev
python -m pip install psutil --find-links=https://ddelange.github.io/psutil/
sudo apt-cache show nvidia-jetpack


免责声明:本文系网络转载或改编,未找到原创作者,版权归原作者所有。如涉及版权,请联系删
 技术文档
技术文档
 推荐好文
推荐好文


 155-2731-8020


