


软件

产品


过去一年里,我反思了自己其实没写多少东西,可能没有产出什么对大家有用的东西,还时不时的消失一下,各位给我的消息我也没能及时反馈,问卷收集的问题也越来越多,但是你们还在,感谢你们对我一直不离不弃的支持和信任,我深知我的水平和能力有限,无法为大家解答所有问题,在这里给大家说句抱歉,能帮得上的我一定帮,我会尽我自己最大的努力。
故不积跬步无以至千里,不积小流无以成江海,这是我下决心和坚持的事,我会坚持做好,现在看来,我干的算是非常粗糙,希望能在各位的监督下成长。p.s. 大家的赞赏和悄悄话我也收到了,特别感谢大家的认可,感谢大家。新的一年里,在这里衷心祝愿大家虎年大吉,万事顺利,开心快乐每一天。
上次说了关于骨料的凸性判断,搭建了一个小工具,今天就讲一下如何应用这个工具。主要有两大块内容,1)一部分是随机顶点的生成,2)另一部分是骨料干涉的判断。因为有小伙伴反应说上次那个有干涉的现象出现,所以我这次着重讲解一下干涉的判断的原理部分,这样如果我出错了,你们自己也可以修改,骨料上的那部分由于是半成品,所以我就不改那个了,大家关注这次的就好。
直入主题,上次的内容在这: 多面体的凸性判定,接着讲。那次的多面体顶点的随机性比较大,所以会有个问题是,多面体的形状的随机性也很大,我试着同一个参数,比如15个顶点,随机三次的结果如下:
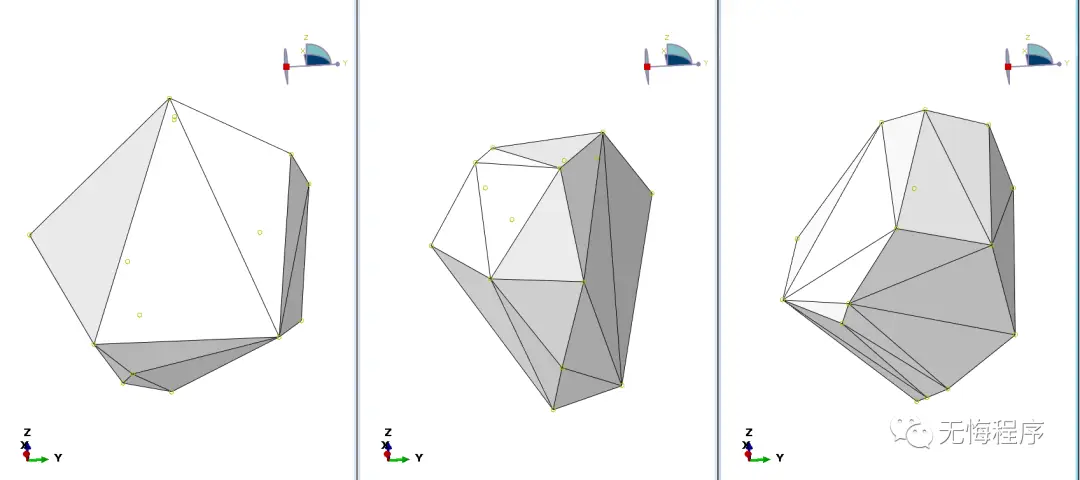
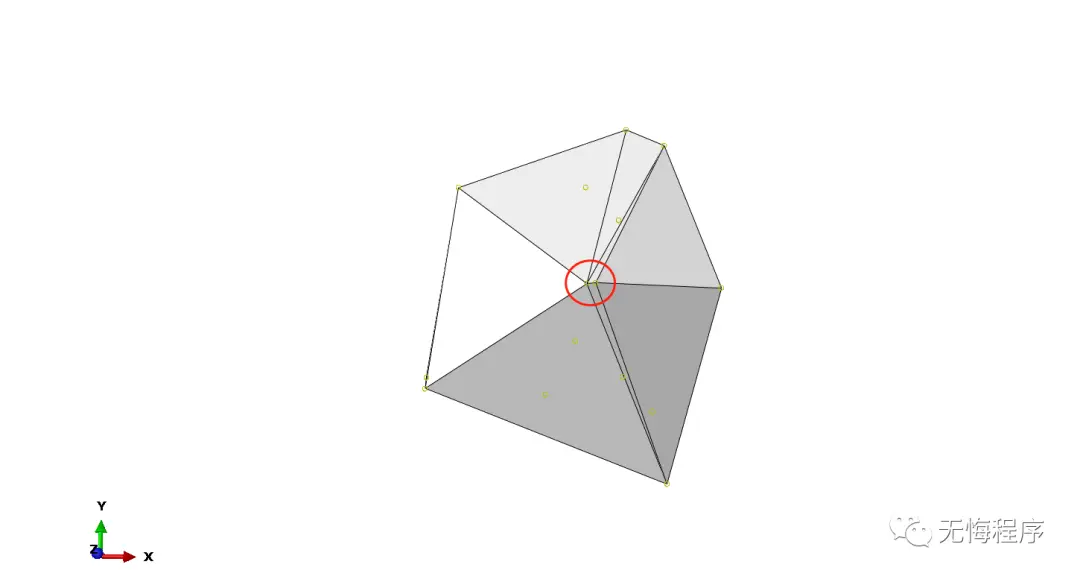
看着也还好是吧,我想表达的意思是,这里面可能会随机出很小的边,如下图所示,不利于画网格,所以建模的时候尽可能消掉过小的边。
所以,我们在循环生成骨料随机顶点的时候,循环体中可以加一个判断,如果当前点与所有现存的顶点之间的距离有小于临界值的,那么这个随机点不符合我们的条件,重新一轮循环。这样随机,就可以避免特别小的边出现。
做法也很简单,再原来createVertices函数的基础上修改一下,加个判断即可。
def verticesCheck(vertice, vertices):
    # vertice -- 随机顶点坐标
    # vertices -- 符合要求的骨料顶点坐标
    sign = True
    for point in vertices:
        x1, y1, z1 = point[0], point[1], point[2]
        x2, y2, z2 = vertice[0], vertice[1], vertice[2]
        distance = np.sqrt((x1-x2)**2 + (y1-y2)**2 + (z1-z2)*2)
        if distance < 0.1:
            sign = False
            break
    return sign
然后把上面的判断函数,添加到生成骨料随机顶点的createVertices函数里,再稍微修改一下即可。
def createVertices(verticeNumber=25):
'''
:param verticeNumber:number of vertices
:return: coordinates of vertices
'''
def verticesCheck(vertice, vertices):
# vertice -- 随机顶点坐标
# vertices -- 符合要求的骨料顶点坐标
sign = True
for point in vertices:
x1, y1, z1 = point[0], point[1], point[2]
x2, y2, z2 = vertice[0], vertice[1], vertice[2]
distance = np.sqrt((x1-x2)**2 + (y1-y2)**2 + (z1-z2)*2)
if distance < 0.1:
sign = False
break
return sign
vertices = [] # 储存顶点坐标
while True:
angle1 = np.random.uniform(0, pi*2)
angle2 = np.random.uniform(0, pi*2)
# 随机生成顶点坐标 x,y,z
z = cos(angle1)
x = sin(angle1)*cos(angle2)
y = sin(angle1)*sin(angle2)
if len(vertices):
if verticesCheck([x,y,z], vertices):
vertices.append([x, y, z])
else:
pass
else:
vertices.append([x, y, z])
if len(vertices)>=verticeNumber:
break
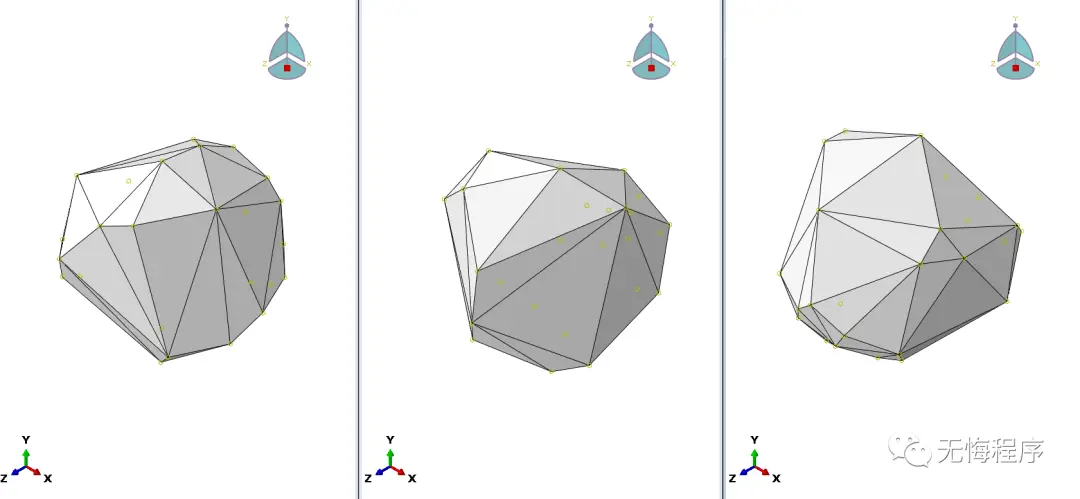
return vertices替换一下原来的createVertices函数,测试一下25点的单个骨料。
单个骨料测试完毕后,现在开始集成一下,做成多骨料生成的脚本,只需要循环调用函数,然后再做干涉判断,目前这种骨料方式是内接半径为1的球体上的,所以我的想法是,判断球体不干涉就行了,是不是。
这个我写过好多了对吧,也比较简单了,随机一下骨料中心点的x、y、z坐标,然后再进行干涉判断。加一个生成位置信息的函数
def centerPosition(aggNumber, length, width, height):
'''
:param aggNumber: 骨料数量
:param length: 空间长度
:param width: 空间宽度
:param height: 空间高度
:return: 骨料位置信息
'''
x = np.random.uniform(1, length-1)
y = np.random.uniform(1, width-1)
z = np.random.uniform(1, height-1)
positions = [[x,y,z]]
while True:
for p in positions:
x2 = np.random.uniform(1, length - 1)
y2 = np.random.uniform(1, width - 1)
z2 = np.random.uniform(1, height - 1)
x1, y1, z1 = p[0], p[1], p[2]
dis = np.sqrt((x1-x2)**2 + (y1-y2)**2 + (z1-z2)**2)
if dis < 2:
pass
else:
positions.append([x2, y2, z2])
if len(positions) >= aggNumber:
break
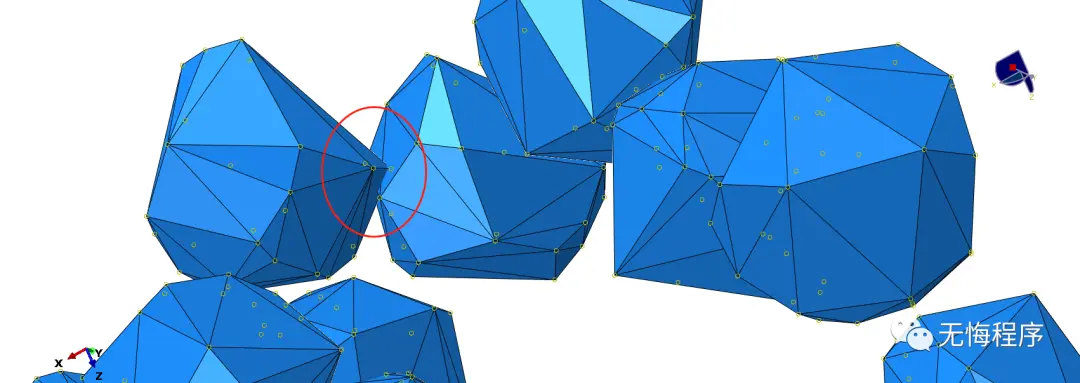
return positions我自己测试了一下,理论上,球与球之间的距离应该超过了球的直径,所以不应该有干涉现象的出现,但是实际过程中却出现了下图中的干涉现象。虽然我自己也挺奇怪的,但是毕竟出现了问题,还是想着怎么解决吧。
告诉自己不用慌,慢慢调试就好了。首先我想的是,是不是代码哪里写错了,我就去找找看。后面发现,哎,果然是我写错了,我把随机点写在循环里了。修改一下,把x2,y2,z2的值放在循环外。
while True:
    x2 = np.random.uniform(1, length - 1)
    y2 = np.random.uniform(1, width - 1)
    z2 = np.random.uniform(1, height - 1)
    sign = True
    for p in positions:
        x1, y1, z1 = p[0], p[1], p[2]
        dis = np.sqrt((x1-x2)**2 + (y1-y2)**2 + (z1-z2)**2)
        if dis < 2:
            sign = False
            break
    if sign:
        positions.append([x2, y2, z2])
修改后再试一次,运行一下脚本。现在不会干涉了。下图是我测试了25个25顶点骨料的结果,效果还行,目前看没有干涉的现象出现。

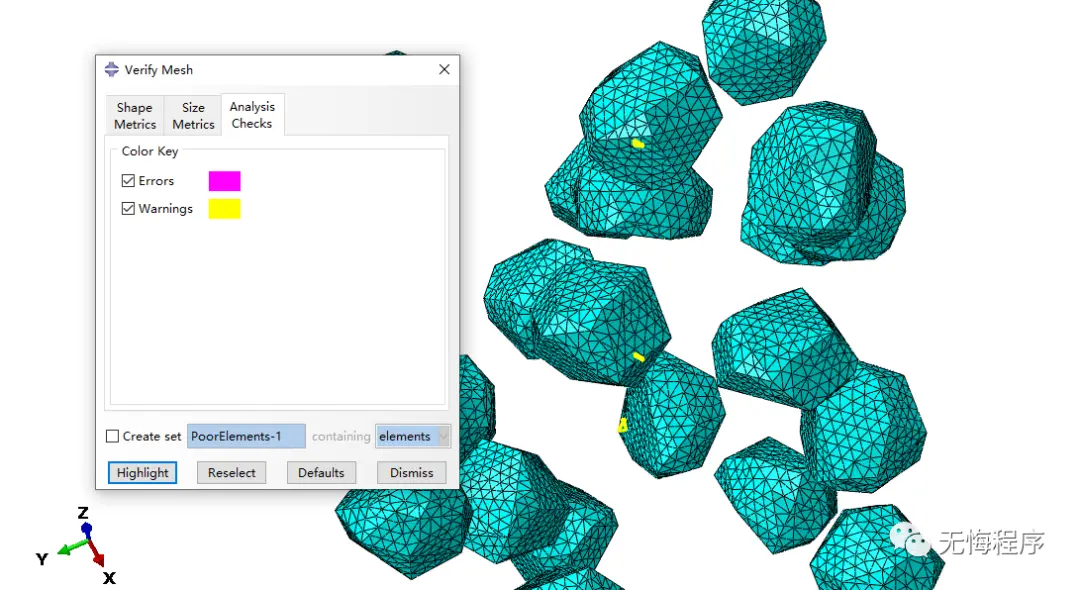
本来到这里就结束了,今天我试试这个网格难不难画,看着效果还行。

整体网格也还可以,至少少数几个警告信息,拿去分析也没啥问题。
最后,我还是把整个源码放进去,大家各取所需,修修改改,有不明白的地方可以私聊给我,我一般都会看到。新年快乐,大家。下次我讲一个关于voronoi多边形边界的建模问题,先说二维的。
# encoding=utf-8
# code by wuhuiguo
#

from abaqus import *
from abaqusConstants import *
import numpy as np
import itertools
from numpy import pi,sin,cos,arccos

# 生成随机顶点
def createVertices(verticeNumber=25):
    '''
    :param verticeNumber:number of vertices
    :return: coordinates of vertices
    '''

    def verticesCheck(vertice, vertices):
        # vertice -- 随机顶点坐标
        # vertices -- 符合要求的骨料顶点坐标
        sign = True
        for point in vertices:
            x1, y1, z1 = point[0], point[1], point[2]
            x2, y2, z2 = vertice[0], vertice[1], vertice[2]
            distance = np.sqrt((x1-x2)**2 + (y1-y2)**2 + (z1-z2)**2)
            if distance < 0.2:
                sign = False
                break
        return sign

    vertices = []  # 储存顶点坐标
    while True:
        angle1 = np.random.uniform(0, pi*2)
        angle2 = np.random.uniform(0, pi*2)
        # 随机生成顶点坐标 x,y,z
        z = cos(angle1)
        x = sin(angle1)*cos(angle2)
        y = sin(angle1)*sin(angle2)
        if len(vertices):
            if verticesCheck([x,y,z], vertices):
                vertices.append([x, y, z])
            else:
                pass
        else:
            vertices.append([x, y, z])

        if len(vertices)>=verticeNumber:
            break
    return vertices

# 方向向量计算
def directN(coords):
    coord1, coord2, coord3 = coords[0],coords[1],coords[2]
    x1, y1, z1 = coord1[0], coord1[1], coord1[2]
    x2, y2, z2 = coord2[0], coord2[1], coord2[2]
    x3, y3, z3 = coord3[0], coord3[1], coord3[2]

    a = (y2-y1)*(z3-z1) - (y3-y1)*(z2-z1)
    b = (z2-z1)*(x3-x1) - (z3-z1)*(x2-x1)
    c = (x2-x1)*(y3-y1) - (x3-x1)*(y2-y1)
    n = np.array([a, b, c])
    n = n/np.linalg.norm(n)
    d = arccos(np.dot(n, coord1)/np.linalg.norm(coord1))
    if d>pi/2.:
        n = -n
    return n

# 平面判断
def chosenPlane(vertices):
    vertices = [np.array(vertice) for vertice in vertices]
    threePoints = list(itertools.combinations(vertices, 3))
    chosenPlane = []
    for threePoint in threePoints:
        n = directN(threePoint)
        sign = True
        for vertice in vertices:
            vector1 = threePoint[0]-vertice
            result = np.dot(vector1, n)
            if result<-1e-5:
                sign = False
                break
        if sign:
            chosenPlane.append(list(threePoint))
    return chosenPlane


if mdb.models.has_key("model-test"):
    del mdb.models["model-test"]
model = mdb.Model(name="model-test", modelType=STANDARD_EXPLICIT)

#
base_length = 10
base_width  = 10
base_height = 10

aggNumber = 25

#

# 循环生成骨料信息
for i in range(aggNumber):
    part = model.Part(name="part-test-{}".format(i), dimensionality=THREE_D, type=DEFORMABLE_BODY)
    vertices = createVertices(verticeNumber=25) # 调用生成骨料顶点的函数
    chosePlane = chosenPlane(vertices)          # 调用骨料平面判断的函数

    # create point
    for vertice in vertices:
        part.DatumPointByCoordinate(coords=tuple(vertice))

    # create plane
    for coords in chosePlane:
        coords.append(coords[0])
        wire = part.WirePolyLine(mergeType=SEPARATE, meshable=ON, points=(coords))
        face_edge = part.getFeatureEdges(name=wire.name)
        part.CoverEdges(edgeList = face_edge, tryAnalytical=True)

    # shell to solid
    part.AddCells(faceList=part.faces[:])

# 循环随机骨料中心点坐标信息
def centerPosition(aggNumber, length, width, height):
    '''
    :param aggNumber: 骨料数量
    :param length: 空间长度
    :param width: 空间宽度
    :param height: 空间高度
    :return: 骨料位置信息
    '''
    x = np.random.uniform(1, length-1)
    y = np.random.uniform(1, width-1)
    z = np.random.uniform(1, height-1)
    positions = [[x,y,z]]
    while True:
        x2 = np.random.uniform(1, length - 1)
        y2 = np.random.uniform(1, width - 1)
        z2 = np.random.uniform(1, height - 1)
        sign = True
        for p in positions:
            x1, y1, z1 = p[0], p[1], p[2]
            dis = np.sqrt((x1-x2)**2 + (y1-y2)**2 + (z1-z2)**2)
            if dis < 2:
                sign = False
                break

        if sign:
            positions.append([x2, y2, z2])

        if len(positions) >= aggNumber:
            break

    return positions
# 调用位置信息
positions = centerPosition(aggNumber, base_length, base_width, base_height)

# 生成实体
assembly = model.rootAssembly
for i in range(aggNumber):
    part = model.parts["part-test-{}".format(i)]
    instanceName = 'instance-test-{}'.format(i)
    assembly.Instance(name=instanceName, part=part, dependent=ON)
    assembly.translate(instanceList=(instanceName, ), vector=tuple(positions[i]))
武汉格发信息技术有限公司,格发许可优化管理系统可以帮你评估贵公司软件许可的真实需求,再低成本合规性管理软件许可,帮助贵司提高软件投资回报率,为软件采购、使用提供科学决策依据。支持的软件有: CAD,CAE,PDM,PLM,Catia,Ugnx, AutoCAD, Pro/E, Solidworks 等。
 技术文档
技术文档
 推荐好文
推荐好文


 155-2731-8020


