


SSD作用
NVMe SSD硬盘仅作为系统盘(rootfs和用户区),系统的启动引导依然是通过SD卡或EMMC,比如升级设备树dtb 还是在SD卡或EMMC中。
步骤一、准备SSD 并格式化为 GPT
- 准备M.2 Key M SSD
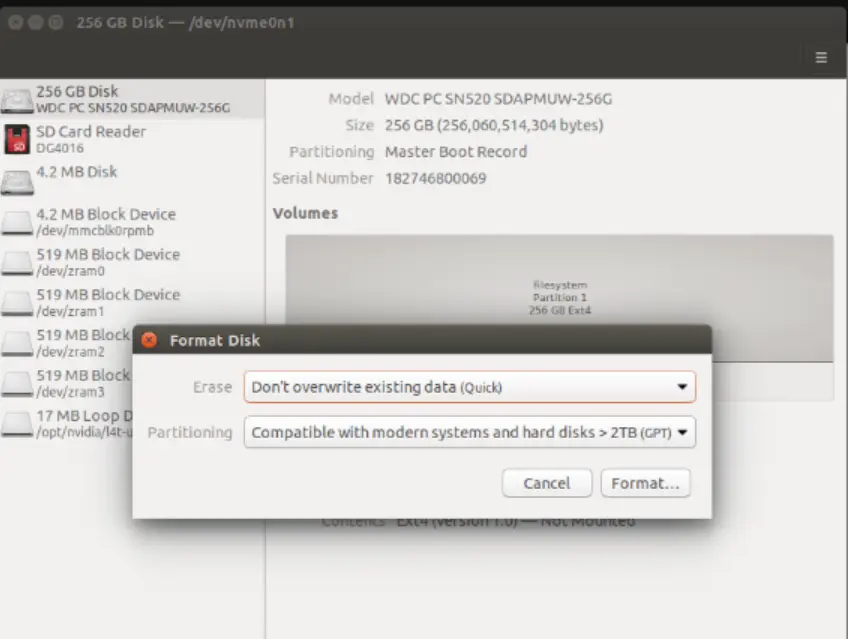
《本例采用的是WD PC SN520 型号SSD》- 打开Ubuntu18.04自带 Disks 工具,'Ctrl+F' 或点击右上角选择‘Format Disk' 并将其格式化为GPT 格式
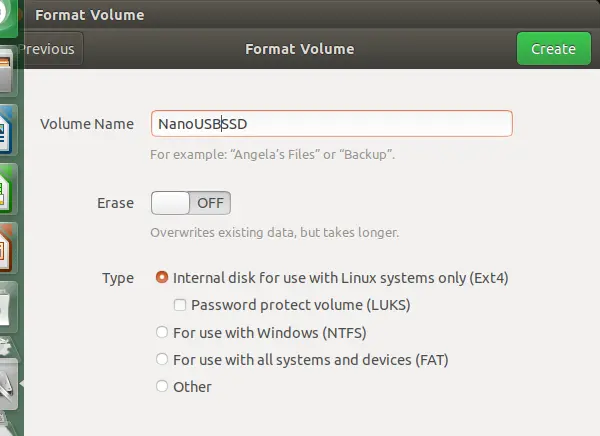
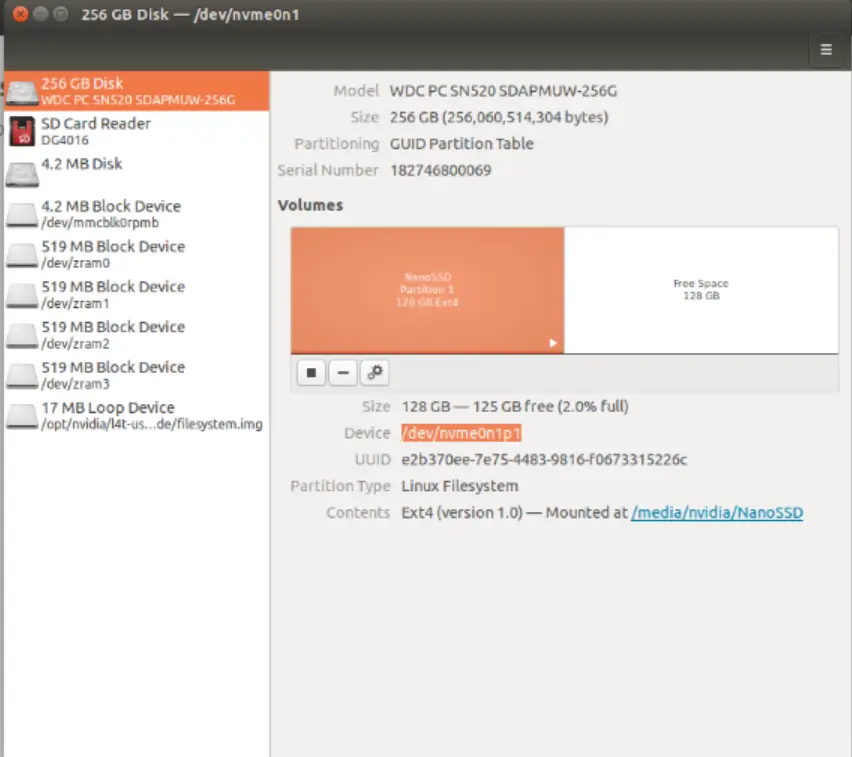
- 格式化时必须选择“Ext4”, 等待完成后,点击下方 '三角按钮',mount 到固定目录如/media/nvidia/xxxx
- 参考下图:
步骤二、复制系统文件到SSD或SD卡 (有两种方案,默认建议方案一)
方案一、 Jetsonhacks rootOnNVMe方法 (M.2 Key M SSD)
步骤一、
git clone https://github.com/jetsonhacks/rootOnNVMe.git
cd rootOnNVMe
./copy-rootfs-ssd.sh
步骤二、
./setup-service.sh
步骤三、
reboot
如果是SD卡,比如/dev/mmcblk1 , 需修改如下文件中的ssd路径为SD卡路径/dev/mmcblk1:
copy-rootfs-ssd.sh
setup-service.sh
data/setssdroot.sh
data/setssdroot.service
方案二、JetPack4.4 概率性失败(目前不建议采用了)
步骤一、复制当前emmc中的镜像到ssd 中,并制作启动盘
- 下载JetsonHacksNano脚本
cd $HOME
git clone https://github.com/JetsonHacksNano/rootOnUSB
cd rootOnUSB
- 创建RAMFS 并确认SSD设备/dev/nvme0n1p1
若是Xavier NX 必须修改此文件,否则USB 会无法使用修改并替换/etc/initramfs-tools/hooks/usb-firmware 文件中tegra21x_xusb_firmware 为 tegra19x_xusb_firmware
$sudo cp ./data/usb-firmware /etc/initramfs-tools/hooks
$cd /etc/initramfs-tools/hooks
$sudo chmod +x /etc/initramfs-tools/hooks/usb-firmware

$vi /etc/initramfs-tools/hooks/usb-firmware
'修改并替换/etc/initramfs-tools/hooks/usb-firmware文件中
tegra21x_xusb_firmware 为 tegra19x_xusb_firmware’

$sudo mkinitramfs -o /boot/initrd.img-4.9.140-tegra
或者
$sudo mkinitramfs -o /boot/initrd.img-$(uname -r)

#等待会出现类似如下提示信息
Warning: couldn't identify filesystem type for fsck hook, ignoring.
I: The initramfs will attempt to resume from /dev/zram3
I: (UUID=873c4af2-cf87-4ddc-921a-6a6c9392dde6)
I: Set the RESUME variable to override this.
/sbin/ldconfig.real: Warning: ignoring configuration file that cannot be opened: /etc/ld.so.conf.d/aarch64-linux-gnu_EGL.conf: No such file or directory
/sbin/ldconfig.real: Warning: ignoring configuration file that cannot be opened: /etc/ld.so.conf.d/aarch64-linux-gnu_GL.conf: No such file or directory
- 运行copyRootToUSB脚本,将原本的系统copy至/dev/nvme0n1p1设备中
$ cd $HOME/rootOnUSB       #注意此处路径为clone的路径
$ ./copyRootToUSB.sh -p /dev/nvme0n1p1
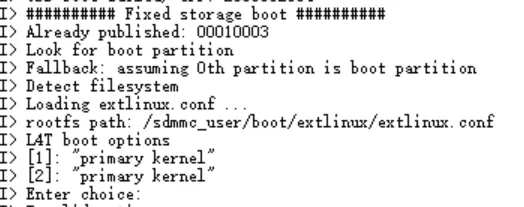
- 修改/boot/extlinux/extlinux.conf文件,添加SSD启动项,之所以添加2个启动项是为了防止SSD 启动失败后还可以选择EMMC 进行启动并排查问题
- 选项1 为SSD启动
- 选项2 为内置EMMC启动
上述启动该选项可接串口到电脑端,在启动过程中通过连接UART DEBUG 时进行输入选择,由于Jetson Ubuntu未提供开机选项画面固只能通过DEBUG UART 开机时按键进行选择开机启动方式
$sudo vi /boot/extlinux/extlinux.conf

TIMEOUT 30
DEFAULT primary

MENU TITLE L4T boot options

LABEL primary
    MENU LABEL primary ssd boot
    LINUX /boot/Image
    INITRD /boot/initrd.img
    APPEND ${cbootargs} pci=nomsi root=/dev/nvme0n1p1 quiet

LABEL emmc_boot
    MENU LABEL primary emmc boot
    LINUX /boot/Image
    INITRD /boot/initrd.img
    APPEND ${cbootargs} rootfstype=ext4 root=/dev/mmcblk0p1 rw rootwait
- 修改开机挂载SSD设备 /etc/fstab
$sudo vi  /etc/fstab
/dev/root            /                     ext4           discard,noatime,errors=remount-ro            0 1
/dev/mmcblk0p1       /mnt/mmc              ext4           discard,noatime,errors=remount-ro            0 2
- 以上步骤保存后退出,重启Nano即可
$sudo reboot
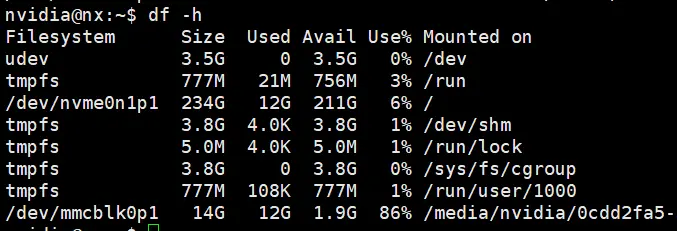
- 待Nano正常开机,通过mount/df 等命令查看当前根目录是否默认挂载SSD 为Boot disk
$df
$mount
- 如在需要的时候把启动盘从SSD切换到EMMC,可按照如下再修改回来
步骤一、修改新挂载的emmc 中的启动信息:(即还原emmc作为系统盘时启动信息)
nvidia@nx:~$sudo vi /media/nvidia/0cdd2fa5-5666-4d76-84ef-2650bc3b67e51/boot/extlinux/extlinux.conf

TIMEOUT 30
DEFAULT primary

MENU TITLE L4T boot options

LABEL primary
      MENU LABEL primary kernel
      LINUX /boot/Image
      INITRD /boot/initrd
      APPEND ${cbootargs} quiet

#LABEL primary
#    MENU LABEL primary ssd boot
#    LINUX /boot/Image
#    INITRD /boot/initrd.img
#    APPEND ${cbootargs} pci=nomsi root=/dev/nvme0n1p1 quiet

#LABEL emmc_boot
#    MENU LABEL primary emmc boot
#    LINUX /boot/Image
#    INITRD /boot/initrd.img
#    APPEND ${cbootargs} rootfstype=ext4 root=/dev/mmcblk0p1 rw rootwait
步骤二、修改默认分区挂载,即还原此前emmc 作为系统盘时的fstab挂载内容
nvidia@nx:~$ sudo vi /media/nvidia/0cdd2fa5-5666-4d76-84ef-2650bc3b67e51/etc/fstab
# /etc/fstab: static file system information.
#
# These are the filesystems that are always mounted on boot, you can
# override any of these by copying the appropriate line from this file into
# /etc/fstab and tweaking it as you see fit.  See fstab(5).
#
# <file system> <mount point>             <type>          <options>                               <dump> <pass>
/dev/root            /                     ext4           defaults                                     0 1
#/dev/root            /                     ext4           discard,noatime,errors=remount-ro            0 1
#/dev/mmcblk0p1       /mnt/mmc              ext4           discard,noatime,errors=remount-ro            0 2
步骤三、重启机器
$sudo reboot
参考文档:
[1] https://devtalk.nvidia.com/default/topic/1061883/jetson-nano/jetson-nano-boot-from-nvme-via-m-2-pcie-fails/post/5392151/#5392151
[2] https://www.jetsonhacks.com/2019/09/17/jetson-nano-run-from-usb-drive/
[3] https://github.com/JetsonHacksNano/rootOnUSB
[4] https://www.ubuntubuzz.com/2020/02/how-to-format-disk-drive-as-gpt-on-ubuntu.html
[5] https://www.jianshu.com/p/fa7360d14a44

 技术文档
技术文档
 推荐好文
推荐好文


 155-2731-8020