


软件

产品


最近开始入坑installShield,由于使用的免费的限制版本,一些“高科技”的用法,这里无从提及,本文就使用中常见的问题,作一个总结:
| Product Version | Product Code | Upgrade Code |
|---|---|---|
| 1.0 | {D73FFD24-6087-4D5A-82AB-1F6B1A680433} | {A00700B1-2345-6789-ABCD-EF0123456789} |
| 1.1 | {D73FFD24-6087-4D5A-82AB-1F6B1A680433} | {A00700B1-2345-6789-ABCD-EF0123456789} |
| 2.0 | {A1071CCE-11A1-11A2-B1A2-B3000D067A34} | {A00700B1-2345-6789-ABCD-EF0123456789} |
从1.0版本升级到1.1版本的话,只是小版本有更新,直接用补丁更新即可,这时候产品Code和升级Code都不用修改,
从1.1版本升级到2.0,由于改动的是大版本,我们有理由认为更新改动很大,这时候产品ID需要更改,如果不更改的话,安装的时候windows会提示你已经有相同的产品安装过了,至于为什么升级Code不变,因为要在原有的基础上进行升级,整个系列的更新码都必须保持一致。
你完全可以在2.0的基础上修改升级码,这样安装的时候windows会认为1.1和2.0就完全是两个不同的APP了。
接下来的几条不太重要:
INSTALLDIR:默认安装路径
DATABASEDIR:存放数据的路径
DEFAULTFONT: 安装过程中的默认字体
ALLUSERS: 安装包 针对哪些用户
Fast Install:快速安装,全部勾选上
1.2 Summary Info
主要是用于Window Installer database显示用,作用不太大,这里忽略
1.3 Add or Remove Programs
Icon: 用于设置在Window Installer上显示的图标
Disable Change/Remove/Repair Button: 是否禁用更换/卸载/修复 按钮
Publisher: 发布者
PublisherURL: 发布者网站
1.4 Upgrade Paths
此模块的设定对软件升级非常重要,右键点击Upgrade Paths,新建NewUpgradeEntry,选定之前旧的安装包(如果没有直接点击cancel)。查看右侧的属性进行设定,主要有:
UpgradeCode: 必须和之前版本的UpgradeCode保持一致
min version: 指定本次更新包需要针对的最小版本号,如1.0
include min: 是否包含最小版本号,
例如minversion设置为1.0, include min设定为yes表示从1.0开始的版本(包括1.0)需要执行此次更新
max version:指定本次更新包需要针对的最大版本号,如2.0
include: max: 是否包含最大版本号
Language Identifiers
Lang Search Criterion
以上两个选项进一步缩小升级包更新的范围。
Ignore Remove Failure:
忽略掉删除错误,设定为yes,表示如果在升级过程中,删除旧版本报错的话,会忽略掉,继续安装新版本,简单暴力,这里设定为yes
Migrate Feature States:
直接贴原文:
Specify whether you want the upgrade to attempt to migrate the feature-selection states from an installed product version to the newer version. When installing the previous version of your product, an end user may have selected to install certain features, and not install others. During the upgrade to a new version of your product, these original selections can be retained as the default selections by selecting Yes for the Migrate Feature States setting.
For example, if your original product contained Feature1, Feature2, and Feature3, and an end user installed only Feature1 and Feature3, by default Feature1 and Feature3 will be selected for installation when your upgraded setup is run. Feature2 will, by default, remain unselected.
一般设定它为yes
Update Notifications View
FlexNet Connect provides a mechanism that enables you to automatically notify your Web -connected end users when patches, updates, and product information for your application are ready for release. The Update Notifications view is where you enable automatic notification for your original installation.
Using FlexNet Connect is simple. When you enable FlexNet Connect, InstallShield includes the Software Manager in your installation. This desktop tool ships with your application and provides a tool for your users to view available updates. To publish updates to your users, you will use a Web-based management portal called the FlexNet Connect Publisher site.
FlexNet Connect includes a variety of options that can be purchased together for a complete solution, or separately for a customized solution. To learn more, visit the Flexera Software Web site.
由于我们的项目中没有用到FlexNet,而是自己实现了一个更新工具,所以这项忽略。
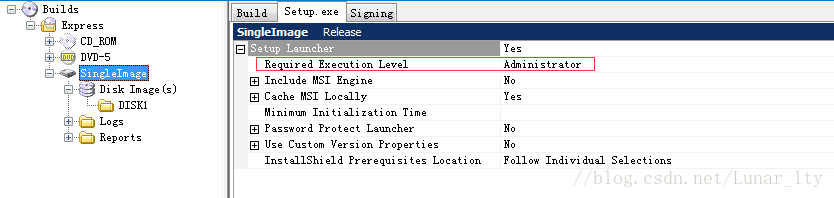
可以看到
Required Execution Level选项,它用来指定运行安装程序时所需要的权限,如果此权限过低,可能导致
在5.2中定制的actions执行失败,5.2中执行actions的权限直接继承自“Required Execution Level”中设定的权限,这里一般设置成Administrator。
小结:
使用InstallShield限定版确实有些不方便的地方,比如为了修改安装后的目标文件的权限问题,笔者就花了不少时间来研究Custom Action;实际上,在非限定版中,可以直接在指定应用程序文件的时候就进行设定。另外,应用程序的补丁更新和安装也是一个问题。
有空将介绍一个自己编写的可自动更新的windows APP工具(结合IS来使用),包括补丁生成工具。
免责声明:本文系网络转载或改编,未找到原创作者,版权归原作者所有。如涉及版权,请联系删
 技术文档
技术文档
 推荐好文
推荐好文


 155-2731-8020


