


软件

产品


最近为了做一些数据分析,把我自己服务器上所有应用的日志都通过 fluentd 转存到 mongodb 了,第一次用 fluentd,记录一些笔记。
因为是初学,绝大部分内容来源于官方文档2,等实际线上使用一段时间后再来更新一些心得。
fluent 比较烦的一点是,从 gem 安装和从 rpm、yum 安装的名字不一样,连配置文件的路径都不一样,需要记住的是:
详细可参见官方文档。
以 CentOS 为例:
# 安装$ sudo curl -L https://toolbelt.treasuredata.com/sh/install-redhat-td-agent2.sh | sh # 启动$ sudo /etc/init.d/td-agent start# 从 rpm 安装的话,# 比如要使用下例的 mongo,需要安装# $ sudo td-agent-gem install fluent-plugin-mongo$ sudo td-agent-gem <PLUGIN_NAME> # 从 gem 安装的话$ sudo gem install <PLUGIN_NAME>fluentd 是一个日志收集系统,通过丰富的插件,可以收集来自于各种系统或应用的日志,然后根据用户定义将日志做分类处理。
通过 fluentd,你可以非常轻易的实现像追踪日志文件并将其过滤后转存到 MongoDB 这样的操作。fluentd 可以彻底的将你从繁琐的日志处理中解放出来。
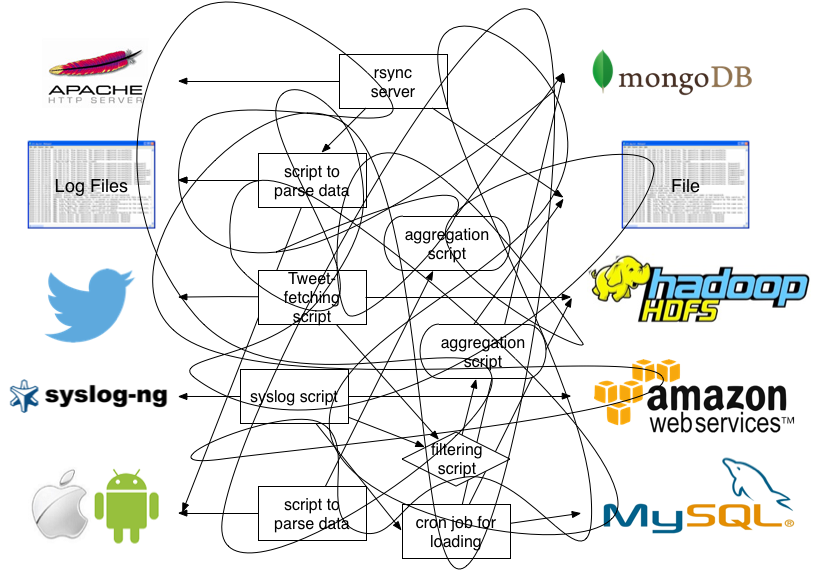
用图来做说明的话,使用 fluentd 以前,你的系统是这样的:
使用了 fluentd 后,你的系统会成为这样:
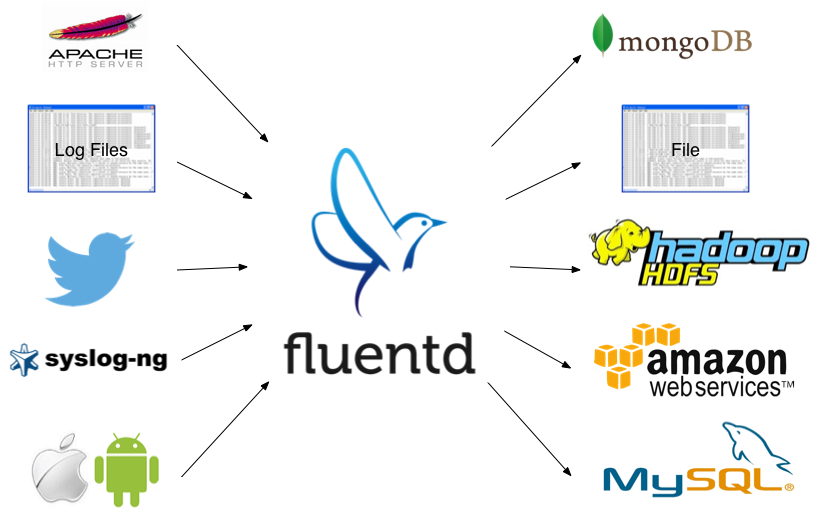
(图片来源3)
分为两种情况:
$ sudo fluentd --setup /etc/fluent$ sudo vi /etc/fluent/fluent.conf$ sudo vi /etc/td-agent/td-agent.conf
你可以在配置文件里使用 @include 来切分你的配置文件,include 支持多种写法:
# 绝对路径include /path/to/config.conf# 相对路径@include conf.d/*.conf# 甚至 URL@include http://example.com/fluent.conf在配置文件里你需要为很多参数赋值,这些值必须使用 fluentd 支持的数据格式,有下列这些:
string:字符串,最常见的格式,详细支持语法见文档1;integer:整数float:浮点数;size 大小,仅支持整数 time:时间,也只支持整数; array:按照 JSON array 解析;hash:按照 JSON object 解析。配置文件的核心是各种命令块(directives),每一种命令都是为了完成某种处理,命令与命令之前还可以组成串联关系,以 pipline 的形式流式的处理和分发日志。
最常见的方式就是 source 收集日志,然后由串联的 filter 做流式的处理,最后交给 match 进行分发。
同时你还可以用 label 将任务分组,用 error 处理异常,用 system 修改运行参数。
下面是详细的说明。
source 是 fluentd 的一切数据的来源,每一个 source 内都包含一个输入模块,比如原生集成的包含 http 和 forward 两个模块,分别用来接收 HTTP 请求和 TCP 请求:
# Receive events from 24224/tcp# This is used by log forwarding and the fluent-cat command<source> @type forward port 24224</source> # http://this.host:9880/myapp.access?json={"event":"data"}<source> @type http port 9880</source>当然,除了这两个外,fluentd 还有大量的支持各种协议或方式的 source 插件,比如最常用的 tail 就可以帮你追踪文件。
每一个具体的插件都包含其特有的参数,比如上例中 port 就是一个参数,当你要使用一个 source 插件的时候,注意看看有哪些参数是需要配置的,然后将其写到 source directive 内。
source dirctive 在获取到输入后,会向 fluent 的路由抛出一个事件,这个事件包含三个要素:
那上例代码中的第二个 source 举例,当我们发起一个 http://this.host:9880/myapp.access?json={"event":"data"} 的请求时,这个 source 会抛出:
# generated by http://this.host:9880/myapp.access?json={"event":"data"}tag: myapp.accesstime: (current time)record: {"event":"data"}关于如何编写一个输入插件,可以参考文档4。
match 用来指定动作,通过 tag 匹配 source,然后执行指定的命令来分发日志,最常见的用法就是将 source 收集的日志转存到数据库。
# http://this.host:9880/myapp.access?json={"event":"data"}<source> @type http port 9880</source> # 将标记为 myapp.access 的日志转存到文件<match myapp.access> @type file path /var/log/fluent/access</match>上例中的 myapp.access 就是 tag,tag 有好几种匹配模式:
*:匹配任意一个 tag;**:匹配任意数量个 tag;a b:匹配 a 或 b;{X,Y,Z}:匹配 X, Y, Z 中的一个。比如我可以写成这样:
<match a.*><match **><match a.{b,c}><match a.* b.*>fluentd 按照 match 出现的顺序依次匹配,一旦匹配成功就不会再往下匹配,所以如果你先写了一个 match **,然后后面的所有的 match 都会被忽略。
然后我们使用了 @type file 插件来处理事件,这个插件有一个 path 属性,用来指定输出文件。
用法和 source 几乎一模一样,不过 source 是抛出事件,match 是接收并处理事件。你同样可以找到大量的各式各样的输出插件,也可以参考文档5自己写一个。
filter 和 match 的语法几乎完全一样,但是 filter 可以串联成 pipeline,对数据进行串行处理,最终再交给 match 输出。
# http://this.host:9880/myapp.access?json={"event":"data"}<source> @type http port 9880</source> <filter myapp.access> @type record_transformer <record> host_param "#{Socket.gethostname}" </record></filter> <match myapp.access> @type file path /var/log/fluent/access</match>这个例子里,filter 获取数据后,调用原生的 @type record_transformer 插件,在事件的 record 里插入了新的字段 host_param,然后再交给 match 输出。
你可以参考文档6来学习如何编写自定义的 filter。
虽然各个插件都有各自的参数,不过 fluentd 为所有的插件都设定了一组默认的参数: - @type:指定插件类型; - @id:给插件指定一个 id; - @label:指定 label; - @log_level:指定插件接收的日志级别。
你可以在任意插件内指定这些参数。
fluentd 的相关设置,可以在启动时设置,也可以在配置文件里设置,包含:
log_levelsuppress_repeated_stacktraceemit_error_log_intervalsuppress_config_dumpwithout_sourcelabel 用于将任务进行分组,方便复杂任务的管理。
你可以在 source 里指定 @label @<LABEL_NAME>,这个 source 所触发的事件就会被发送给指定的 label 所包含的任务,而不会被后续的其他任务获取到。
看个例子:
<source> @type forward</source> <source> # 这个任务指定了 label 为 @SYSTEM # 会被发送给 <label @SYSTEM> # 而不会被发送给下面紧跟的 filter 和 match @type tail @label @SYSTEM</source> <filter access.**> @type record_transformer <record> # ... </record></filter><match **> @type elasticsearch # ...</match> <label @SYSTEM> # 将会接收到上面 @type tail 的 source event <filter var.log.middleware.**> @type grep # ... </filter> <match **> @type s3 # ... </match></label>用来接收插件通过调用 emit_error_event API 抛出的异常,使用方法和 label 一样,通过设定 <label @ERROR> 就可以接收到相关的异常。
一个监听 Nginx 日志的例子:
<source> @type tail @id nginx-access @label @nginx path /var/log/nginx/access.log pos_file /var/lib/fluentd/nginx-access.log.posg tag nginx.access format /^(?<remote>[^ ]*) (?<host>[^ ]*) \[(?<time>[^\]]*)\] (?<code>[^ ]*) "(?<method>\S+)(?: +(?<path>[^\"]*) +\S*)?" (?<size>[^ ]*)(?: "(?<referer>[^\"]*)" "(?<agent>[^\"]*)")?$/ time_format %d/%b/%Y:%H:%M:%S %z</source><source> @type tail @id nginx-error @label @nginx path /var/log/nginx/error.log pos_file /var/lib/fluentd/nginx-error.log.posg tag nginx.error format /^(?<time>\d{4}/\d{2}/\d{2} \d{2}:\d{2}:\d{2}) \[(?<log_level>\w+)\] (?<pid>\d+).(?<tid>\d+): (?<message>.*)$/</source><label @nginx> <match nginx.access> @type mongo database nginx collection access host 10.47.12.119 port 27016 time_key time flush_interval 10s </match> <match nginx.error> @type mongo database nginx collection error host 10.47.12.119 port 27016 time_key time flush_interval 10s </match></label>为了匹配,你也需要修改 Nginx 的 log_format 为:
log_format main '$remote_addr $host [$time_local] $status "$request" $body_bytes_sent "$http_referer" "$http_user_agent"';
我自己在用的一个 docker 的镜像和 docker-compose.yml。
	// private static FluentLogger LOG = FluentLogger.getLogger("app");	// for remote fluentd	// port 24225	// bind 172.16.5.20	// The method should be called only once.	private static FluentLogger LOG = FluentLogger.getLogger("docker",			"172.16.5.20", 24225);		public static void main(String[] args) {		FluentLoggerTest fluentLoggerTest = new FluentLoggerTest();  		fluentLoggerTest.doApplicationLogic();		System.out.println("=====end main ======");	}  	public void doApplicationLogic() {		// Then, please create the events like this.		// This will send the event to fluentd, with tag 'app.follow' and the		// attributes 'from' and 'to'.		Map<String, Object> data = new HashMap<String, Object>();		data.put("from", "userA");		data.put("to", "userB");		LOG.log("test", data);		// Close method in FluentLogger class should be called explicitly when		// application is finished.		// The method closes socket connection with the fluentd.  		FluentLogger.close();		//FluentLogger.closeAll();	} Maven pom
	<logger.version>0.2.1</logger.version>
<dependency>

    <groupId>org.fluentd</groupId>

    <artifactId>fluent-logger</artifactId>

    <version>${logger.version}</version>

  </dependency>


免责声明:本文系网络转载或改编,未找到原创作者,版权归原作者所有。如涉及版权,请联系删
 技术文档
技术文档
 推荐好文
推荐好文


 155-2731-8020


