软件

产品


本部分承接第一部分,专为熟悉 Unity C# 的开发者打造,全程聚焦 Godot 4.x .NET 稳定版的 C# 专属开发能力,所有内容均与 Unity 开发体系 1:1 对标,覆盖核心编程范式、API 映射、最佳实践与避坑指南,可直接复制保存为 Markdown 文档。前置要求:已完成第一部分的环境搭建、核心概念认知,已安装 Godot .NET 版与.NET 6/8 LTS SDK。
Unity 的生命周期魔术方法(如Awake/Start/Update)是通过反射调用的弱类型方法;而 Godot 的生命周期是重写 Node 父类的强类型虚方法,编译期即可校验,性能更优,且完全适配 C# 的面向对象特性。
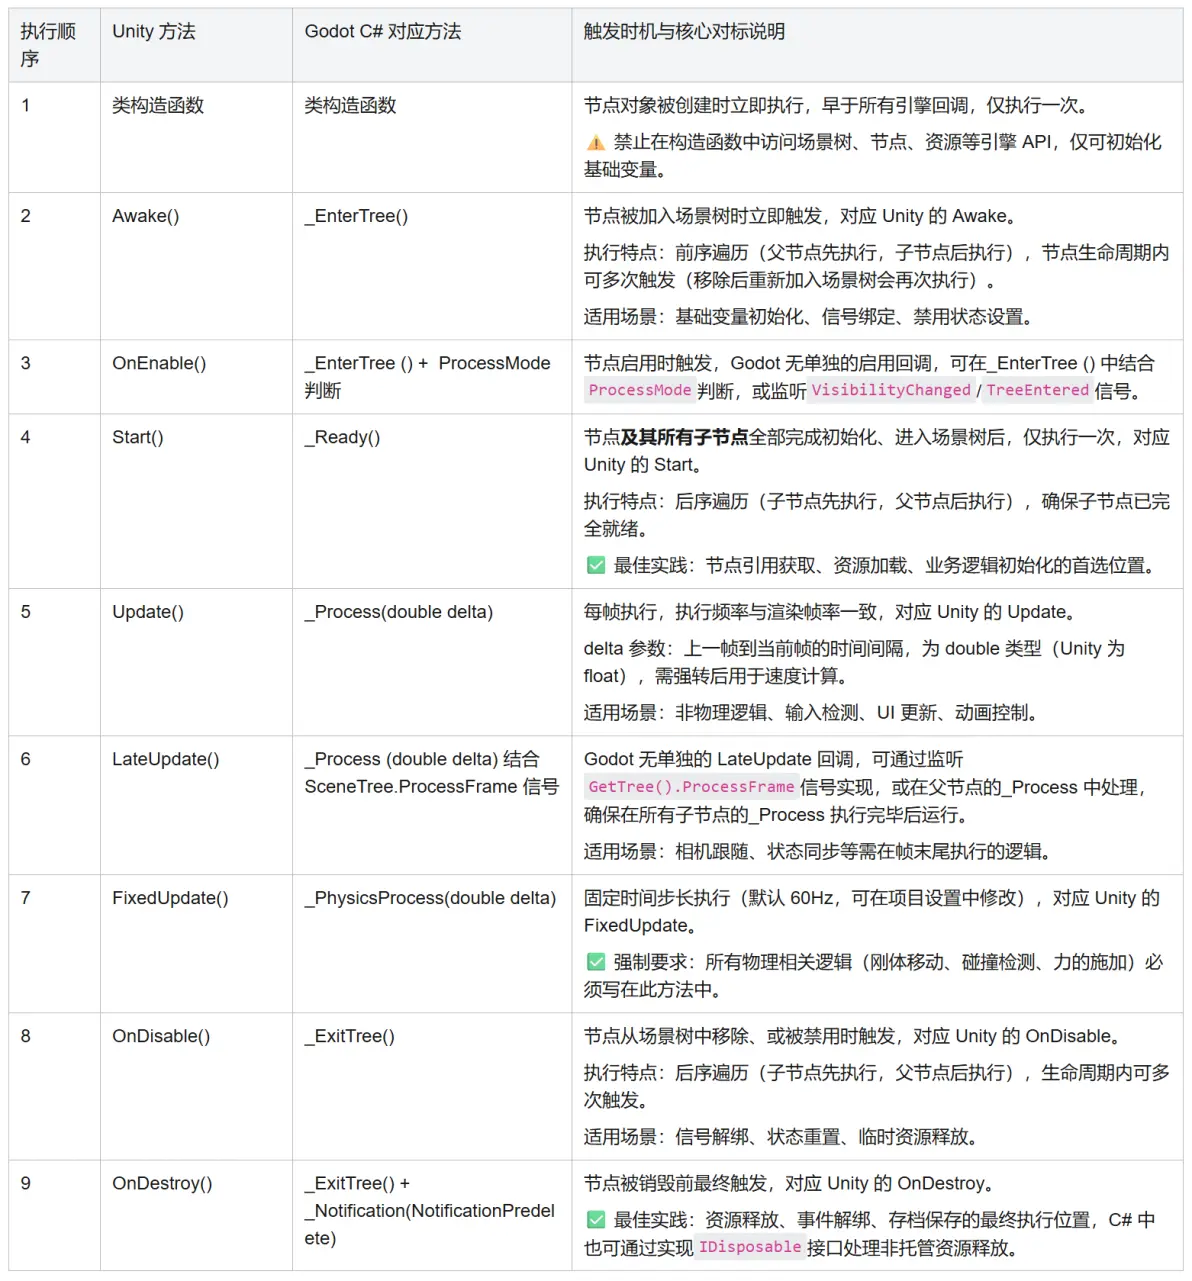
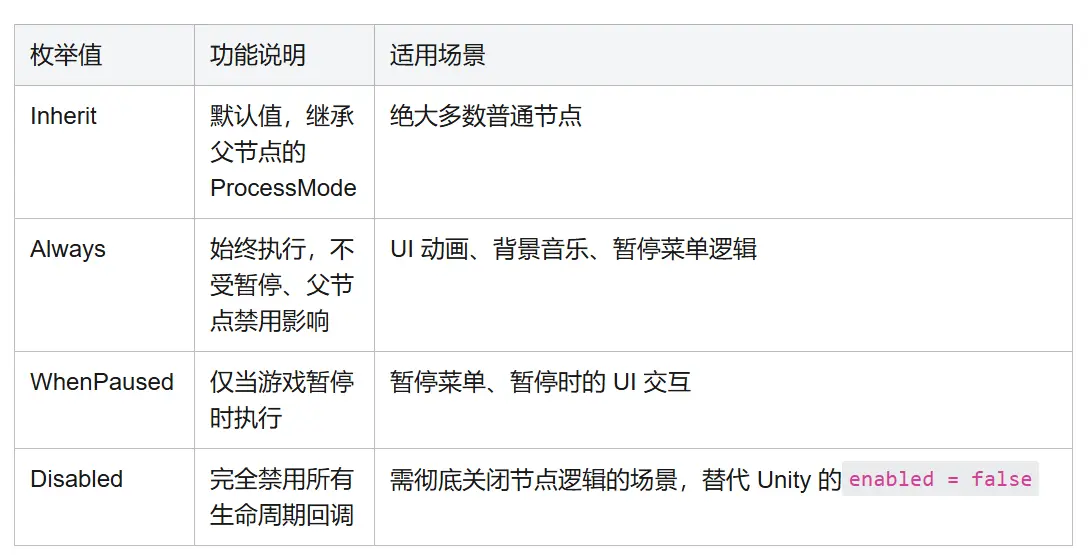
代码块
using Godot;

[GlobalClass]
public partial class LifecycleTest : Node2D
{
    // 构造函数,对标Unity类构造函数
    public LifecycleTest()
    {
        GD.Print("【1】构造函数执行:对象已创建,禁止访问引擎API");
    }

    // 对标Unity Awake()
    public override void _EnterTree()
    {
        GD.Print("【2】_EnterTree执行:节点已加入场景树");
    }

    // 对标Unity Start()
    public override void _Ready()
    {
        GD.Print("【3】_Ready执行:节点与所有子节点全部就绪");
    }

    // 对标Unity Update()
    public override void _Process(double delta)
    {
        // GD.Print($"【4】_Process执行:每帧更新,delta={delta}");
    }

    // 对标Unity FixedUpdate()
    public override void _PhysicsProcess(double delta)
    {
        // GD.Print($"【5】_PhysicsProcess执行:物理帧更新,delta={delta}");
    }

    // 对标Unity OnDisable()
    public override void _ExitTree()
    {
        GD.Print("【6】_ExitTree执行:节点已离开场景树");
    }

    // 对标Unity OnDestroy()
    public override void _Notification(int what)
    {
        if (what == NotificationPredelete)
        {
            GD.Print("【7】_NotificationPredelete执行:节点即将被销毁");
        }
    }
}
信号是 Godot 官方首推的解耦方案,对标 Unity 的 C# 原生委托 + 事件、UnityEvent,核心优势是支持编辑器可视化绑定、强类型安全、零 GC 开销、与引擎深度集成,是 Godot 中跨节点、跨模块通信的首选方案。
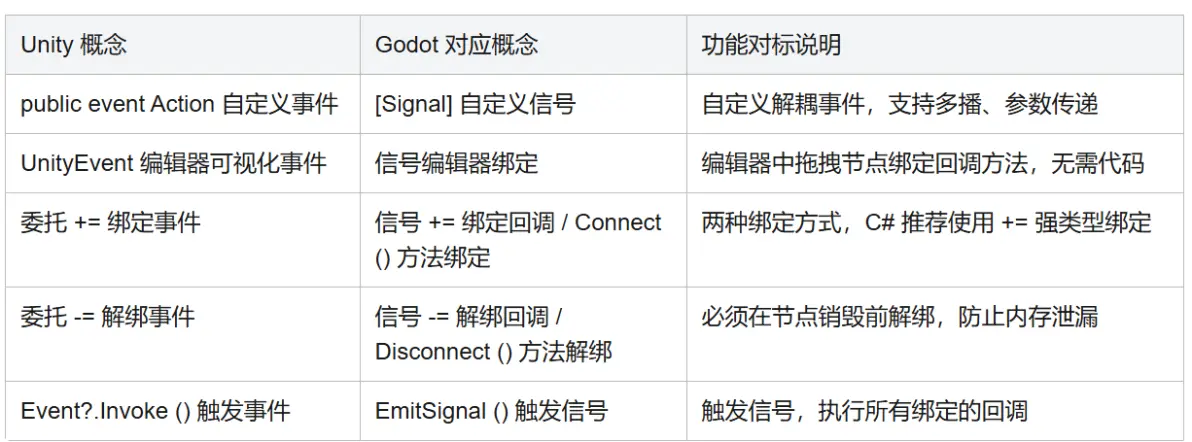
Godot 4.x C# 中,自定义信号必须遵循 [Signal] 特性 + EventHandler 后缀委托 的规范,源码生成器会自动生成强类型的信号事件,编译期校验参数类型,杜绝运行时错误。
完整示例(对标 Unity 自定义事件)
Unity 原版参考写法
代码块
using UnityEngine;

public class Player : MonoBehaviour
{
    // 定义自定义事件
    public event Action<int, int> OnHealthChanged;
    public event Action OnPlayerDied;

    private int _currentHealth;
    private int _maxHealth = 100;

    private void Start()
    {
        _currentHealth = _maxHealth;
    }

    public void TakeDamage(int damage)
    {
        _currentHealth = Mathf.Max(0, _currentHealth - damage);
        // 触发血量变化事件
        OnHealthChanged?.Invoke(_currentHealth, _maxHealth);

        if (_currentHealth <= 0)
        {
            // 触发玩家死亡事件
            OnPlayerDied?.Invoke();
        }
    }
}
Godot C# 对应标准写法
代码块
using Godot;

[GlobalClass]
public partial class Player : CharacterBody2D
{
    // 定义自定义信号:必须加[Signal]特性,委托名必须以EventHandler结尾
    // 源码生成器会自动生成去掉EventHandler后缀的强类型信号(HealthChanged、PlayerDied)
    [Signal]
    public delegate void HealthChangedEventHandler(int currentHealth, int maxHealth);

    [Signal]
    public delegate void PlayerDiedEventHandler();

    [Export] public int MaxHealth = 100;
    private int _currentHealth;

    public override void _Ready()
    {
        _currentHealth = MaxHealth;
    }

    public void TakeDamage(int damage)
    {
        _currentHealth = Mathf.Max(0, _currentHealth - damage);

        // 触发信号:强类型写法,推荐使用SignalName.XXX,避免硬编码字符串
        EmitSignal(SignalName.HealthChanged, _currentHealth, MaxHealth);

        if (_currentHealth <= 0)
        {
            EmitSignal(SignalName.PlayerDied);
        }
    }
}
Godot C# 提供两种绑定方式,推荐使用 += 强类型事件绑定,完全贴合 C# 开发习惯,编译期校验;Connect () 方法适用于动态绑定、编辑器绑定场景。
方式 1:+= 强类型绑定(对标 Unity 委托绑定,首选)
代码块
using Godot;

public partial class UIManager : CanvasLayer
{
    [Export] public Player PlayerNode;
    [Export] public Label HealthLabel;
    [Export] public Panel GameOverPanel;

    public override void _Ready()
    {
        // 绑定信号回调,对标Unity的 Player.OnHealthChanged += UpdateHealthUI;
        PlayerNode.HealthChanged += UpdateHealthUI;
        PlayerNode.PlayerDied += ShowGameOverPanel;
    }

    // 血量变化回调,参数必须与信号定义完全一致
    private void UpdateHealthUI(int currentHealth, int maxHealth)
    {
        HealthLabel.Text = $"血量:{currentHealth}/{maxHealth}";
    }

    private void ShowGameOverPanel()
    {
        GameOverPanel.Visible = true;
    }

    // 必须在节点离开场景树时解绑,防止内存泄漏,对标Unity的OnDestroy里解绑
    public override void _ExitTree()
    {
        PlayerNode.HealthChanged -= UpdateHealthUI;
        PlayerNode.PlayerDied -= ShowGameOverPanel;
    }
}
方式 2:编辑器可视化绑定(对标 UnityEvent)
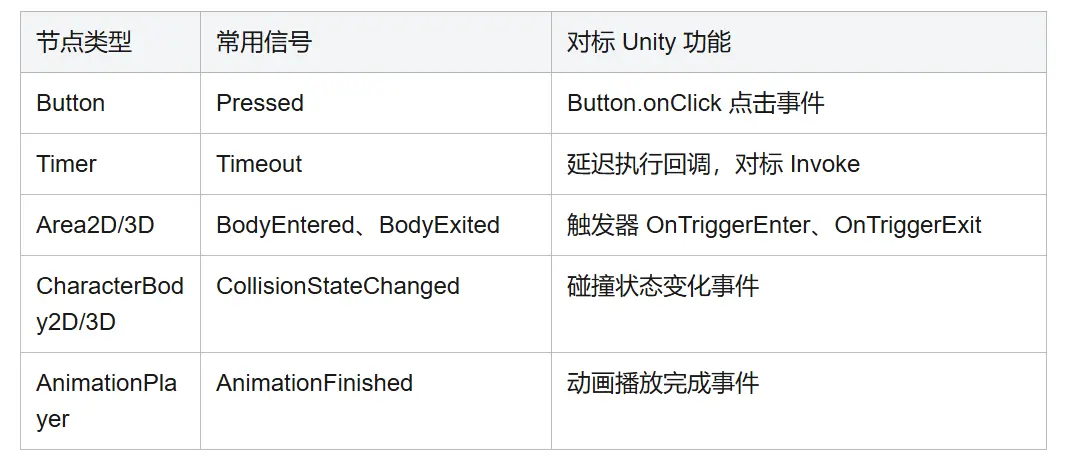
Godot 所有内置节点都提供了大量预设信号,对标 Unity 的 UI 事件、触发器事件、动画事件等,无需自己定义,直接绑定即可使用。
高频内置信号示例
代码示例:按钮点击信号绑定
代码块
using Godot;

public partial class MainMenu : CanvasLayer
{
    private Button _startButton;
    private Button _quitButton;

    public override void _Ready()
    {
        // 获取按钮节点
        _startButton = GetNode<Button>("StartButton");
        _quitButton = GetNode<Button>("QuitButton");

        // 绑定点击信号,两种写法均可
        // 写法1:+= 强类型绑定(推荐)
        _startButton.Pressed += OnStartGame;
        // 写法2:Connect方法绑定
        _quitButton.Connect(Button.SignalName.Pressed, Callable.From(OnQuitGame));
    }

    private void OnStartGame()
    {
        GD.Print("开始游戏");
        GetTree().ChangeSceneToFile("res://Scenes/Game.tscn");
    }

    private void OnQuitGame()
    {
        GD.Print("退出游戏");
        GetTree().Quit();
    }

    public override void _ExitTree()
    {
        // 解绑信号
        _startButton.Pressed -= OnStartGame;
        _quitButton.Disconnect(Button.SignalName.Pressed, Callable.From(OnQuitGame));
    }
}
Unity 开发者习惯使用IEnumerator协程实现延迟执行、分步逻辑、异步加载等需求;Godot C# 原生支持C# 标准 async/await 语法,完全替代协程,语法更标准、功能更强大、调试更友好,无 GC 开销,完美适配.NET 生态。
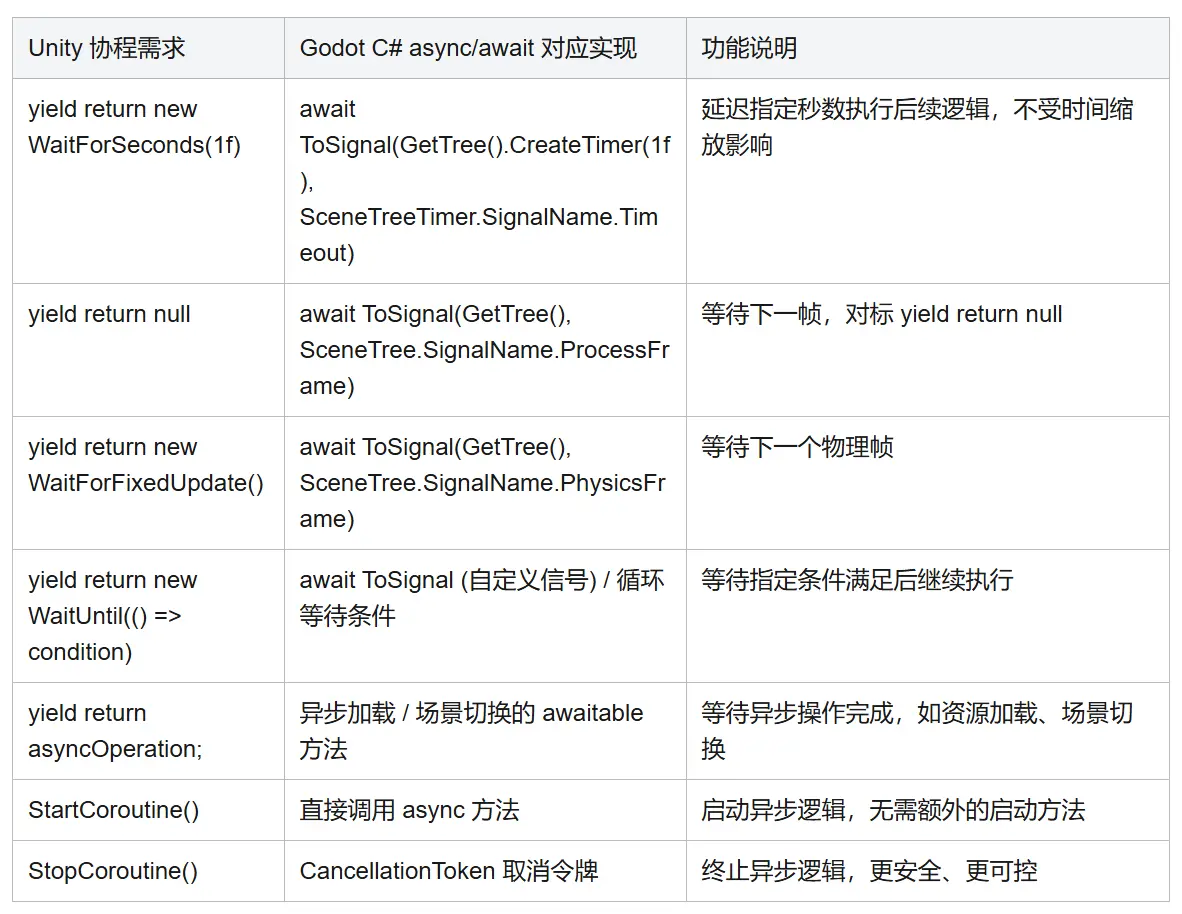
场景 1:基础延迟执行(对标 Unity WaitForSeconds)
Unity 协程原版写法
代码块
using UnityEngine;
using System.Collections;

public class DelayTest : MonoBehaviour
{
    private void Start()
    {
        StartCoroutine(DelayDoSomething(3f));
    }

    private IEnumerator DelayDoSomething(float delaySeconds)
    {
        Debug.Log("延迟开始");
        yield return new WaitForSeconds(delaySeconds);
        Debug.Log("3秒后执行此逻辑");
    }
}
Godot C# async/await 对应写法
代码块
using Godot;

[GlobalClass]
public partial class DelayTest : Node2D
{
    public override void _Ready()
    {
        // 直接调用async方法,无需对标StartCoroutine的额外方法
        DelayDoSomething(3f);
    }

    // 必须声明async关键字,返回值推荐用Task,无返回值可用async void
    private async void DelayDoSomething(float delaySeconds)
    {
        GD.Print("延迟开始");
        // 延迟指定秒数,CreateTimer第二个参数设为true可忽略时间缩放,对标WaitForSecondsRealtime
        await ToSignal(GetTree().CreateTimer(delaySeconds), SceneTreeTimer.SignalName.Timeout);
        GD.Print("3秒后执行此逻辑");
    }
}
场景 2:循环分步执行(对标 Unity yield return null 循环)
常用于倒计时、动画分步执行、进度条更新等需求,完全替代协程的循环写法。
代码块
using Godot;
using System.Threading.Tasks;

[GlobalClass]
public partial class CountdownTest : Node2D
{
    [Export] public int TotalSeconds = 10;
    [Export] public Label CountdownLabel;

    public override void _Ready()
    {
        StartCountdown();
    }

    private async void StartCountdown()
    {
        int currentTime = TotalSeconds;

        while (currentTime > 0)
        {
            CountdownLabel.Text = $"倒计时:{currentTime}秒";
            currentTime--;
            // 等待1秒,继续下一次循环
            await ToSignal(GetTree().CreateTimer(1f), SceneTreeTimer.SignalName.Timeout);
        }

        CountdownLabel.Text = "倒计时结束!";
    }
}
场景 3:等待信号触发(对标 Unity WaitForEvent)
异步等待自定义信号或引擎信号触发,无需额外的回调嵌套,代码逻辑完全线性。
代码块
using Godot;

[GlobalClass]
public partial class WaitSignalTest : Node2D
{
    [Export] public Player PlayerNode;
    [Export] public Button StartButton;

    public override void _Ready()
    {
        WaitPlayerDie();
        WaitButtonClick();
    }

    // 异步等待玩家死亡信号
    private async void WaitPlayerDie()
    {
        GD.Print("等待玩家死亡");
        // 等待PlayerDied信号触发,再执行后续逻辑
        await ToSignal(PlayerNode, Player.SignalName.PlayerDied);
        GD.Print("玩家已死亡,执行游戏结束逻辑");
    }

    // 异步等待按钮点击
    private async void WaitButtonClick()
    {
        GD.Print("等待按钮点击");
        await ToSignal(StartButton, Button.SignalName.Pressed);
        GD.Print("按钮被点击,开始游戏");
    }
}
场景 4:异步资源加载与场景切换(对标 Unity AsyncOperation)
Godot 的资源加载、场景切换均提供 awaitable 异步方法,避免主线程卡顿,对标 Unity 的异步加载。
代码块
using Godot;
using System.Threading.Tasks;

[GlobalClass]
public partial class AsyncLoadTest : Node2D
{
    [Export] public Label LoadingLabel;
    [Export] public ProgressBar LoadingProgress;

    public override void _Ready()
    {
        LoadGameSceneAsync();
    }

    private async void LoadGameSceneAsync()
    {
        LoadingLabel.Text = "开始加载游戏场景...";

        // 1. 异步加载场景资源,不阻塞主线程
        var loadTask = ResourceLoader.LoadThreadedRequest("res://Scenes/Game.tscn");

        // 2. 监听加载进度,更新UI
        while (ResourceLoader.LoadThreadedGetStatus("res://Scenes/Game.tscn") != ResourceLoader.ThreadLoadStatus.Loaded)
        {
            float progress = ResourceLoader.LoadThreadedGetProgress("res://Scenes/Game.tscn");
            LoadingProgress.Value = progress * 100;
            LoadingLabel.Text = $"加载中:{progress * 100:F0}%";
            // 等待下一帧,更新进度
            await ToSignal(GetTree(), SceneTree.SignalName.ProcessFrame);
        }

        LoadingLabel.Text = "加载完成,正在进入游戏...";
        // 等待0.5秒,给用户看加载完成提示
        await ToSignal(GetTree().CreateTimer(0.5f), SceneTreeTimer.SignalName.Timeout);

        // 3. 切换场景
        GetTree().ChangeSceneToFile("res://Scenes/Game.tscn");
    }
}
Godot 输入系统同时兼容两种开发模式:
输入映射是 Godot 输入系统的核心,将物理按键(键盘 A、手柄十字键左等)绑定到逻辑动作(move_left、jump 等),代码中仅需检测逻辑动作,无需关心具体按键,完美适配跨平台开发。
配置步骤
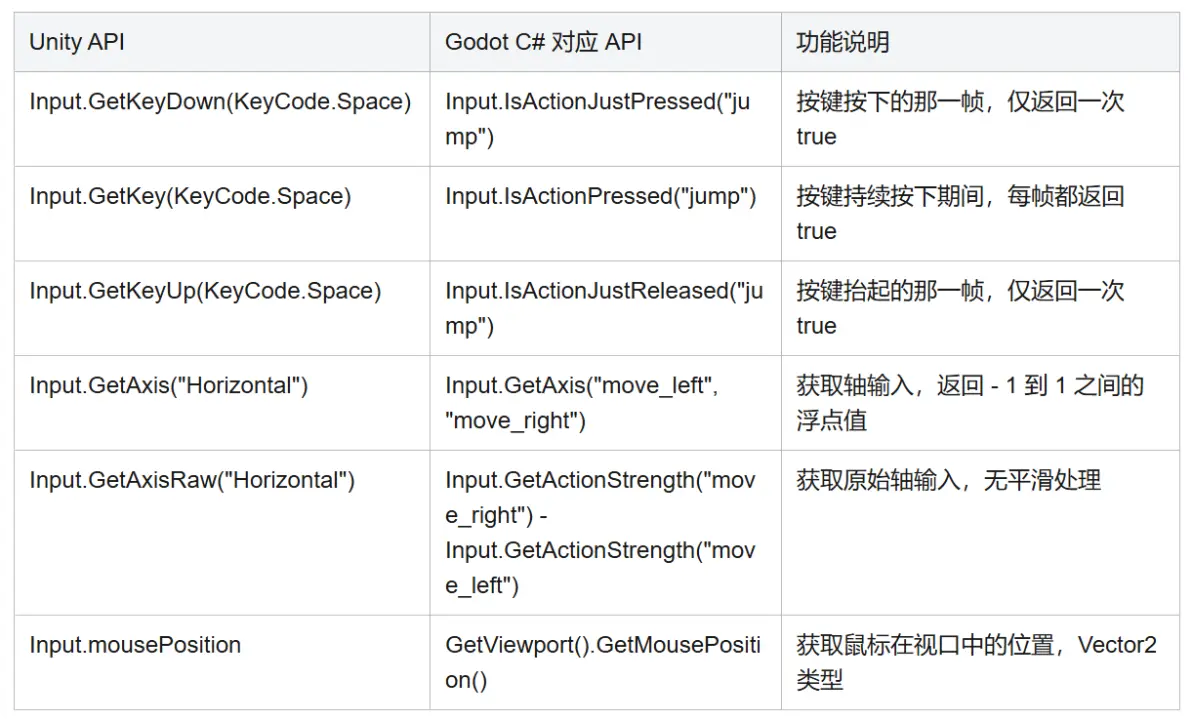
Unity 原版参考写法
代码块
using UnityEngine;

public class PlayerController : MonoBehaviour
{
    [SerializeField] private float moveSpeed = 5f;
    [SerializeField] private float jumpForce = 7f;
    private Rigidbody2D _rb;
    private Vector2 _moveInput;
    private bool _isGrounded;

    private void Awake()
    {
        _rb = GetComponent<Rigidbody2D>();
    }

    private void Update()
    {
        // 输入检测
        _moveInput.x = Input.GetAxisRaw("Horizontal");
        _moveInput.y = Input.GetAxisRaw("Vertical");
        _moveInput.Normalize();

        // 跳跃检测
        if (Input.GetButtonDown("Jump") && _isGrounded)
        {
            _rb.AddForce(Vector2.up * jumpForce, ForceMode2D.Impulse);
        }
    }

    private void FixedUpdate()
    {
        // 移动逻辑
        _rb.velocity = new Vector2(_moveInput.x * moveSpeed, _rb.velocity.y);
    }

    private void OnCollisionEnter2D(Collision2D other)
    {
        if (other.collider.CompareTag("Ground"))
        {
            _isGrounded = true;
        }
    }

    private void OnCollisionExit2D(Collision2D other)
    {
        if (other.collider.CompareTag("Ground"))
        {
            _isGrounded = false;
        }
    }
}
Godot C# 对应实现
代码块
using Godot;

[GlobalClass]
public partial class PlayerController : CharacterBody2D
{
    // 导出字段,编辑器可编辑
    [Export] public float MoveSpeed = 300f;
    [Export] public float JumpForce = -500f; // Godot 2D Y轴向下,所以跳跃力为负数
    [Export] public float Gravity = 1200f;

    private Vector2 _moveInput;
    private bool _isGrounded => IsOnFloor(); // CharacterBody2D内置地面检测,无需自己实现

    // 物理逻辑全部写在_PhysicsProcess中,对标Unity FixedUpdate
    public override void _PhysicsProcess(double delta)
    {
        // 1. 重力应用
        if (!_isGrounded)
        {
            Velocity = new Vector2(Velocity.X, Velocity.Y + Gravity * (float)delta);
        }
        else
        {
            // 落地后重置Y轴速度
            Velocity = new Vector2(Velocity.X, 0);
        }

        // 2. 输入检测
        // 轴输入,对标Unity GetAxisRaw,返回-1到1的值
        _moveInput.X = Input.GetAxis("move_left", "move_right");
        _moveInput.Y = Input.GetAxis("move_up", "move_down");
        _moveInput = _moveInput.Normalized();

        // 跳跃检测:按键按下的那一帧触发,且必须在地面上
        if (Input.IsActionJustPressed("jump") && _isGrounded)
        {
            Velocity = new Vector2(Velocity.X, JumpForce);
        }

        // 3. 移动逻辑
        Velocity = new Vector2(_moveInput.X * MoveSpeed, Velocity.Y);
        // 执行移动,内置碰撞检测,对标Unity Rigidbody2D.velocity
        MoveAndSlide();
    }
}
鼠标输入检测
代码块
using Godot;

public partial class MouseTest : Node2D
{
    public override void _Process(double delta)
    {
        // 获取鼠标位置,对标Unity Input.mousePosition
        Vector2 mousePos = GetViewport().GetMousePosition();
        GD.Print($"鼠标位置:{mousePos}");

        // 鼠标左键按下检测
        if (Input.IsMouseButtonPressed(MouseButton.Left))
        {
            GD.Print("鼠标左键持续按下");
        }

        // 鼠标左键按下的那一帧
        if (Input.IsMouseButtonJustPressed(MouseButton.Left))
        {
            GD.Print("鼠标左键按下");
        }

        // 鼠标滚轮检测
        float wheelDelta = Input.GetMouseWheelVertical();
        if (wheelDelta != 0)
        {
            GD.Print($"鼠标滚轮滚动:{wheelDelta}");
        }
    }
}


      复制成功
事件回调式输入(对标 Unity Input System 事件回调)
无需每帧检测输入,通过重写_Input方法,仅在输入事件发生时触发,性能更优,适合单次输入事件(如跳跃、攻击、菜单打开)Meshimer。
代码块
using Godot;

public partial class InputEventTest : Node2D
{
    // 输入事件发生时触发,仅在有输入时执行,无需每帧检测
    public override void _Input(InputEvent @event)
    {
        // 跳跃动作按下
        if (@event.IsActionPressed("jump"))
        {
            GD.Print("跳跃动作触发,无需每帧检测");
            Jump();
        }

        // 攻击动作按下
        if (@event.IsActionPressed("attack"))
        {
            GD.Print("攻击动作触发");
            Attack();
        }
    }

    private void Jump()
    {
        // 跳跃逻辑
    }

    private void Attack()
    {
        // 攻击逻辑
    }
}


      复制成功
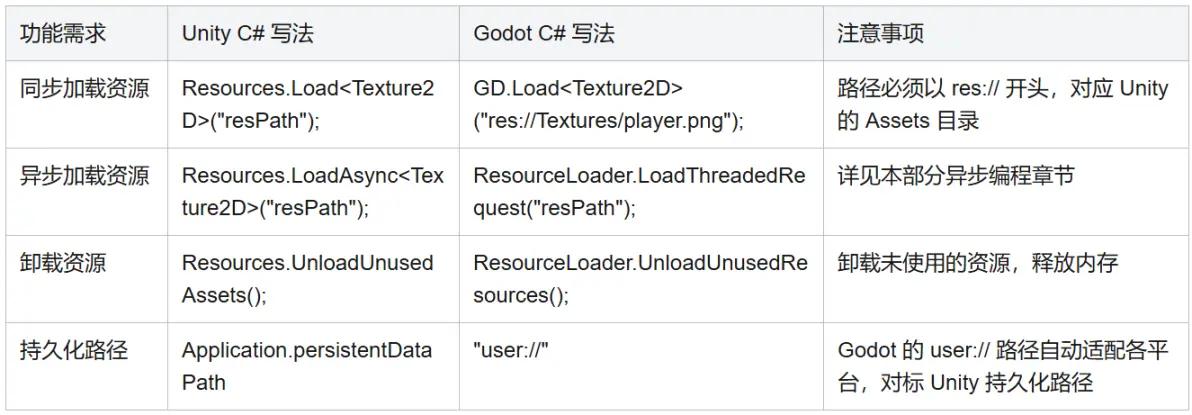
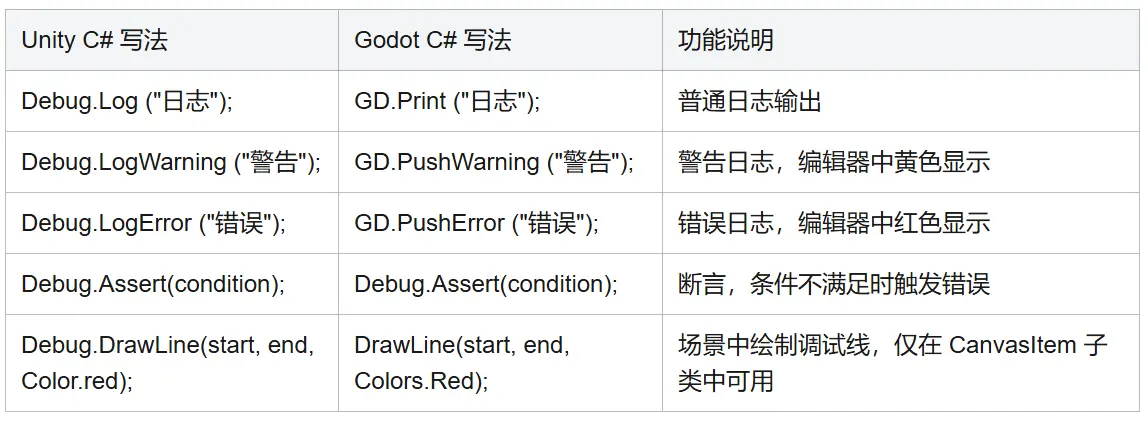
本部分覆盖日常开发 90% 的高频 API,1:1 对标 Unity 写法,可直接作为开发手册复制使用。
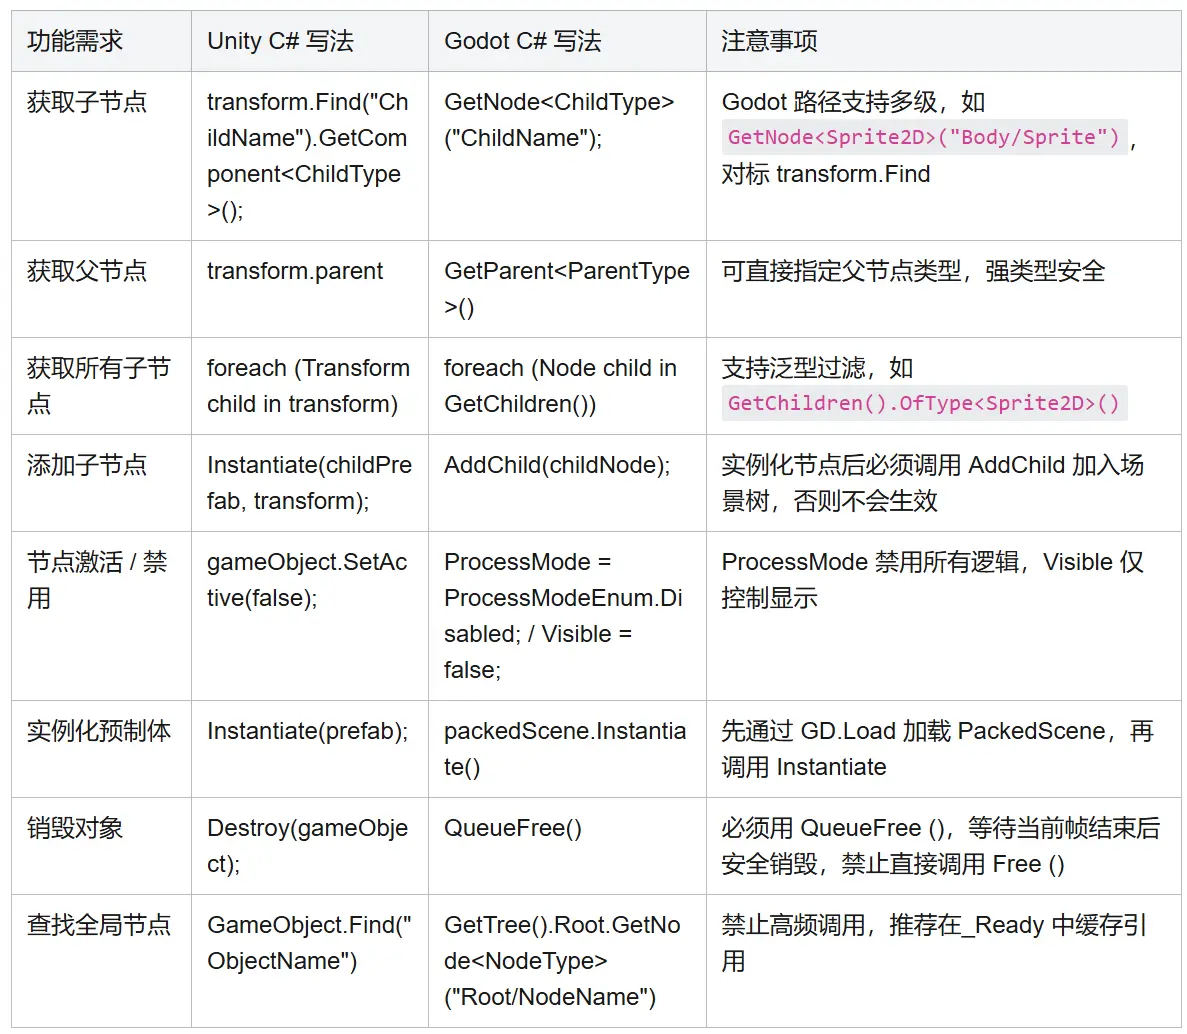
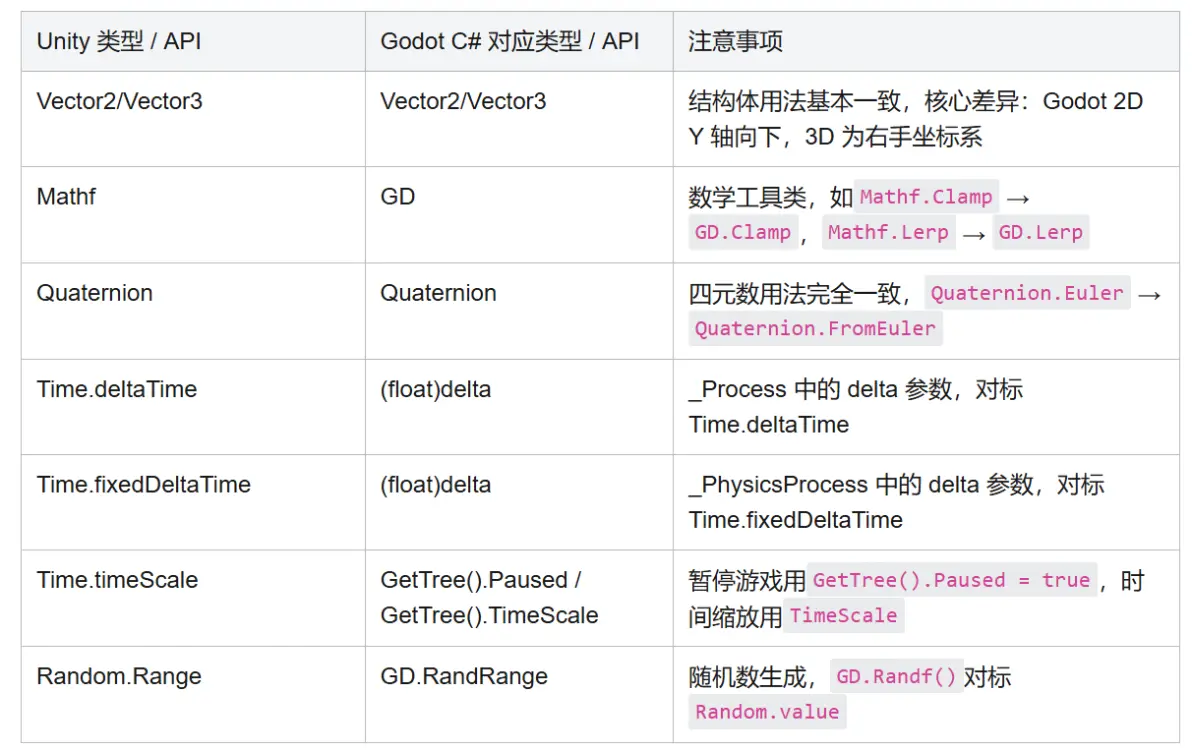
第三部分将完整讲解:
免责声明:本文系网络转载或改编,未找到原创作者,版权归原作者所有。如涉及版权,请联系删
 技术文档
 推荐好文



 155-2731-8020