软件

产品


## 简介
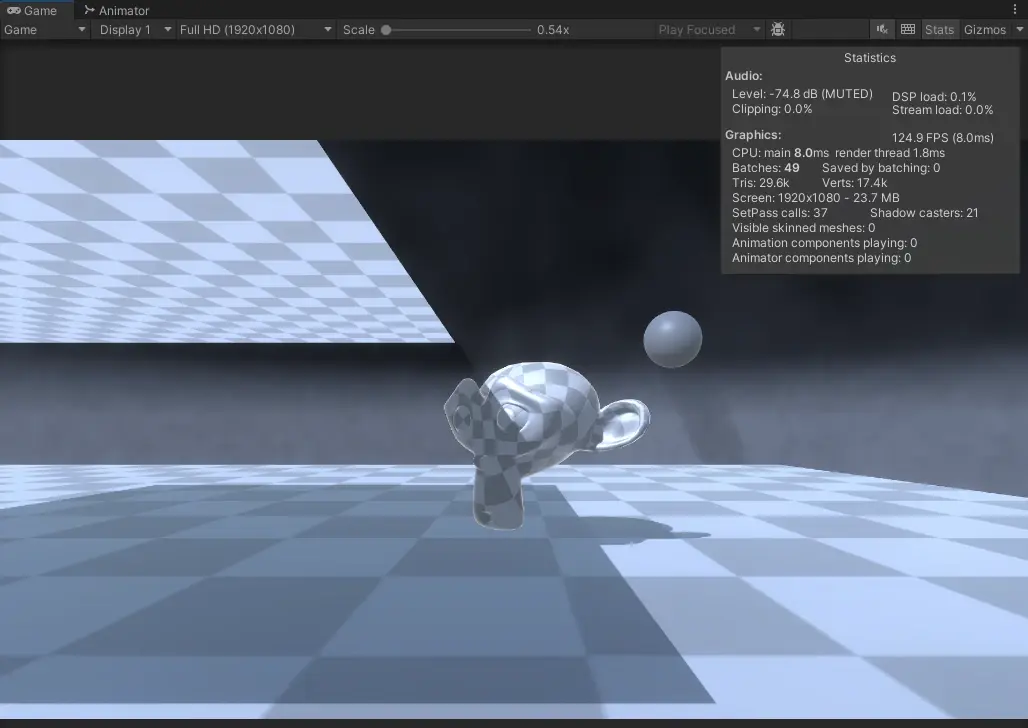
体积雾是一种视觉效果,用于模拟光在介质(如雾、烟或云)中的散射。本文档将介绍如何在 Unity 中使用 **Raymarching** 技术实现体积雾,并结合提供的代码文件(`VolumeLighting.shader`、`VolumeLightingFeature.cs`、`VolumLightingVolume.cs` 和 `Composite.shadergraph`)详细说明实现过程,包括性能优化、使用 **Fractal Brownian Motion (FBM)** 实现动态雾、加入高度雾的效果,以及最终的实现方案。
## 1. **使用 Raymarching 实现体积雾** ###
1.1 什么是 Raymarching? RayMarching 是一种渲染技术,通过沿着光线对 3D 空间进行采样,确定光与介质的交互。与传统的光栅化渲染不同,Raymarching 可以模拟体积效果,通过逐步采样光线路径上的密度和光照值来实现。 其原理是从摄像机位置出发,往视锥内一个像素方向前进,每隔一定距离计算该空间点中雾的密度/光的贡献,将每次步进计算的值累加后,得到这个像素的光照值。逐像素执行如此的计算后,获得视锥空间内的体积光照值。 RayMarching正是用这种简单粗暴的方式实现体积光/体积雾,通过其原理也可推测其性能消耗非常昂贵,需要利用适当的优化技术才能实现流程运行。 ###
1.2 在 `VolumeLighting.shader` 中的实现基础的 Raymarching 首先在Unity的渲染管线资源中开启屏幕深度纹理的生成,以便在Shader中获取像素的深度信息。 开启方法是在Project Settings -> Graphics -> Scriptable Render Pipeline Settings中,选择的渲染管线资源(如URP Asset),然后在Inspector面板中勾选 `Depth Texture` 选项。 开启后,渲染管线会在渲染过程中生成一个深度纹理,供后续的Shader使用。 新建一个Shader文件 `VolumeLighting.shader`,并在其中实现Raymarching逻辑。以下是关键代码片段及其解释:
1. **在`Properties`中定义体积雾的参数** Properties { [Header(Raymarch)] _MaxStep ("MaxStep", float) = 200 // 最大步数 _MaxDistance ("MaxDistance", float) = 200 // 最大距离 _StepSize ("StepSize", Range(0, 2)) = 0.1 // 步长 [Header(Lighting)] _LightIntensity ("LightIntensity", Range(0, 10)) = 0.5 // 光强度 _LightColor ("LightColor", Color) = (1, 1, 1, 1) // 光颜色 _ShadowPower ("ShadowPower", Range(0, 3)) = 1.0 // 阴影强度 }
2. **在顶点着色器中传递 UV 和深度信息** SubShader { Tags { "RenderType" = "Opaque" "RenderPipeline" = "UniversalPipeline" } ZWrite Off ZTest Always Cull Off Pass { Tags { "LightMode" = "UniversalForward" } HLSLPROGRAM // 接收阴影所需关键字 #pragma multi_compile _ _MAIN_LIGHT_SHADOWS #pragma multi_compile _ _MAIN_LIGHT_SHADOWS_CASCADE #pragma multi_compile _ _SHADOWS_SOFT #pragma vertex vert #pragma fragment frag #include "Packages/com.unity.render-pipelines.universal/ShaderLibrary/Core.hlsl" #include "Packages/com.unity.render-pipelines.universal/ShaderLibrary/Lighting.hlsl" #include "Packages/com.unity.render-pipelines.universal/ShaderLibrary/Shadows.hlsl" // shader 从渲染管线获取的各种内置变量 struct Attributes { float4 positionOS : POSITION; float3 normalOS : NORMAL; float4 tangentOS : TANGENT; float2 uv : TEXCOORD0; }; // 顶点着色器输出到片段着色器的数据结构 struct Varyings { float4 positionCS : SV_POSITION; float3 positionWS : TEXCOORD0; float3 normalWS : TEXCOORD1; float3 viewDirWS : TEXCOORD2; float3 positionOS : TEXCOORD3; float2 uv : TEXCOORD4; }; // 参数定义 TEXTURE2D_X_FLOAT(_CameraDepthTexture); SAMPLER(sampler_CameraDepthTexture); TEXTURE2D(_MainTex); SAMPLER(sampler_MainTex); float _MaxDistance; float _MaxStep; float _StepSize; float _LightIntensity; half4 _LightColor; float _ShadowPower; // 顶点着色器 Varyings vert(Attributes v) { Varyings o; // 获取不同空间下坐标信息 VertexPositionInputs positionInputs = GetVertexPositionInputs(v.positionOS.xyz); o.positionCS = positionInputs.positionCS; // UV坐标传递 o.uv = v.uv; return o; } half4 frag(Varyings i) : SV_Target { // TODO: Raymarching 实现体积雾逻辑 } ENDHLSL } } FallBack "Packages/com.unity.render-pipelines.universal/FallbackError"
3. **`frag` 函数实现了 Raymarching 的核心逻辑** 主要步骤如下:
接下来是依次实现上面步骤的代码片段: a. **读取深度纹理** 因为之前开启了深度纹理的生成,可以在Shader中通过 `_CameraDepthTexture` 访问它: half4 frag(Varyings i) : SV_Target { float2 uv = i.uv; float depth = SAMPLE_TEXTURE2D_X(_CameraDepthTexture, sampler_CameraDepthTexture, uv).r; depth = 1 - depth; // ......exited code } b. **计算光线起点和方向** 光线起点是摄像机位置 之前传递的uv坐标和深度值可以用来计算光线在世界空间中的起点和方向: float4 GetTheWorldPos(float2 ScreenUV, float Depth) { //获取像素的屏幕空间位置 float3 ScreenPos = float3(ScreenUV, Depth); float4 normalScreenPos = float4(ScreenPos * 2.0 - 1.0, 1.0); //得到ndc空间下像素位置 float4 ndcPos = mul(unity_CameraInvProjection, normalScreenPos); ndcPos = float4(ndcPos.xyz / ndcPos.w, 1.0); //获取世界空间下像素位置 float4 sencePos = mul(unity_CameraToWorld, ndcPos * float4(1, 1, - 1, 1)); sencePos = float4(sencePos.xyz, 1.0); return sencePos; } half4 frag(Varyings i) : SV_Target { float2 uv = i.uv; float depth = SAMPLE_TEXTURE2D_X(_CameraDepthTexture, sampler_CameraDepthTexture, uv).r; depth = 1 - depth; float3 ro = _WorldSpaceCameraPos.xyz; // 摄像机位置 float3 worldPos = GetTheWorldPos(uv, depth).xyz; // 像素在世界空间的位置 float3 rd = normalize(worldPos - ro); // 光线方向 float3 currentPos = ro; // 光线起点 float m_length = min(length(worldPos - ro), _MaxDistance); // 最大采样距离,取决于像素深度和预设最大距离 // ......exited code } c. **Raymarching 循环** 之后就是在一个循环中沿着光线前进,计算每个采样点的雾密度和光照贡献: float GetShadow(float3 posWorld) { // 通过内置函数计算阴影 float4 shadowCoord = TransformWorldToShadowCoord(posWorld); float shadow = MainLightRealtimeShadow(shadowCoord); return shadow; } half4 frag(Varyings i) : SV_Target { // ......exited code // 计算步长 float delta = _StepSize; float3 addLength = delta * rd; // 累积光照值 float totalValue = 0; // 通过最大采样步数获得最大光照值,用于归一化 float maxLightValue = min(_MaxStep, _MaxDistance / _StepSize); // 距离变量 float d = 0; for(int j = 0; j < _MaxStep; j ++) { // 采样位置超过最大采样距离则跳出 d += delta; if(d > m_length) break; currentPos += addLength; // 计算阴影 float shadow = GetShadow(currentPos); totalValue += _LightIntensity * shadow; } // 颜色矫正 half3 lightCol = pow(totalValue / maxLightValue, _ShadowPower) * _LightColor.rgb * _MainLightColor.rgb; return real4(lightCol, 1); } ### 1.3 使用 `VolumeLightingFeature` 体积雾效果集成渲染管线(URP)中 新建脚本 `VolumeLightingFeature.cs`,将体积雾效果集成到 Unity 的通用渲染管线(URP)中,作为一个自定义渲染 Pass。体积雾效果在透明物体渲染之后应用。 `VolumeLightingFeature.cs`的工作是:
为此先创建一个新的shaderGraph `Composite.shadergraph`,用于将体积雾效果与场景颜色进行混合:
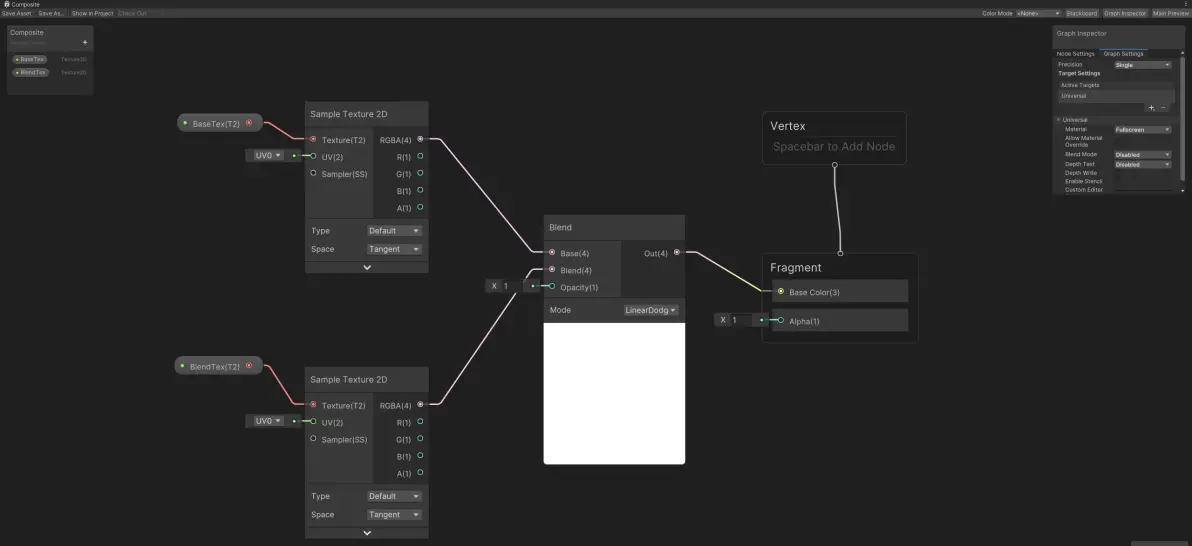
然后在 `VolumeLightingFeature.cs` 中实现渲染逻辑: using System; using UnityEngine; using UnityEngine.Rendering; using UnityEngine.Rendering.Universal; public class VolumeLightingFeature : ScriptableRendererFeature { [System.Serializable] public class LightingEventSetting { public RenderPassEvent Event = RenderPassEvent.AfterRenderingTransparents; } public LightingEventSetting settings = new LightingEventSetting(); class VolumeLightingPass : ScriptableRenderPass { RenderTargetIdentifier currentTarget; VolumLightingVolume volumeLighting; Material volumeLightingMaterail; Material compositeMaterial; // static readonly int TempTargetId = Shader.PropertyToID("_TempTargetVolumLighting"); // static readonly int MaxStepId = Shader.PropertyToID("_MaxStep"); // static readonly int MaxDistanceId = Shader.PropertyToID("_MaxDistance"); // static readonly int StepSizeId = Shader.PropertyToID("_StepSize"); // static readonly int LightIntensityId = Shader.PropertyToID("_LightIntensity"); // static readonly int ShadowPowerId = Shader.PropertyToID("_ShadowPower"); static readonly int _BaseTex = Shader.PropertyToID("_BaseTex"); static readonly int _BlendTex = Shader.PropertyToID("_BlendTex"); static readonly string k_RenderTag = "Render Volume Lighting Effects"; public VolumeLightingPass(RenderPassEvent evt) { renderPassEvent = evt; var shader = Shader.Find("PostEffect/VolumeLighting"); if (shader == null) { Debug.LogError("PostEffect/VolumeLighting路径下无法找到着色器"); return; } } public override void OnCameraSetup(CommandBuffer cmd, ref RenderingData renderingData) { currentTarget = renderingData.cameraData.renderer.cameraColorTargetHandle; } public override void Execute(ScriptableRenderContext context, ref RenderingData renderingData) { if (!renderingData.cameraData.postProcessEnabled) return; var stac = VolumeManager.instance.stack; volumeLighting = stac.GetComponent<VolumLightingVolume>(); if (volumeLighting == null) { Debug.LogError("VolumLighting为空"); return; } if (!volumeLighting.IsActive()) { return; } volumeLightingMaterail = volumeLighting.volumLightingMaterial.value; if (volumeLightingMaterail == null) { Debug.LogError("体积光材质为空"); return; } compositeMaterial = volumeLighting.compositeMaterial.value; if (compositeMaterial == null) { Debug.LogError("体积光合成材质为空"); return; } var cmd = CommandBufferPool.Get(k_RenderTag); Render(cmd, ref renderingData); context.ExecuteCommandBuffer(cmd); CommandBufferPool.Release(cmd); } public override void OnCameraCleanup(CommandBuffer cmd) { } void Render(CommandBuffer cmd, ref RenderingData renderingData) { ref var cameraData = ref renderingData.cameraData; // 复制当前屏幕内容 var colourText = RenderTexture.GetTemporary(cameraData.camera.scaledPixelWidth, cameraData.camera.scaledPixelHeight, 0, RenderTextureFormat.Default); cmd.Blit(currentTarget, colourText); var w = cameraData.camera.scaledPixelWidth; var h = cameraData.camera.scaledPixelHeight; var destinationTex = RenderTexture.GetTemporary(w, h, 0, RenderTextureFormat.Default); // 设置体积光材质参数 // volumeLightingMaterail.SetInt(MaxStepId, volumeLighting.maxStep.value); // volumeLightingMaterail.SetFloat(MaxDistanceId, volumeLighting.maxDistance.value); // volumeLightingMaterail.SetFloat(StepSizeId, volumeLighting.stepSize.value); // volumeLightingMaterail.SetFloat(LightIntensityId, volumeLighting.lightIntensity.value); // volumeLightingMaterail.SetFloat(ShadowPowerId, volumeLighting.shadowPower.value); // 渲染体积光 int shaderPass = 0; cmd.Blit(destinationTex, destinationTex, volumeLightingMaterail, shaderPass); // 合成 compositeMaterial.SetTexture(_BlendTex, destinationTex); compositeMaterial.SetTexture(_BaseTex, colourText); cmd.Blit(colourText, currentTarget, compositeMaterial); // 释放临时RT RenderTexture.ReleaseTemporary(colourText); RenderTexture.ReleaseTemporary(destinationTex); } } private VolumeLightingPass volumeLightingPass; public override void Create() { volumeLightingPass = new VolumeLightingPass(settings.Event); } public override void AddRenderPasses(ScriptableRenderer renderer, ref RenderingData renderingData) { renderer.EnqueuePass(volumeLightingPass); } } 之后再新建一个Volume组件脚本 `VolumLightingVolume.cs`,用于在场景中添加体积雾效果: using UnityEngine; using UnityEngine.Rendering; using UnityEngine.Rendering.Universal; public class VolumLightingVolume : VolumeComponent, IPostProcessComponent { public MaterialParameter volumLightingMaterial = new MaterialParameter(null); public MaterialParameter compositeMaterial = new MaterialParameter(null); // public ClampedFloatParameter lightIntensity = new ClampedFloatParameter(1f, 0f, 3f); // public FloatParameter stepSize = new FloatParameter(0.1f); // public FloatParameter maxDistance = new FloatParameter(1000); // public IntParameter maxStep = new IntParameter(200); // public FloatParameter shadowPower = new FloatParameter(1f); public bool IsActive() => volumLightingMaterial.value != null && compositeMaterial.value != null; public bool IsTileCompatible() => false; } 开启体积雾效果:
这就完成了一个基础的 Raymarching 体积雾实现。 如果直接使用上述代码,可能会发现性能较差,且雾的效果较为单一。接下来我们将介绍一些性能优化技巧,并结合 FBM 实现动态雾和高度雾效果。
Raymarching 的计算量较大,因为需要对每条光线进行多次采样。以下是代码中实现的性能优化措施:
一般情况下,在离相机较远或细节较少的区域,可以使用较大的步长以减少采样次数。在细节较多的区域,则需要更小的步长以捕捉更多细节。 简单实现一个自适应步长机制:在近处使用较小步长,在远处通过给步长×缩放值实现较大步长。 可以通过smooth函数平滑过渡两个步长,这由 `_SmoothLinearToExp` 开关和 `SmoothLinearToExp` 函数控制。 使用Toggle开关 `_SmoothLinearToExp` 来启用或禁用自适应步长功能: Properties { // ......exited code [Header(Advanced)] [Toggle(_SmoothLinearToExp)]_SmoothLinearToExp ("SmoothLinearToExp", Float) = 1.0 _PreciseSteps ("PreciseSteps", Float) = 100 _TransitionSteps ("TransitionSteps", Float) = 50 _StepScale ("StepScale", Float) = 10.0 } SubShader { // ......exited code Pass { Tags { "LightMode" = "UniversalForward" } HLSLPROGRAM // 自定义关键字,用于启用自适应步长 #pragma shader_feature_local _SmoothLinearToExp // ......exited code // 参数定义 float _PreciseSteps; float _TransitionSteps; float _StepScale; // 平滑过渡函数,返回的是步长的缩放值 // x: 当前步进次数,n: 开始平滑的位置,k: 最大缩放值,a: 平滑范围 float SmoothLinearToExp(float x, float n, float k, float a) { float s = smoothstep(n, n + a, x); return (1-s) + s * k; } half4 frag(Varyings i) : SV_Target { // ......exited code float delta = _StepSize; float3 addLength = delta * rd; // 累积光照值 float totalValue = 0; // 通过最大采样步数获得最大光照值,用于归一化 float maxLightValue = min(_MaxStep, _MaxDistance / _StepSize); // 距离变量 float d = 0; for(int j = 0; j < _MaxStep; j ++) { // 自适应步长计算 #ifdef _SmoothLinearToExp float scale = SmoothLinearToExp(j + 1, _PreciseSteps, _StepScale, _TransitionSteps); d += delta * scale; if(d > m_length) break; currentPos += addLength * scale; #else d += delta; if(d > m_length) break; currentPos += addLength; #endif // 采样位置超过最大采样距离则跳出 d += delta; if(d > m_length) break; currentPos += addLength; // 计算阴影 float shadow = GetShadow(currentPos); totalValue += _LightIntensity * shadow; } // ......exited code } ENDHLSL } }
通过RayMatching原理可知,体积雾的计算量与屏幕分辨率成正比。为了提高性能,可以降低需要计算的像素数量。 在 `VolumeLightingFeature.cs` 中,通过设置 `downSample` 参数降低体积雾的渲染分辨率,从而减少计算量。 public class VolumeLightingFeature : ScriptableRendererFeature { // ......exited code void Render(CommandBuffer cmd, ref RenderingData renderingData) { ref var cameraData = ref renderingData.cameraData; // 复制当前屏幕内容 var colourText = RenderTexture.GetTemporary(cameraData.camera.scaledPixelWidth, cameraData.camera.scaledPixelHeight, 0, RenderTextureFormat.Default); cmd.Blit(currentTarget, colourText); // 降低计算分辨率 var downSample = volumeLighting.downSample.value > 0 ? volumeLighting.downSample.value : 1; var w = cameraData.camera.scaledPixelWidth / downSample; var h = cameraData.camera.scaledPixelHeight / downSample; var downSampleTexture = RenderTexture.GetTemporary(w, h, 0, RenderTextureFormat.Default); // 渲染体积光 int shaderPass = 0; var destinationTex = RenderTexture.GetTemporary(w, h, 0, RenderTextureFormat.Default); cmd.Blit(downSampleTexture, destinationTex, volumeLightingMaterail, shaderPass); // 合成 compositeMaterial.SetTexture(_BlendTex, destinationTex); compositeMaterial.SetTexture(_BaseTex, colourText); cmd.Blit(colourText, currentTarget, compositeMaterial); // 释放临时RT RenderTexture.ReleaseTemporary(colourText); RenderTexture.ReleaseTemporary(destinationTex); RenderTexture.ReleaseTemporary(downSampleTexture); } // ......exited code } 此时再开启体积雾效果,可以明显感觉到性能提升。 通过调整 `downSample` 参数,可以在性能和视觉效果之间找到一个平衡点。
**Fractal Brownian Motion (FBM)** 是一种通过叠加多层噪声(称为倍频层或 Octaves)生成程序化噪声的方法。它非常适合模拟自然现象,如云、雾和水波。 同时,FBM 允许通过调整噪声的频率和振幅来控制细节层次,从而实现更复杂和自然的视觉效果。
`FBM3D` 函数通过多层 3D 噪声生成动态雾: // --- Procedural noise (value noise + FBM) --- float Hash31(float3 p) { p = frac(p * 0.1031); p += dot(p, p.yzx + 33.33); return frac((p.x + p.y) * p.z); } float ValueNoise3D(float3 p) { float3 i = floor(p); float3 f = frac(p); float3 u = f * f * (3.0 - 2.0 * f); float n000 = Hash31(i + float3(0,0,0)); float n100 = Hash31(i + float3(1,0,0)); float n010 = Hash31(i + float3(0,1,0)); float n110 = Hash31(i + float3(1,1,0)); float n001 = Hash31(i + float3(0,0,1)); float n101 = Hash31(i + float3(1,0,1)); float n011 = Hash31(i + float3(0,1,1)); float n111 = Hash31(i + float3(1,1,1)); float nx00 = lerp(n000, n100, u.x); float nx10 = lerp(n010, n110, u.x); float nx01 = lerp(n001, n101, u.x); float nx11 = lerp(n011, n111, u.x); float nxy0 = lerp(nx00, nx10, u.y); float nxy1 = lerp(nx01, nx11, u.y); return lerp(nxy0, nxy1, u.z); // 0..1 } float FBM3D(float3 p, int octaves) { float amp = 1; float sum = 0.0; for (int k = 0; k < octaves; k++) { sum += ValueNoise3D(p) * amp; p *= 2.0; amp *= 0.5; } return sum; // ~0..1 }
通过在噪声位置中加入时间偏移,实现雾的动态移动效果: float t = _TimeParameters.x * _NoiseSpeed; float3 noisePos = currentPos * _NoiseScale + noiseDir * t; float n = FBM3D(noisePos, _NoiseOctaves);
高度雾通过根据当前光线位置的高度对雾的密度进行衰减,从而实现雾在地面附近更浓、在高空逐渐稀薄的效果。 float heightFade = saturate((_MaxHeight - currentPos.y) / _FadeDistance);
回到 `VolumeLighting.shader`,再`Properties`块中添加参数定义: Properties { // ......exited code [Header(Height)] _MaxHeight ("MaxHeight", float) = 1000.0 // 最大高度 _FadeDistance ("FadeDistance", float) = 100.0 // 衰减距离 [Header(Noise)] [Toggle(_Noise)]_Noise ("Noise", Float) = 1.0 // 是否启用噪声 _NoiseScale ("NoiseScale", Range(0, 3)) = 0.5 // 噪声缩放 _NoiseSpeed ("NoiseSpeed", Range(0, 5)) = 1.0 // 噪声速度 _NoiseIntensity ("NoiseIntensity", Range(0, 3)) = 2.0 // 噪声强度 _NoiseDirection ("NoiseDirection (xyz)", Vector) = (1, 0, 0, 0) // 噪声移动方向 _NoiseOctaves ("NoiseOctaves", Range(0, 5)) = 1 // 噪声倍频层数 } SubShader { // ......exited code Pass { Tags { "LightMode" = "UniversalForward" } HLSLPROGRAM // ......exited code #pragma shader_feature_local _Noise #pragma shader_feature_local _SmoothLinearToExp // ......exited code // Noise params float _NoiseScale; float _NoiseSpeed; float _NoiseIntensity; float3 _NoiseDirection; int _NoiseOctaves; float _MaxHeight; float _FadeDistance; // ......exited code half4 frag(Varyings i) : SV_Target { // ......exited code float3 noiseDir = normalize(_NoiseDirection); float totalValue = 0; // 通过最大采样步数获得最大光照值,用于归一化 float maxLightValue = min(_MaxStep, _MaxDistance / _StepSize); // 距离变量 float d = 0; for(int j = 0; j < _MaxStep; j ++) { // ......exited code // 计算高度衰减 float heightFade = saturate((_MaxHeight - currentPos.y) / _FadeDistance); density *= heightFade; // 世界空间的动画噪声 #ifdef _Noise float t = _TimeParameters.x * _NoiseSpeed; float3 noisePos = currentPos * _NoiseScale + noiseDir * t; float n = FBM3D(noisePos, _NoiseOctaves); float noiseFade = smoothstep(50, 100, d); // n = smoothstep(0, noiseFade+ 0.001, n); float density = saturate(pow(n + noiseFade, 3 - _NoiseIntensity)); #else float density = 1.0; #endif // 计算阴影 float shadow = GetShadow(currentPos); totalValue += _LightIntensity * shadow * density * heightFade; } // 颜色矫正 half3 lightCol = pow(totalValue / maxLightValue, _ShadowPower) * _LightColor.rgb * _MainLightColor.rgb; // 采样主纹理颜色,如果不需要屏幕颜色可以省略 half3 oCol = SAMPLE_TEXTURE2D(_MainTex, sampler_MainTex, uv).rgb; half3 lightCol = lightCol + oCol; return real4(lightCol, 1); } ENDHLSL } FallBack "Packages/com.unity.render-pipelines.universal/FallbackError" } 之后可以通过调整噪声参数和高度雾参数,获得丰富多样的体积雾效果。
完整代码在本人的开源框架内:
GitHub - Link-InterNumber/UFlowFramework: 一个轻量级Unity开发框架
github.com/Link-InterNumber/UFlowFramework
免责声明:本文系网络转载或改编,未找到原创作者,版权归原作者所有。如涉及版权,请联系删
 技术文档
 推荐好文



 155-2731-8020