


软件

产品


Esri_Land_Cover_2020_10m数据来源是Esri公司,基于10m哨兵影像数据,使用 深度学习 方法制作做的全球土地覆盖数据。该数据集一共分类十类,分别如下所示: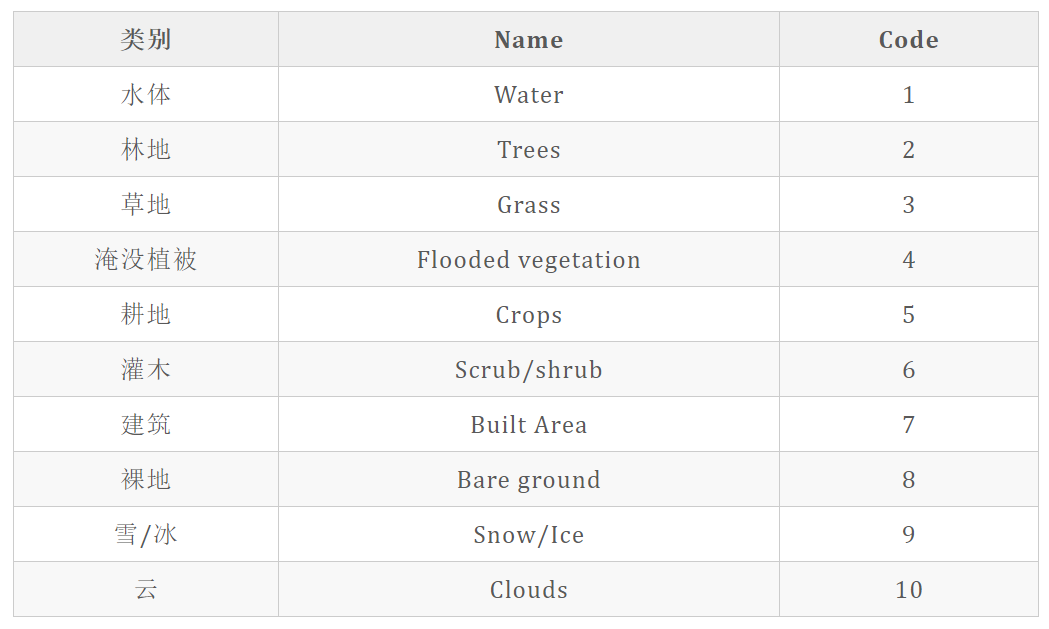
更多介绍参考【10米ESRI土地覆盖数据介绍与下载教程】。
首先下载全球的esri土地覆盖文件,在此基础上操作。
根据影像范围生成影像的边界框shp,便于筛选。python代码如下。 这里使用pyshp创建矢量,pyshp需要是1.2.3版本。
# python3
from osgeo import gdal, osr, ogr
import os
import shapefile
# pyshp需要是1.2.3版本: pip install pyshp==1.2.3
from tqdm import tqdm


def tifbound(tifpath, shppath):
    """
    生成一个tif的边框,保存到一个shp
    :param tifpath:
    :param shppath:
    :return:
    """
    # 1 读取影像坐标点和投影
    ds = gdal.Open(tifpath)
    geo_transform = ds.GetGeoTransform()
    proj = ds.GetProjection()
    srs = osr.SpatialReference()
    srs.ImportFromWkt(proj)
    X, Y = ds.RasterXSize, ds.RasterYSize

    xres, yres = geo_transform[1], geo_transform[-1]
    x0, y0 = geo_transform[0], geo_transform[3]
    x1, y1 = x0 + X * xres, y0
    x2, y2 = x0 + X * xres, y0 + yres * Y
    x3, y3 = x0, y0 + yres * Y
    x4, y4 = x0, y0

    # 2 写出到矢量
    """
    using pyshp create shpfile
    (1) type:You can reference shape types by the numbers or by constants defined by PyShp:
    shapefile.NULL = 0 shapefile.POINT = 1 shapefile.POLYLINE = 3 shapefile.POLYGON = 5
    shapefile.MULTIPOINT = 8 shapefile.POINTZ = 11 shapefile.POLYLINEZ = 13 shapefile.POLYGONZ = 15
    shapefile.MULTIPOINTZ = 18 shapefile.POINTM = 21 shapefile.POLYLINEM = 23 shapefile.POLYGONM = 25
    shapefile.MULTIPOINTM = 28 shapefile.MULTIPATCH = 31'''
    (2) field setting
    Field name: the name describing the data at this column index.
    Field type: the type of data at this column index. Types can be: Character, Numbers, Longs, Dates, or Memo. The “Memo” type has no meaning within a GIS and is part of the xbase spec instead.
    Field length: the length of the data found at this column index. Older GIS software may truncate this length to 8 or 11 characters for “Character” fields.
    Decimal length: the number of decimal places found in “Number” fields.
    """

    w = shapefile.Writer(shapeType=5)
    # 设置字段,最大长度为254,C为字符串
    w.field('FIRST_FLD')
    w.field('SECOND_FLD', 'C', '40')
    # 添加几何和添加字段信息,添加两个示例,字段顺序区分先后
    w.poly([[[x0, y0], [x1, y1], [x2, y2], [x3, y3], [x4, y4]]])
    w.record('First', os.path.basename(tifpath))

    # 保存
    w.save(shppath)

    # 设置投影,通过.prj文件设置,需要写入一个wkt字符串

    # 影像的投影直接写出
    wkt = srs.ExportToWkt()
    # 写出prj文件
    f = open(shppath.replace(".shp", ".prj"), 'w')
    f.write(wkt)
    f.close()
    ds = None


if __name__ == '__main__':

    tifFolder = r"https://www.gofarlic.com\dem\NPP\ESRI_2020_全球\esritif"
    shpFolder = r"https://www.gofarlic.com\dem\NPP\ESRI_2020_全球\shps"
    tifs = [i for i in os.listdir(tifFolder) if i.endswith(".tif")]
    for tif in tqdm(tifs):
        tifpath = os.path.join(tifFolder, tif)
        shppath = os.path.join(shpFolder, tif[:-4] + ".shp")
        tifbound(tifpath,shppath)
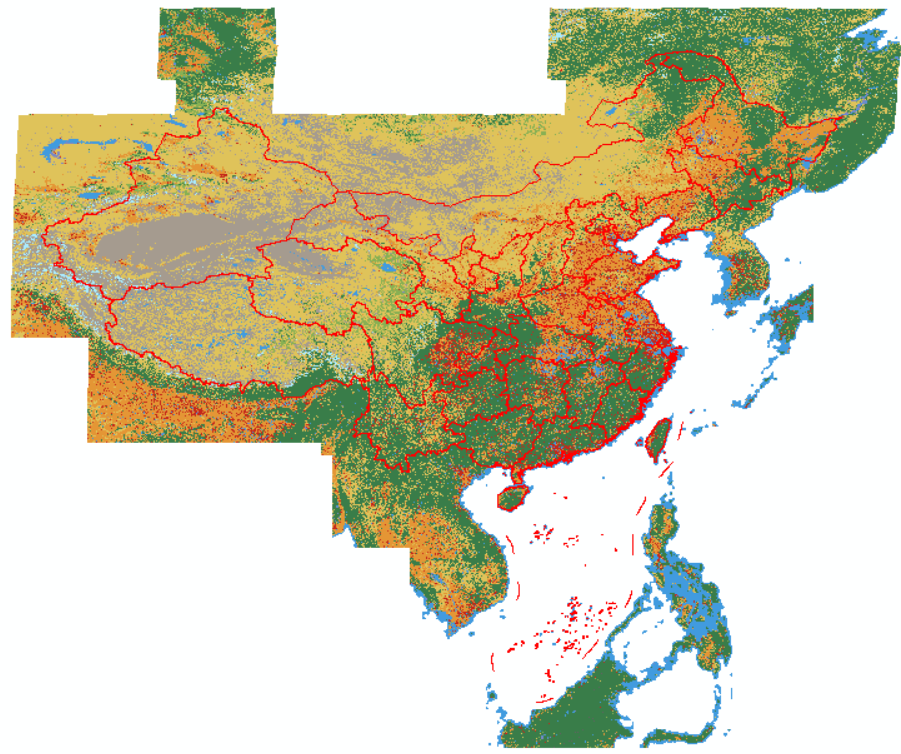
中国范围的 utm 投影分带是43-53带,在arcgis中筛选出需要的影像。
[外链图片转存失败,源站可能有防盗链机制,建议将图片保存下来直接上传(img-nKOcB3Z3-1640256149366)(https://gitee.com/kingbird0/picgorep/raw/master/picbed/2021-12-21-1640050774244.png)]
获取arcgis左侧 数据库 下的需要的图层 ,下面的代码需要在arcgis中运行
mxd = arcpy.mapping.MapDocument('current')
dfs = arcpy.mapping.ListDataFrames(mxd)
df = dfs[0]
lyrs= arcpy.mapping.ListLayers(mxd,"",df)
for lyr in lyrs:
    print('"'+lyr.name+'.tif'+'",')
原始的数据为utm投影,转换为wgs84地理坐标。投影转换在arcigis中运行。将覆盖中国范围的文件名复制到tifs变量中。 转投影这一步比较慢,晚上睡觉的时候运行比较划算。
# -*- coding:utf-8 -*-
# arcgis中运行
import arcpy
import os
import sys
from arcpy import env

arcpy.env.overwriteOutput = True
arcpy.env.addOutputsToMap = False
# global tif folder path
path = ur"https://www.gofarlic.com\dem\NPP\ESRI_2020_全球\esritif"
outpath = ur"https://www.gofarlic.com\dem\NPP\ESRI_2020_全球\wgs84"
if not os.path.exists(outpath):
    os.makedirs(outpath)

tifs=["53U_20200101-20210101.tif",
"53T_20200101-20210101.tif",
"52U_20200101-20210101.tif",
"52R_20200101-20210101.tif",
"52S_20200101-20210101.tif",
"52T_20200101-20210101.tif",
"51U_20200101-20210101.tif",
"51N_20200101-20210101.tif",
"51P_20200101-20210101.tif",
"51Q_20200101-20210101.tif",
"51R_20200101-20210101.tif",
"51S_20200101-20210101.tif",
"51T_20200101-20210101.tif",
"43T_20200101-20210101.tif",
"43S_20200101-20210101.tif",
"44R_20200101-20210101.tif",
"44S_20200101-20210101.tif",
"44T_20200101-20210101.tif",
"45R_20200101-20210101.tif",
"45S_20200101-20210101.tif",
"45T_20200101-20210101.tif",
"45U_20200101-20210101.tif",
"46T_20200101-20210101.tif",
"46R_20200101-20210101.tif",
"46S_20200101-20210101.tif",
"47Q_20200101-20210101.tif",
"47R_20200101-20210101.tif",
"47S_20200101-20210101.tif",
"47T_20200101-20210101.tif",
"48P_20200101-20210101.tif",
"48Q_20200101-20210101.tif",
"48R_20200101-20210101.tif",
"48S_20200101-20210101.tif",
"48T_20200101-20210101.tif",
"49N_20200101-20210101.tif",
"49P_20200101-20210101.tif",
"49Q_20200101-20210101.tif",
"49R_20200101-20210101.tif",
"49S_20200101-20210101.tif",
"49T_20200101-20210101.tif",
"50N_20200101-20210101.tif",
"50P_20200101-20210101.tif",
"50Q_20200101-20210101.tif",
"50R_20200101-20210101.tif",
"50S_20200101-20210101.tif",
"50T_20200101-20210101.tif",
"50U_20200101-20210101.tif"]
arcpy.env.pyramid = "None"
for tif in tifs:
    intif = os.path.join(path,tif)
    outtif = os.path.join(outpath,tif[:-4]+"wgs.tif")
    sr = arcpy.SpatialReference(4326)
    arcpy.ProjectRaster_management(intif, outtif,
                                   sr, "NEAREST", "0.0000833333333333333333")
推荐使用 python 的gma库来拼接,速度快,效果好。
介绍参考。
公众号【老王GIS】回复关键词:esri2020c,按照提示获取。全程无套路。
免责声明:本文系网络转载或改编,未找到原创作者,版权归原作者所有。如涉及版权,请联系删
 技术文档
技术文档
 热门文章
热门文章


 155-2731-8020


